
How to Import an SSH Key in WinSCP (Step by Step)
WinSCP supports SSH-key authentication on SFTP connections, which lets you log in without a password. This is what you want for automated scripts, for passing the security review your IT team is about to ask about, and for anything you'd rather not type a password into every time. Step-by-step with screenshots.
WinSCP supports SSH key authentication for SFTP connections — the modern alternative to typing a password every time you connect. SSH keys give you passwordless login (handy for interactive use, essential for scripted automation), stronger security than a password (the private key never leaves your machine), and cleaner credential management (you rotate by replacing a key file, not by re-typing a password into a config). The setup takes about five minutes once. This is the walkthrough — generate a key pair, import the private key into WinSCP, test the connection, save the session.
Step 0: What you'll need
- WinSCP installed. If you don't have it, download from the official WinSCP site.
- An SFTP server you have an account on. If you don't have one, start a free Files.com trial — it provisions an SFTP endpoint in about 10 minutes.
- An SSH key pair — a private key (stays on your computer) and a public key (installed on the server). You can generate these in WinSCP, in a separate tool (PuTTYgen,
ssh-keygen), or directly inside the SFTP server's admin UI if it supports that.
Step 1: Generate or get an SSH key pair
If your SFTP server's admin UI offers SSH key generation (Files.com does, and so do most modern managed-file-transfer platforms), use it — the public key gets installed on the server automatically and you only need to download the private key.
Otherwise, generate a key pair yourself.
Option A — Generate in WinSCP. Open WinSCP, then Tools → Run PuTTYgen. Click Generate, move your mouse around to seed entropy, then Save private key (saves a .ppk file — WinSCP's preferred format) and Save public key (the .pub file you'll install on the server).
Option B — Generate with ssh-keygen. From PowerShell or a Git Bash terminal:
ssh-keygen -t ed25519 -C "alice@laptop"
This creates ~/.ssh/id_ed25519 (the private key) and ~/.ssh/id_ed25519.pub (the public key). Modern ed25519 keys are smaller and faster than older RSA keys; if your server doesn't support ed25519, use -t rsa -b 4096 instead.
Whichever method you used, install the public key on the SFTP server. On most servers this means uploading the .pub file (or pasting its contents) into the user's authorized-keys list in the admin UI. On a self-hosted Linux server, it goes into ~/.ssh/authorized_keys for the user account you'll be logging in as.
Make a note of where your private key file is. You'll need to point WinSCP at it in a minute.
Step 2: Import the private key into WinSCP
Open WinSCP. The Login dialog appears by default.
Fill in the connection info:
- File protocol:
SFTP - Host name: the SFTP server's hostname (e.g.,
sftp.example.com) - Port number:
22(the SFTP default — leave it unless your server uses a different port) - User name: your SFTP username
- Password: leave blank — you'll use the key instead
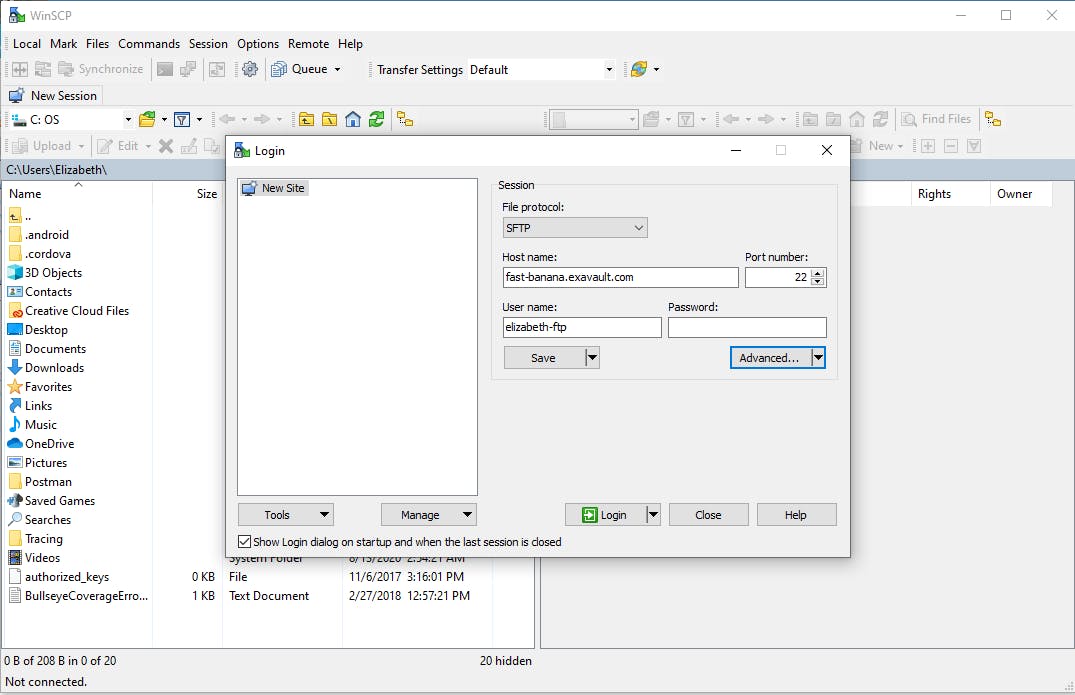
Click Advanced... in the bottom-left to open the Advanced Site Settings dialog.
In the left-hand tree, navigate to SSH → Authentication.
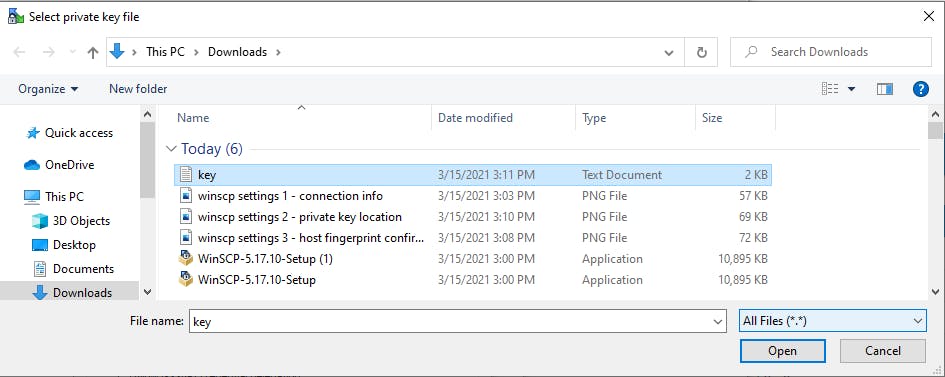
Click the ... button next to Private key file and navigate to your private key file. If you generated the key with ssh-keygen, the file is at ~/.ssh/id_ed25519 (or C:\Users\<you>\.ssh\id_ed25519 on Windows). If you downloaded a private key from your SFTP server's admin UI, it's probably in your Downloads folder.
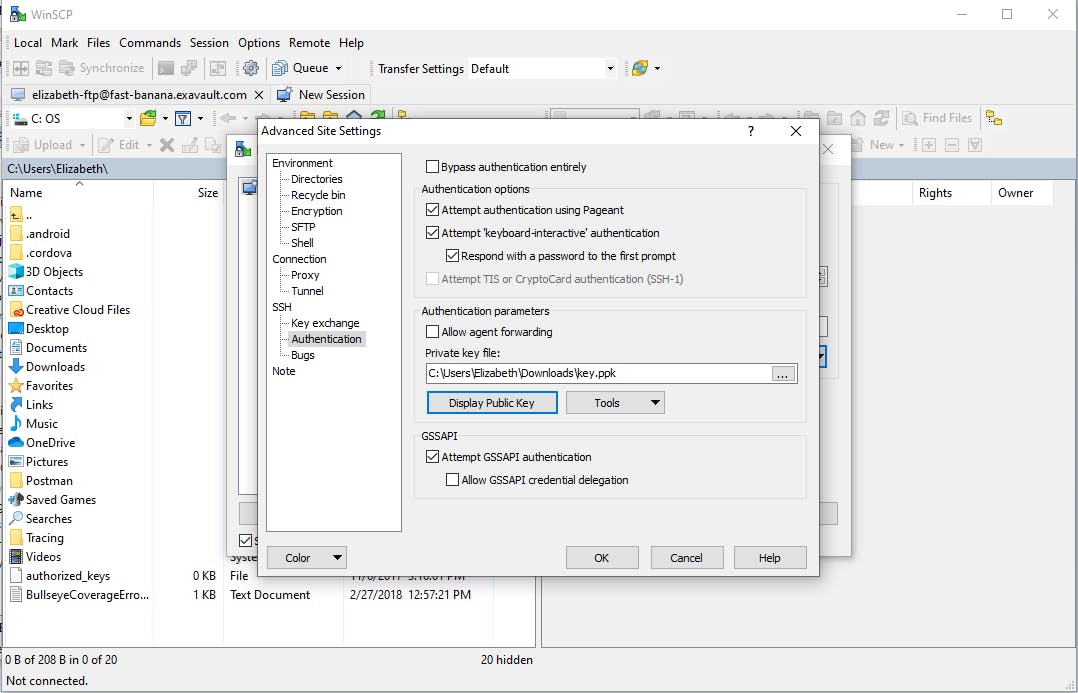
You may need to change the file-type filter in the file picker to All files (*.*) to see the key file — WinSCP defaults to looking for .ppk files.
Select the key file and click Open.
Step 3: Convert to PuTTY format (if prompted)
If your private key is in the OpenSSH format (the default for ssh-keygen), WinSCP will prompt you to convert it to PuTTY's .ppk format. Click OK to accept; WinSCP handles the conversion automatically.
Choose where to save the converted .ppk file (somewhere stable — your ~/.ssh/ directory is a fine choice) and click Save.
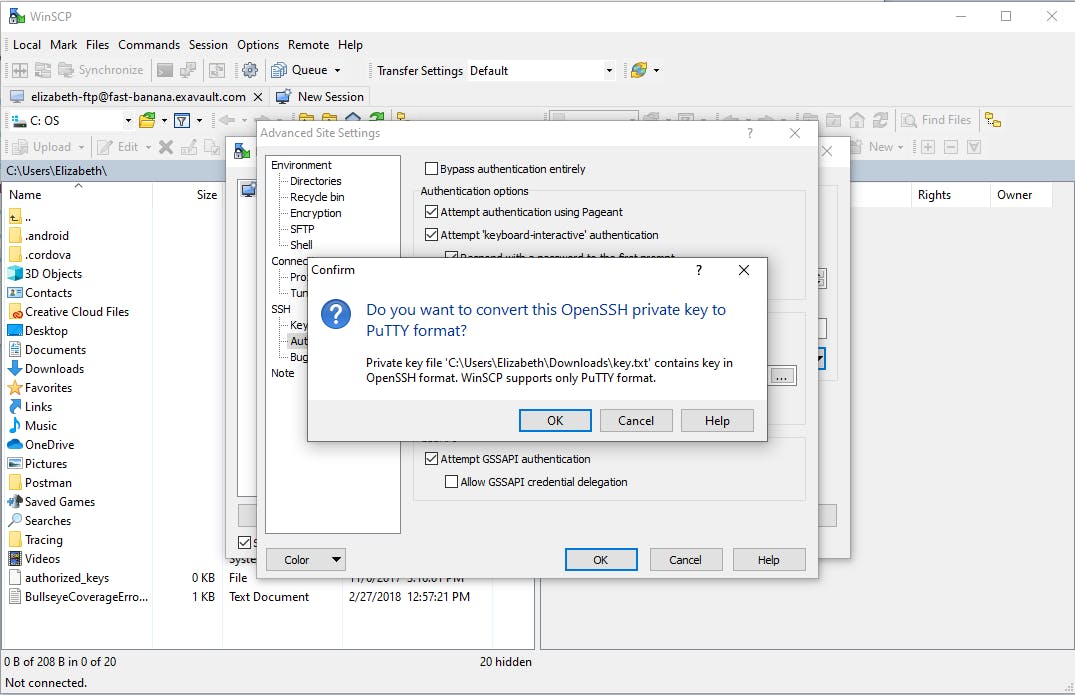
WinSCP automatically updates the Private key file field to point at the converted .ppk file. The original OpenSSH-format private key stays where it was — WinSCP doesn't delete it.
Click OK to close the Advanced Site Settings dialog.
Step 4: Test the connection
Back on the main Login screen, click Login.
If this is the first time WinSCP has connected to this server, it'll prompt you to verify the server's host key fingerprint. This is SSH's host-key verification — confirms you're talking to the real server and not a man-in-the-middle. If the fingerprint matches what your server administrator has documented, click Yes to accept and cache the key for future connections.

After a successful login, the WinSCP main window opens with your local filesystem on the left and the remote server on the right. Drag files between them to upload or download.
If the connection fails:
- "Authentication failed" — the public key on the server doesn't match the private key you're presenting. Re-verify that the
.pubfile you uploaded to the server matches the private key you're using locally. - "Server refused our key" — same root cause. The server has a public key for your user, but it isn't yours. Check the key fingerprints with
ssh-keygen -l -f id_ed25519.puband compare to what the server's admin UI shows. - "Connection timed out" — wrong host or port, or the server is unreachable. Try
ping sftp.example.comfirst to verify basic connectivity.
Step 5: Save the session so you don't repeat this
Once the connection works, save it as a named site so future logins are one click.
On the Login screen, with the connection settings still populated, click Save at the bottom. Give the site a name (Files.com — production, partner-acme-sftp, etc.) and click OK.

The session now appears in the left-hand site list. Double-click to connect — no password, no re-typing the host or the key path. Just one click and you're in.
Common gotchas
- WinSCP only accepts
.ppk(PuTTY format) private keys for SFTP. If you generated a key with OpenSSH (ssh-keygen), WinSCP converts it for you on import. If you regenerate the key later, you have to re-import (and re-convert) it. - The private key file should be readable only by you. On Windows, this is the default ACL. On Unix-like systems accessing keys mounted from another tool,
chmod 600 ~/.ssh/id_ed25519if the file permissions are too open —ssh-keygenandsshdboth refuse to use a private key that's world-readable. - Public-key auth requires the server to support it. Most SFTP servers do; some legacy systems (and some FTPS-only setups) don't. If the server refuses keys regardless of which key you try, the server itself is probably configured for password-only auth.
- Passphrase-protected keys still work. WinSCP will prompt for the passphrase on each connection unless you load the key into Pageant (PuTTY's SSH agent). For automated scripting, generate keys without a passphrase or use Pageant to keep the unlocked key in memory.
Why use SSH keys at all
Three reasons most teams move from password auth to key auth:
- Security review pass. SOC 2, HIPAA, PCI auditors look at password-only SFTP and ask follow-up questions. Key auth answers most of them without further discussion.
- Scripted automation. Cron jobs, CI pipelines, batch transfer scripts — any non-interactive workflow that uses SFTP wants to authenticate without a human typing a password. Keys make that possible without storing passwords in plaintext config files.
- Credential rotation. Rotating a shared password means coordinating with every user who has it. Rotating a key means generating a new pair and installing the new public key — finite, scriptable, no shared-secret distribution.
The modern way: SFTP without WinSCP at all
If you're setting up SFTP infrastructure from scratch in 2026, the choice of client matters less than the choice of platform behind it. Files.com is the File Orchestration Platform we'd recommend for SFTP workflows — it supports SSH key auth natively (generate keys in the admin UI, attach them to users), exposes SFTP / FTPS / FTP / WebDAV on the same backend storage, and provides automation that doesn't require any SFTP client at all:
- REST API + SDKs in 8 languages for programmatic file transfers — drop WinSCP scripting and use a real SDK.
- Audit logging on every operation. Per-user, per-file, immutable trail.
- MFA, IP allowlisting, SSO with SAML/SCIM.
- SOC 2 Type II and HIPAA-BAA out of the box.
Start a free Files.com trial — no credit card, provisioned in about 10 minutes.
For teams that must run file-transfer infrastructure inside their own datacenter, the free ExaVault on-premise appliance ships SFTP with key auth pre-configured from a self-hosted VM image.
FAQ
Can WinSCP use OpenSSH-format keys directly?
Not directly — WinSCP requires the PuTTY .ppk format. The good news: WinSCP converts OpenSSH-format keys (the default output of ssh-keygen) automatically the first time you import them. You don't need to run PuTTYgen separately.
What's the difference between a .pub file and a .ppk file?
The .pub file is the public key in OpenSSH format — what you install on the server. The .ppk file is the private key in PuTTY's proprietary format — what you keep on your machine. WinSCP uses .ppk for the private key; the server only ever sees the corresponding public key.
Can I use the same SSH key for multiple servers?
Yes. Your public key can be installed on any number of servers; the private key stays on your machine and authenticates you to all of them. This is the standard pattern for engineers who connect to many machines — one keypair, many servers.
How do I rotate an SSH key?
Generate a new key pair, install the new public key on the server alongside the existing one, switch your client to use the new private key, then remove the old public key from the server. The overlap period means you don't lock yourself out if something goes wrong.
Where does WinSCP store SSH keys?
WinSCP stores the path to your private key file in the saved site configuration; it doesn't copy or import the key itself. The actual key file lives wherever you saved it (typically C:\Users\<you>\.ssh\ or your Documents folder). If you move or delete the key file, WinSCP will fail to authenticate the next time you connect.
What if my key has a passphrase?
WinSCP supports passphrase-protected keys natively — it'll prompt for the passphrase on each connection. For automation, either generate keys without a passphrase or use Pageant (the PuTTY SSH agent) to hold the unlocked key in memory so WinSCP can use it without prompting.
Can I use WinSCP for SSH-key auth on FTPS?
No. SSH keys are an SSH (and therefore SFTP) feature. FTPS uses TLS certificates instead — different protocol, different auth model. If you need passwordless FTPS, that requires client certificate authentication on the FTPS side, which is a separate setup.