Share Folders
Shared folders are used to share files with others who do not have accounts. It's a collaborative place where you can …well, share stuff. Shared folders can be download-only, or upload+download.
They're best used if you need to share an ongoing set of files with somebody, or you want to have a collaborative space where you can both upload and download files. If you just need to get one or two files to somebody on a one-time basis, we recommend you look at our send files feature.
How to Share Folders

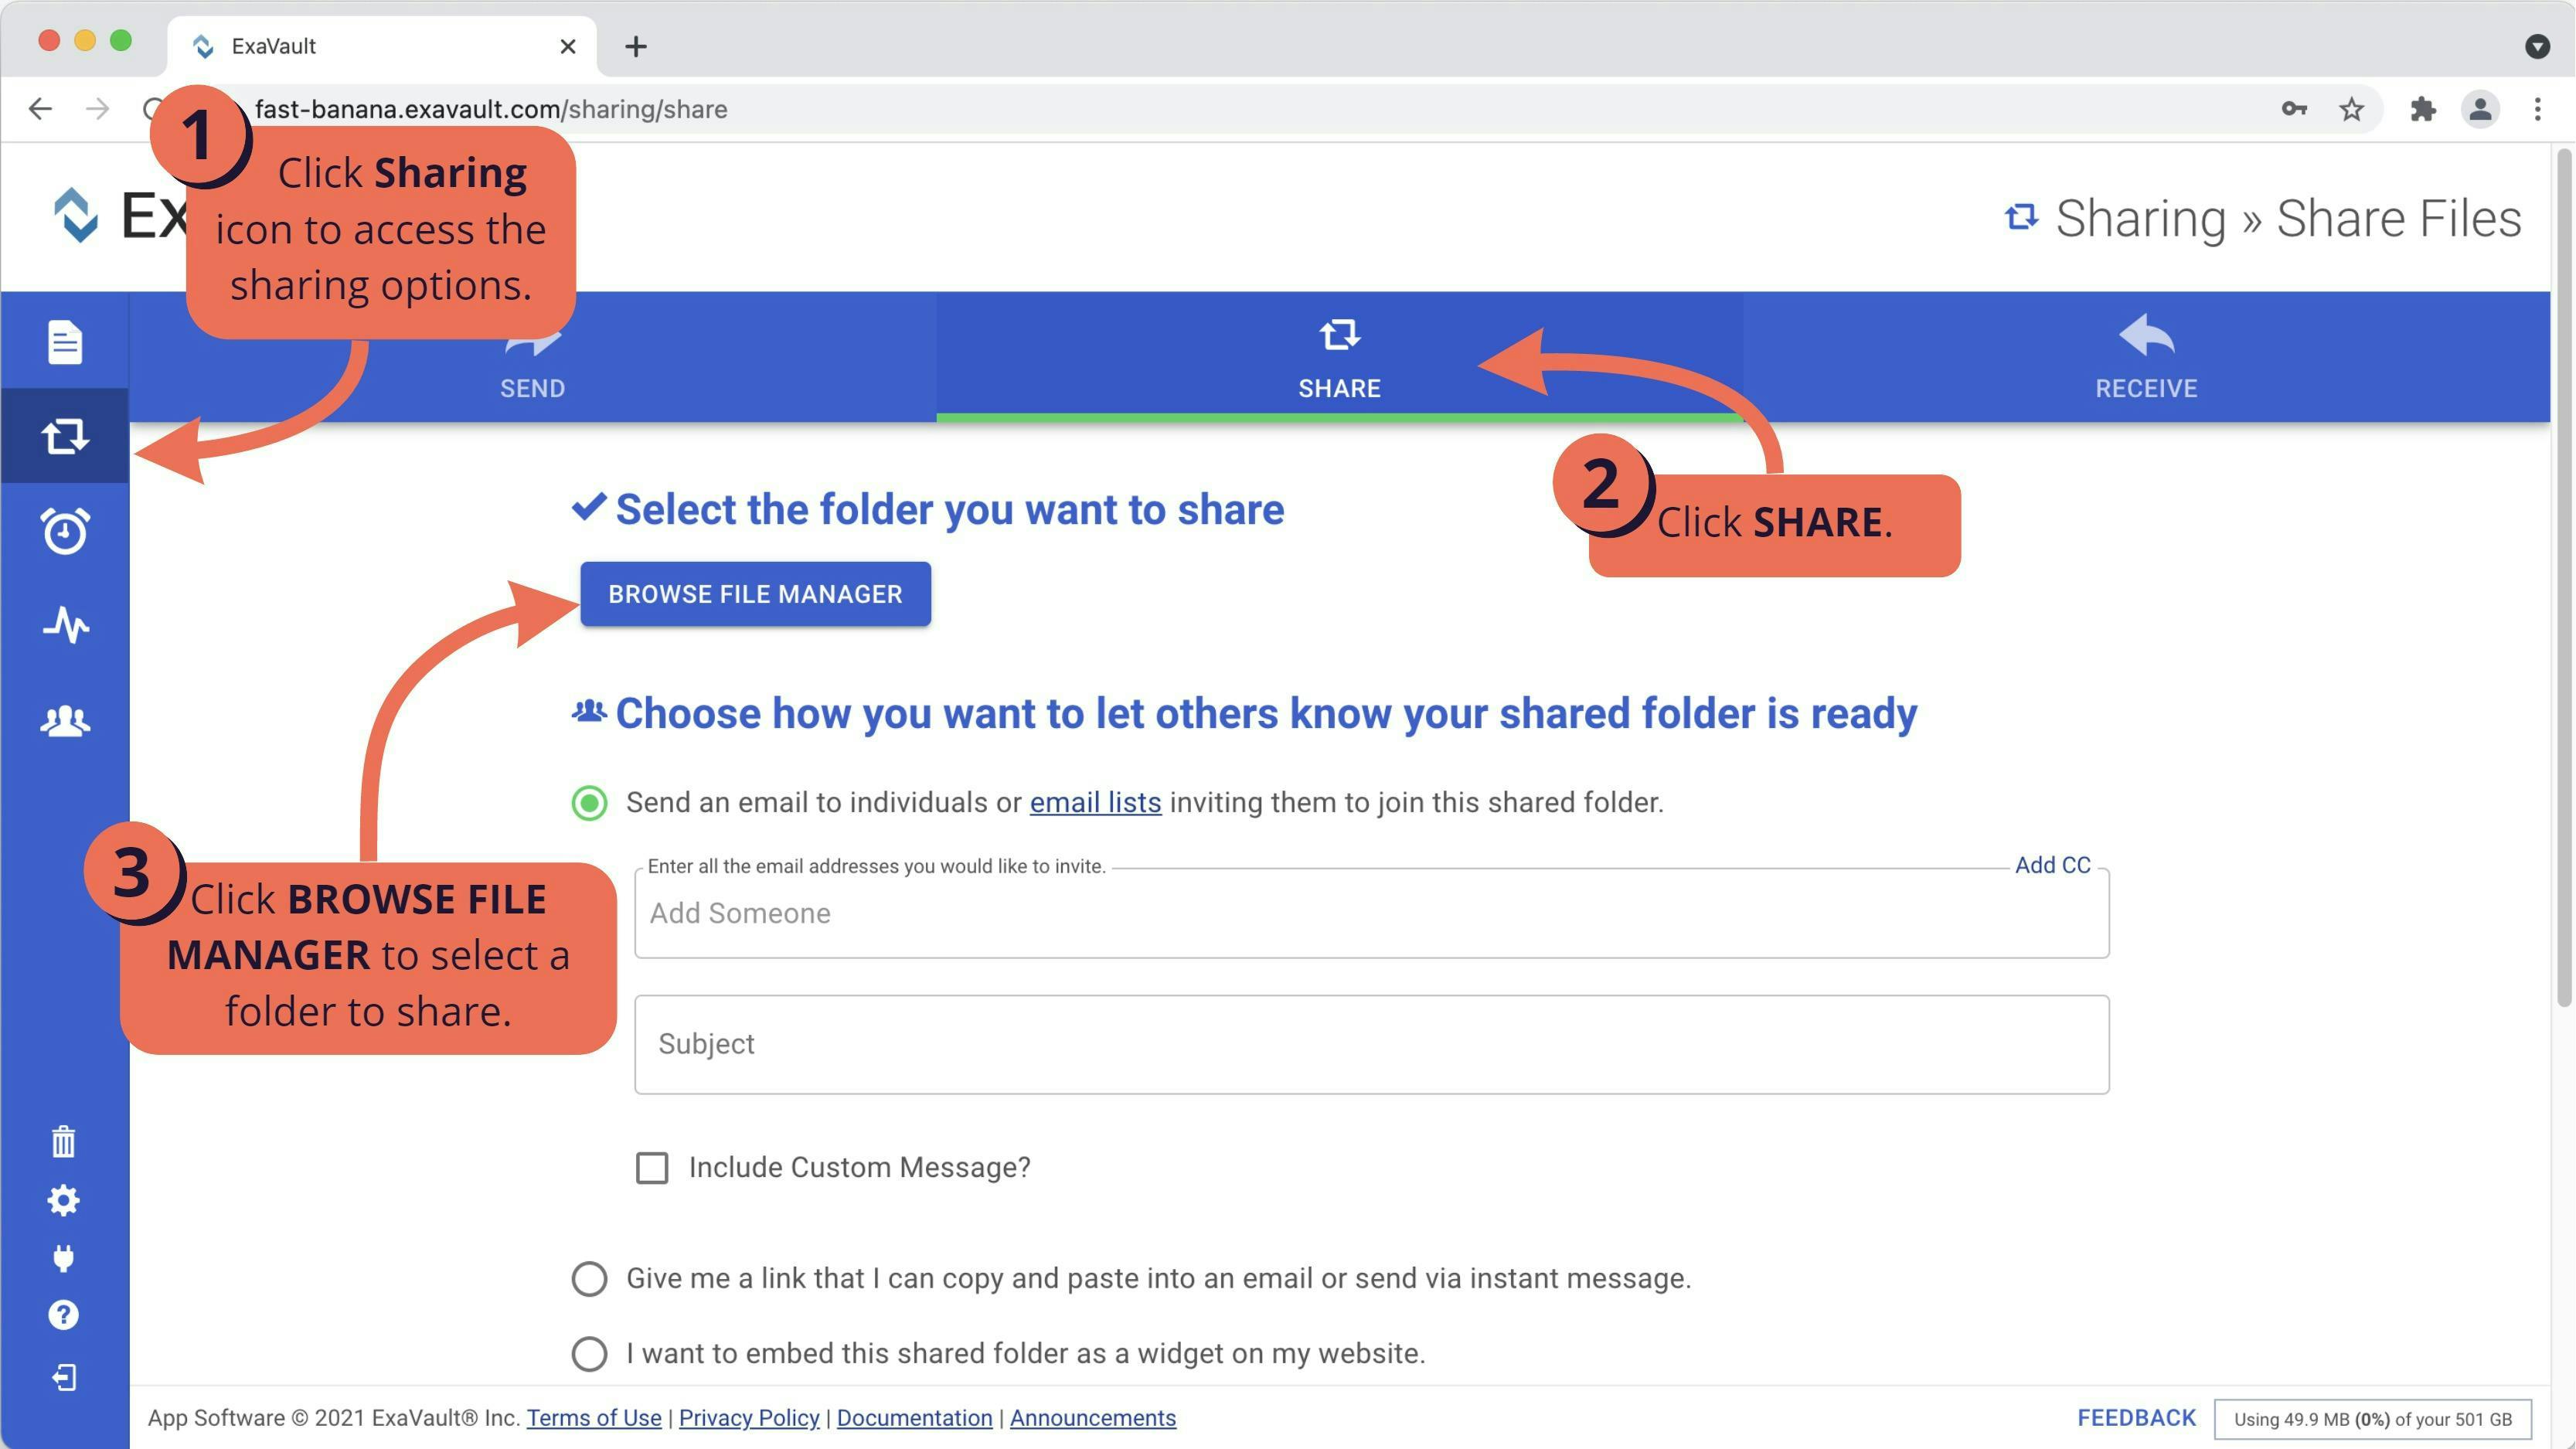
To share a folder in your ExaVault account, start by clicking the Sharing button on the main navigation toolbar on the left side of your window. Click the SHARE tab at the top-center of the page and complete the following steps:
Step 1: Select the folder you want to share
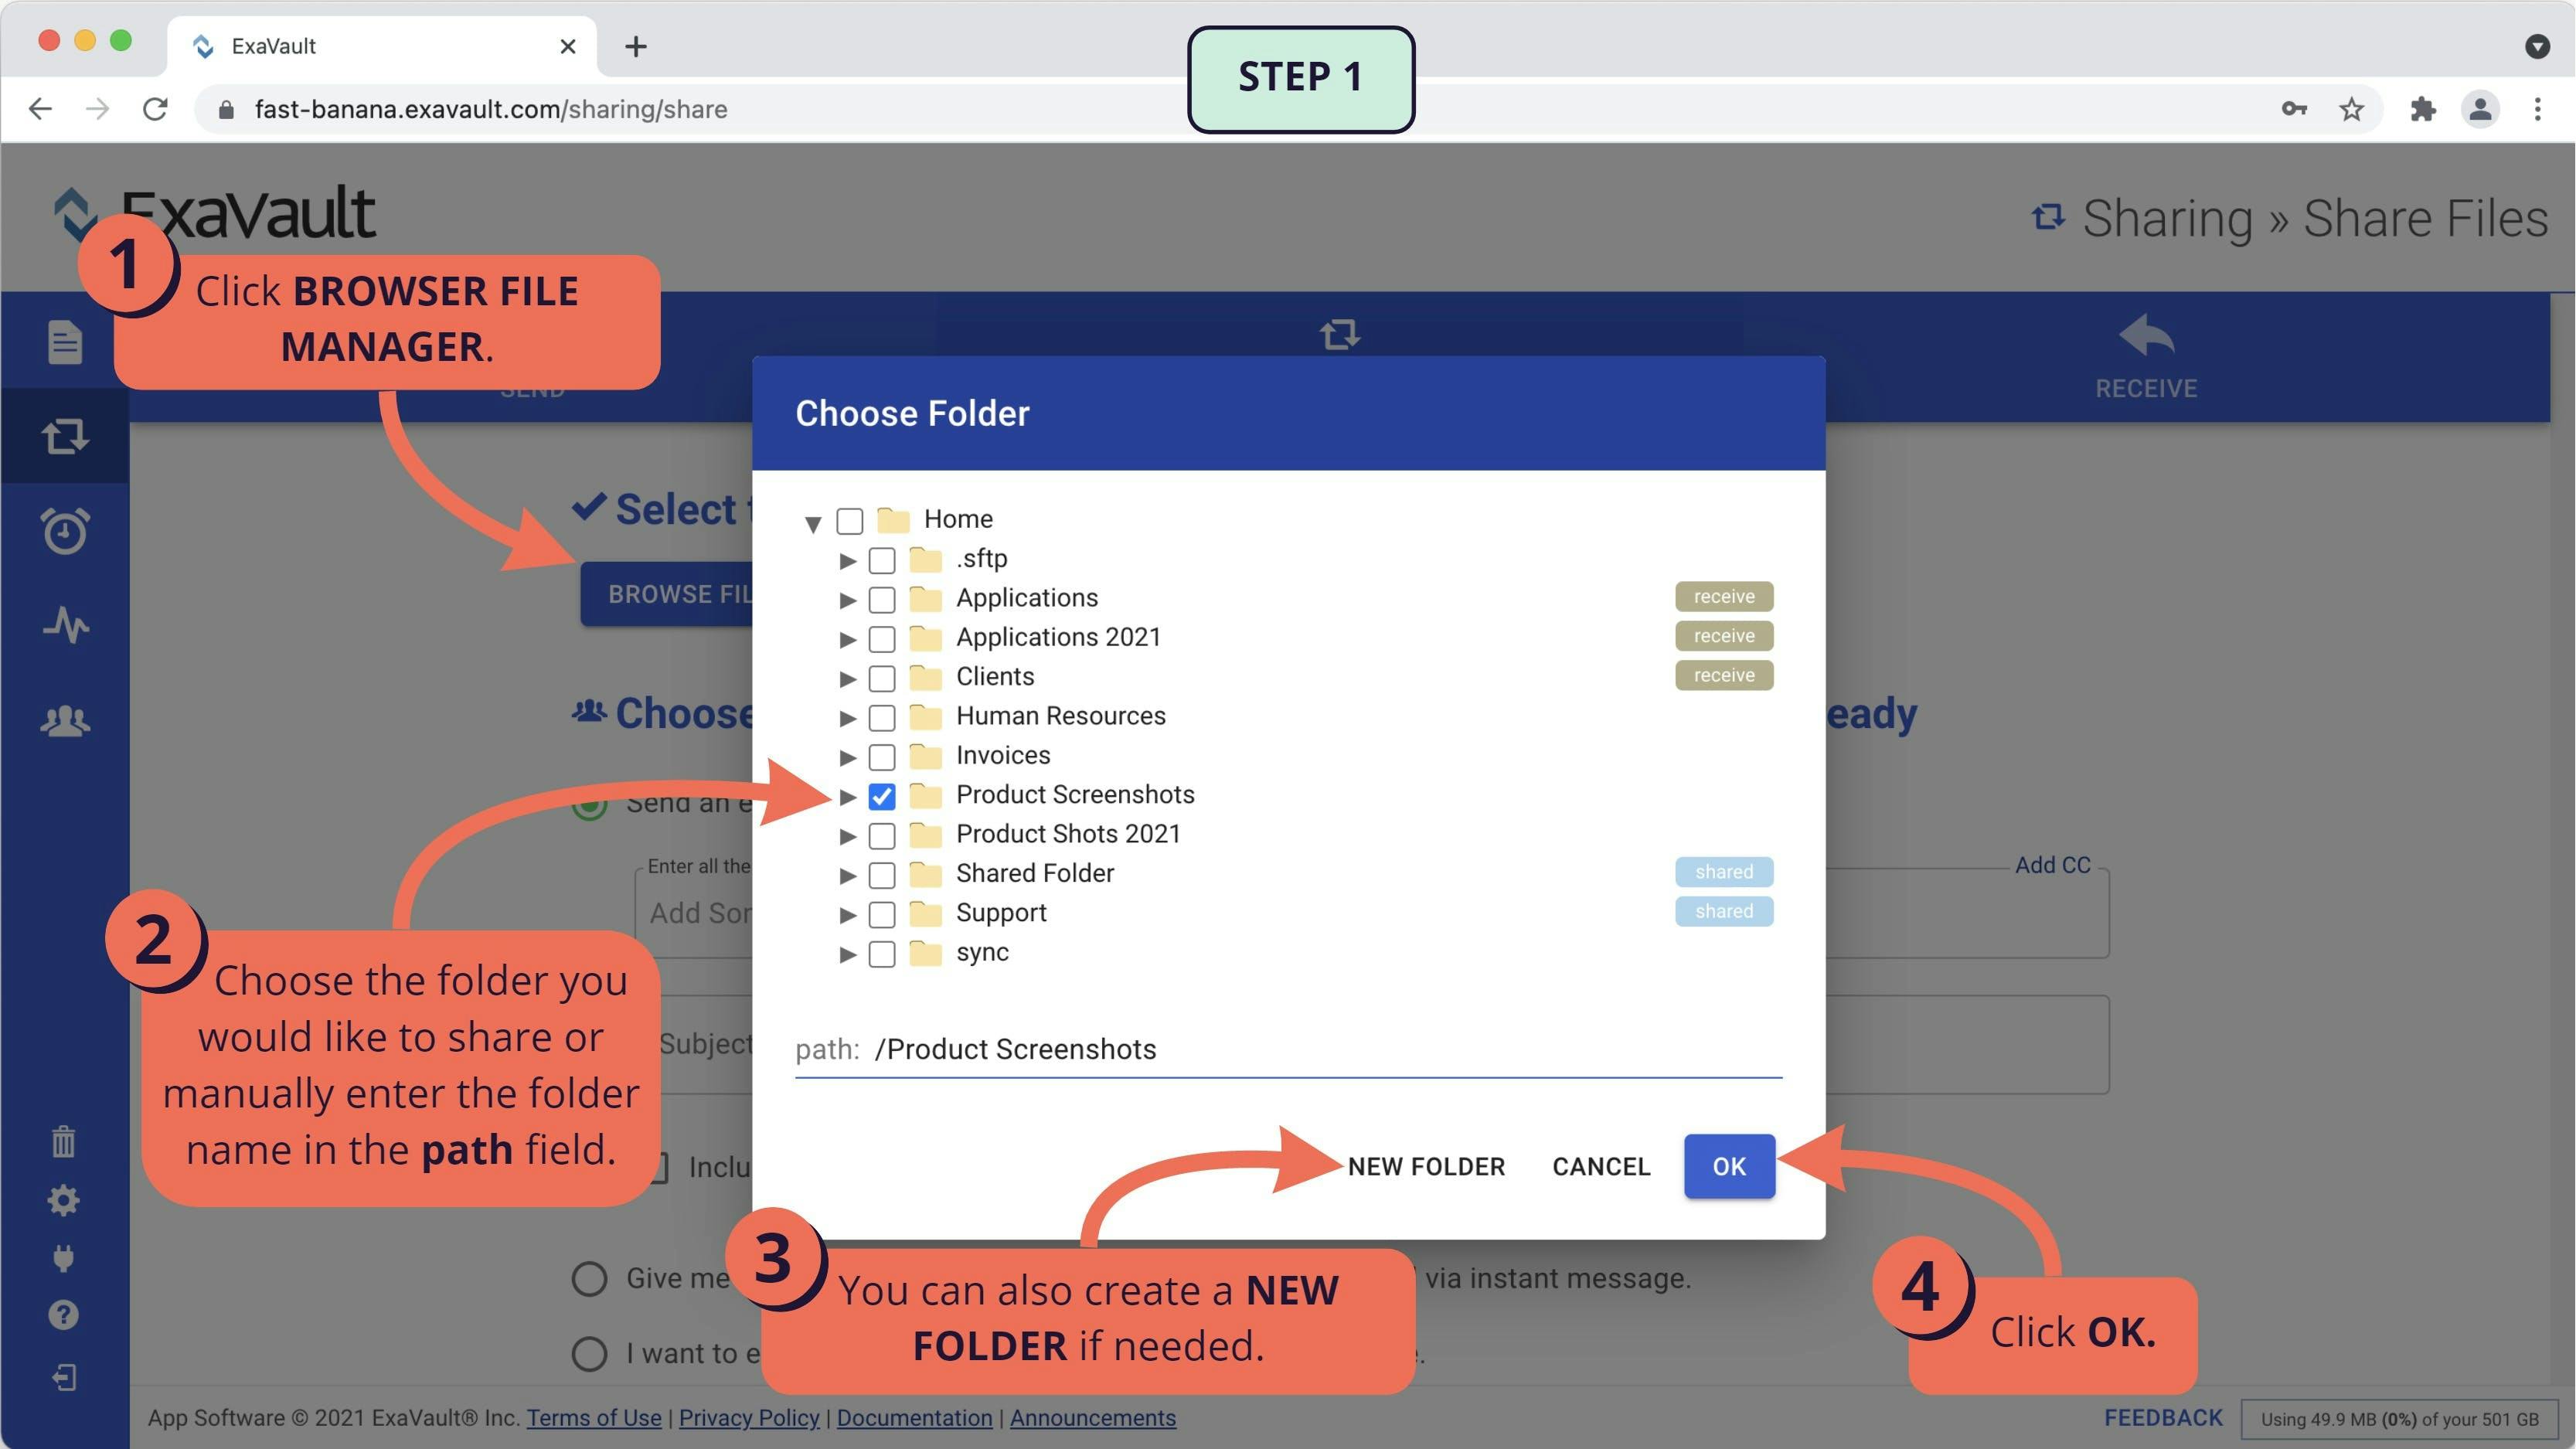
1. Click the BROWSE FILE MANAGER button.
2. Use the folder navigation to find the folder you would like to share or manually enter the folder name in the path field.
3. You can also create a NEW FOLDER if needed.
4. Click OK when folder is selected.
Step 2: Choose how to notify recipients of the shared folder
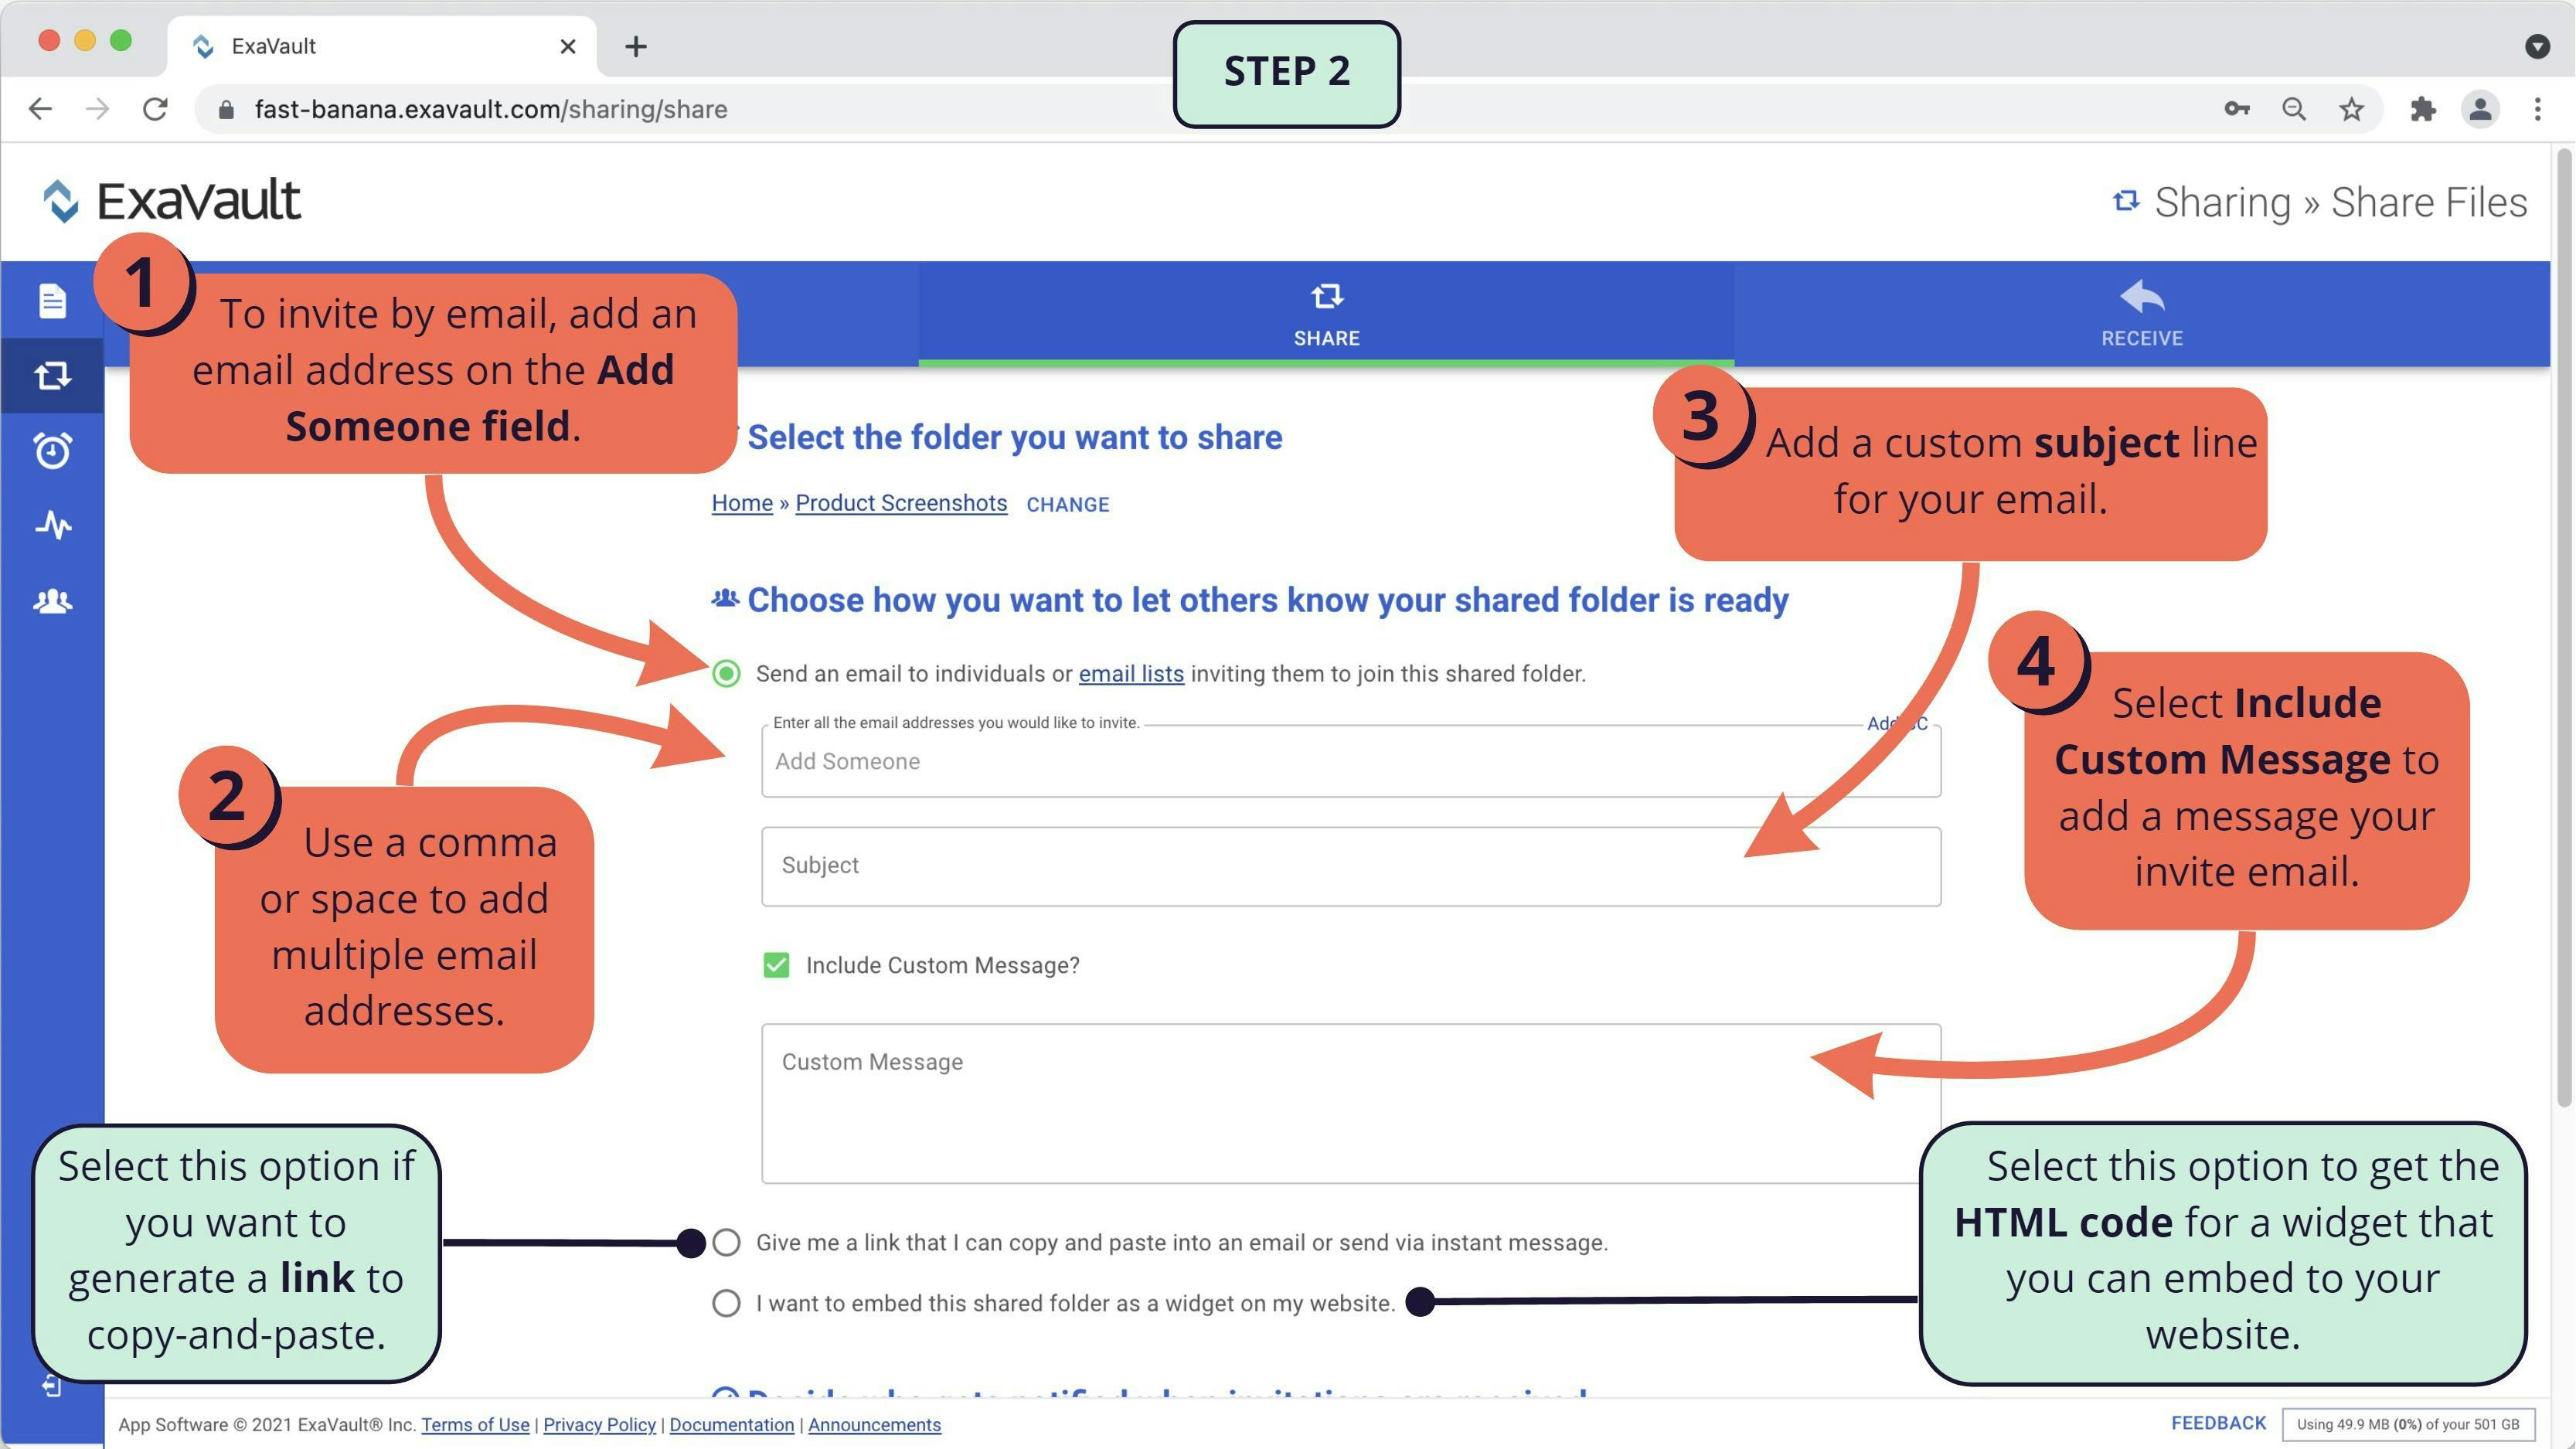
There are two options for notifying your recipient(s) about the new share folder:
Send an email with instructions to access the share link.
1. In the Add Someone field, type an email address.
2. To add a second email, enter a comma or press space before typing the next address. You can also copy-and-paste a list of emails or use an Email List feature to create a preset list.
3. In the Subject field, add the custom subject line you would like to appear in invite email.
4. You have the option to select Include Custom Message? This will provide a Custom Message field that can be used to include additional text for the body of your invite email.
Copy a link to manually circulate the files for download.
- When this option is selected, no immediate action is required. A link will be provide once you finish your settings and click CONFIRM SHARE.
- This method is best if you intend on sharing the link through an instant messenger, hyperlinking in a newsletter, or similar communications.
Embed this shared folder as a widget on my website.
- When this option is selected, no immediate action is required. HTML code for a widget will be provide once you finish your settings and click CONFIRM SHARE.
- This method is best if you want clients to interact with files in the selected share folder while viewing a webpage other than ExaVault.
You can Require recipients to enter their email address if you select Give me a link… or I want to embed… options when sharing your folder.
If make your folder public rather than invite specific recipients to download, you may want to collect the email of each person who accesses the files for additional activity logging and notification options.
Step 3: Decide who gets notified when the folder is accessed
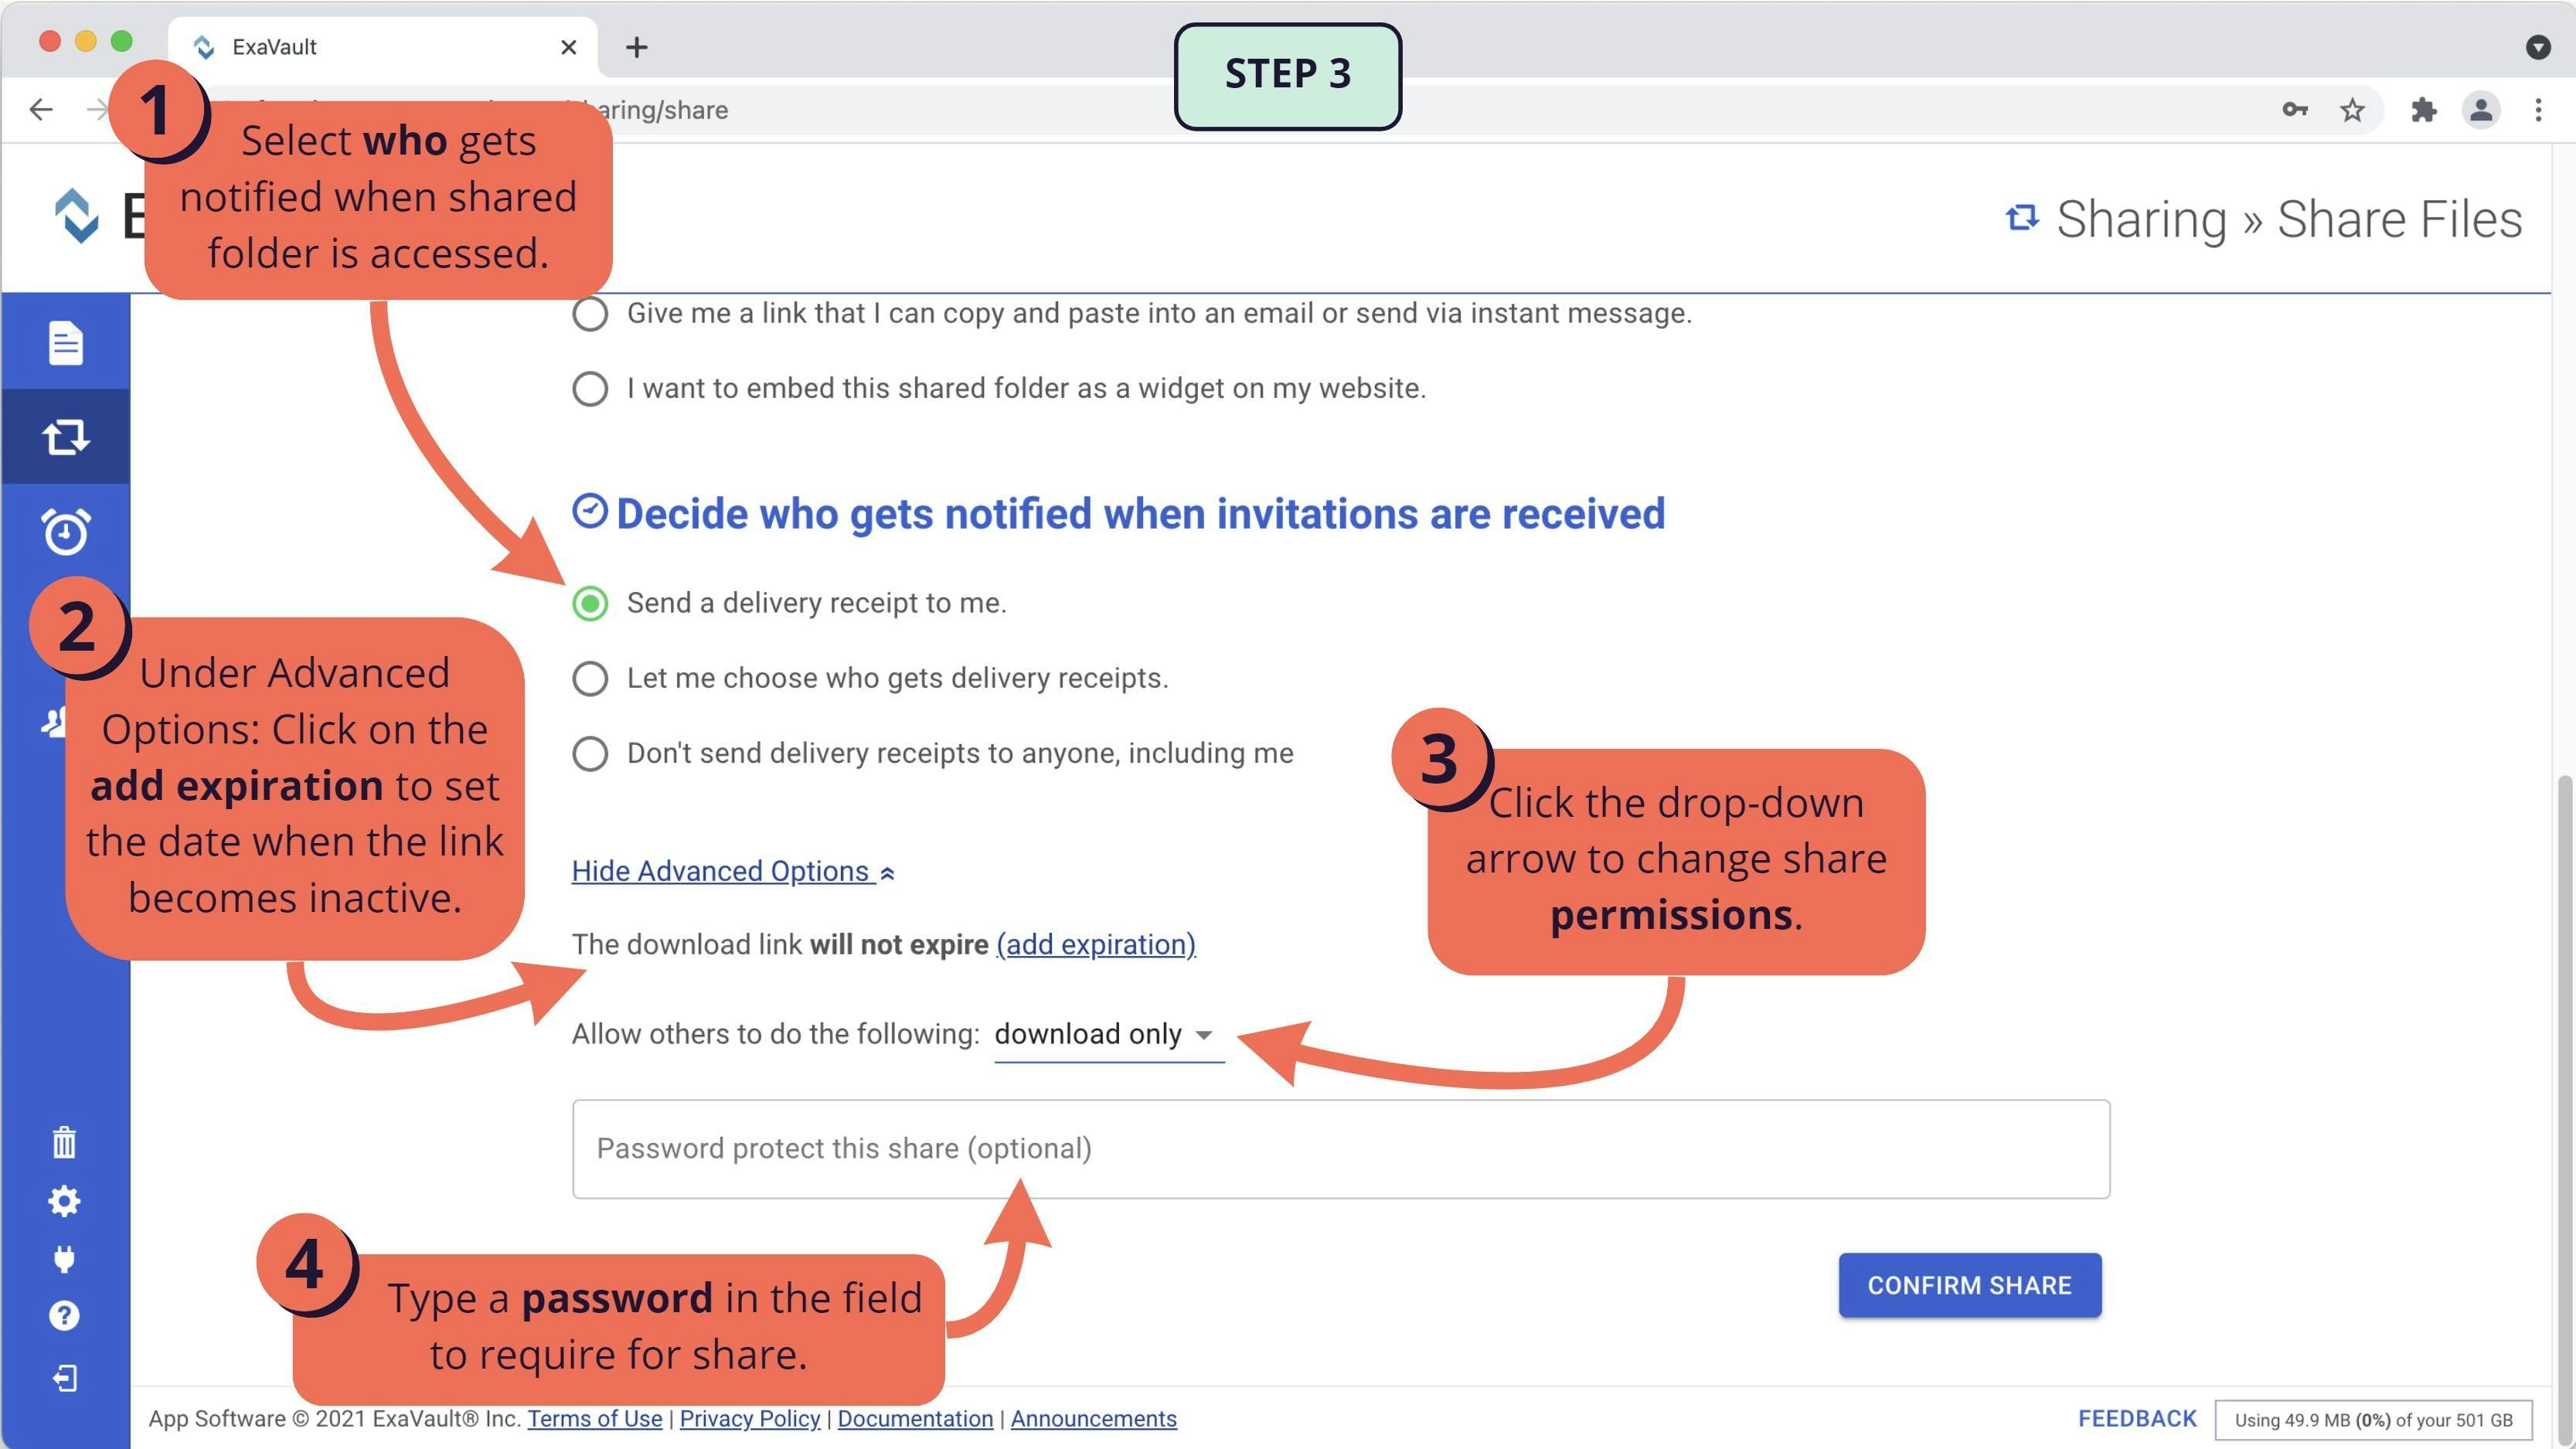
When sharing a folder, a delivery receipt email can be triggered when the invitee has accessed the folder. You have the following options for sending the delivery receipt:
- Send a delivery receipt to me. Sends a message to the user who originally shared the folder.
- Let me choose who gets a delivery receipt. Allows you to enter one or many email addresses (separated by a space or comma) to receive the delivery receipt email.
- Don't send any delivery receipts to anyone, including me.. Disables the delivery receipt for this folder share.
(Optional) Advanced Options
There are three additional settings that can be found when clicking Show Advance Options:
Expiration Date
By default, share folders will not have an expiration date. An expiration dates can be added on any future date. Clients attempting to access the share folder after the expiration date will receive a message that the folder are no longer available.
To add an expiration date:
1. Click on the add expiration link to open the calendar picker.
2. Select the new date.
3. Click Ok.
To remove, use the blue x icon that appears next to the new date.
Allow others too...
This settings will determine how invitees are able to interact with your share folder. There are three options:
1. download only… invitee will be able to view all folder contents and updates to folder contents but they can only download files.
2. download & upload… invitee will be able to view all folder contents and updates to folder contents. They can download files and upload their own files.
3. download, upload, modify & delete… invitee will be able to view all folder contents and updates to folder contents. In addition to downloading and uploading files, they are able to create new folders, move contents, and delete files within the share folder.
Password Protect
You have the option to enable a password for extra security. When this setting is enabled, users will be prompted for the password before they are allowed to access the folder.
To set the password:
1. Type your password in the field.
2. To send files without password, leave password field blank or delete any text previously entered.
3. Once all settings are finished, click CONFIRM SHARE to save password.
Step 4: Click CONFIRM SHARE
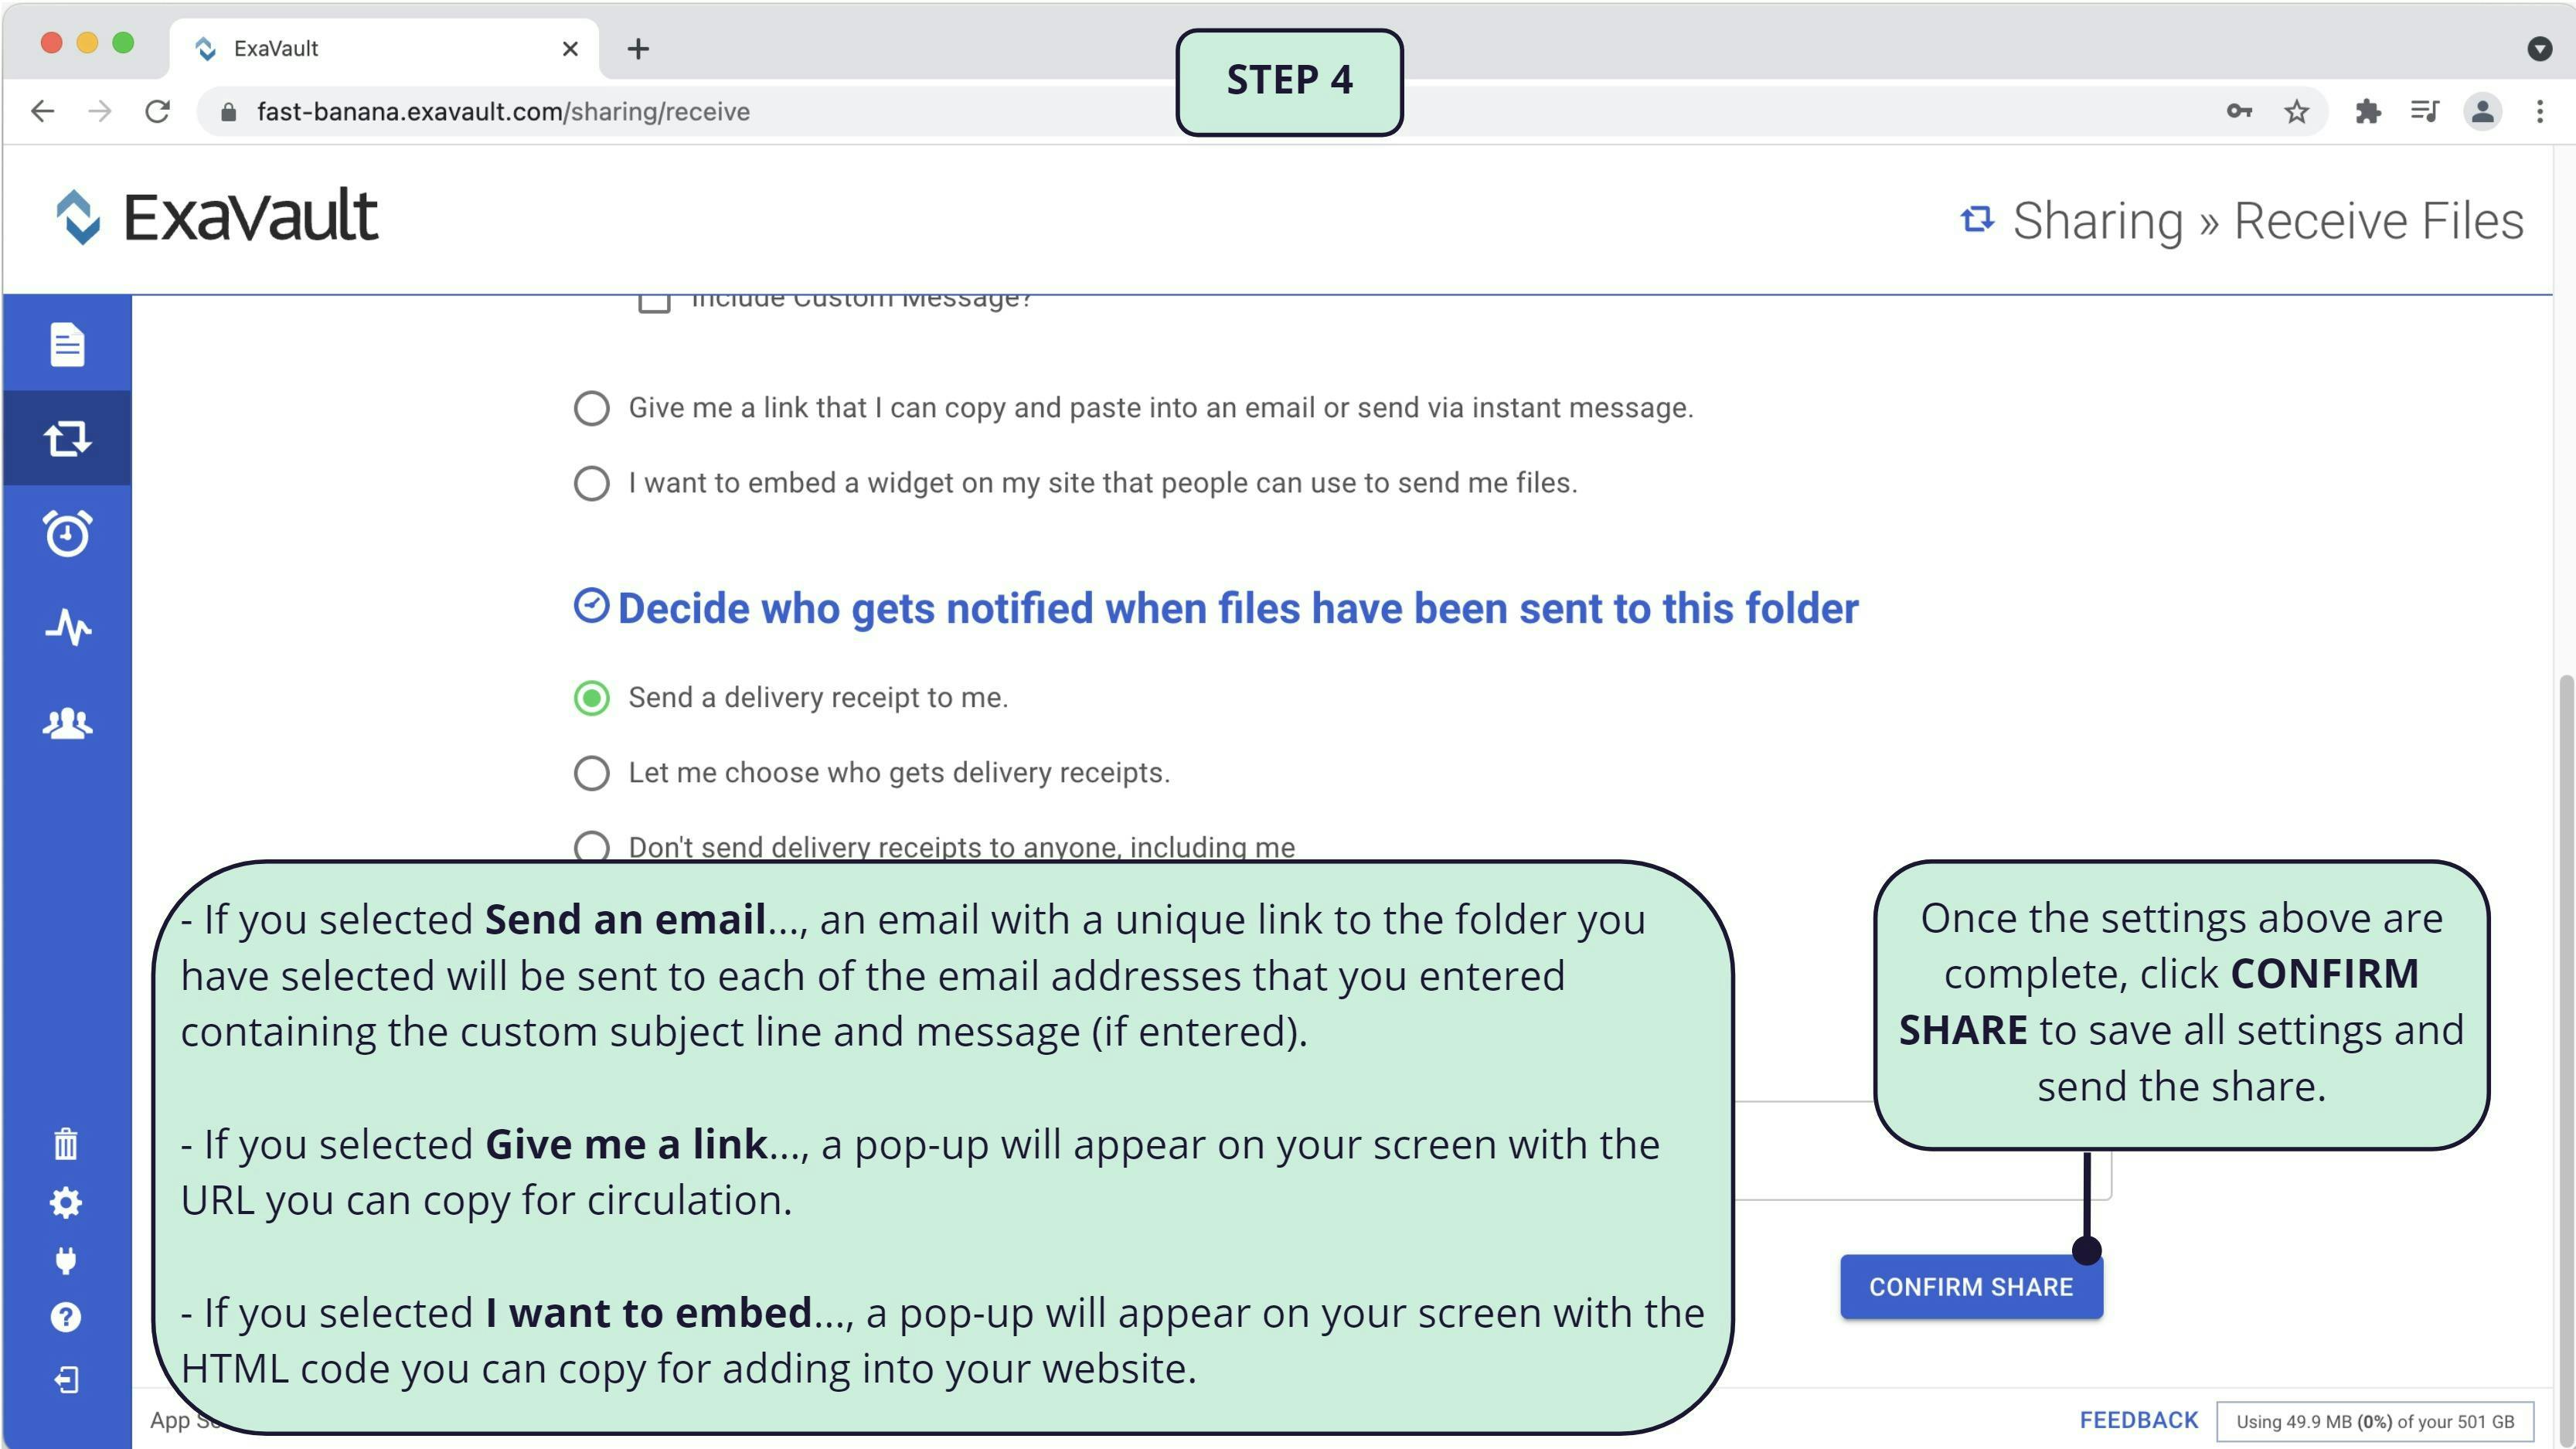
Once the settings above are complete, click CONFIRM SHARE to save all settings, create the share link for the selected folder, and notify the recipients.
- If you selected Send an email…, an email with a unique link to the folder you have selected will be sent to each of the email addresses that you entered containing the custom subject line and message (if entered).
- If you selected Give me a link…, a pop-up will appear on your screen with the URL you can copy for circulation.
- If you selected I want to embed…, a pop-up will appear on your screen with the HTML code you can copy for adding into your website.
Managing Existing Share Folders
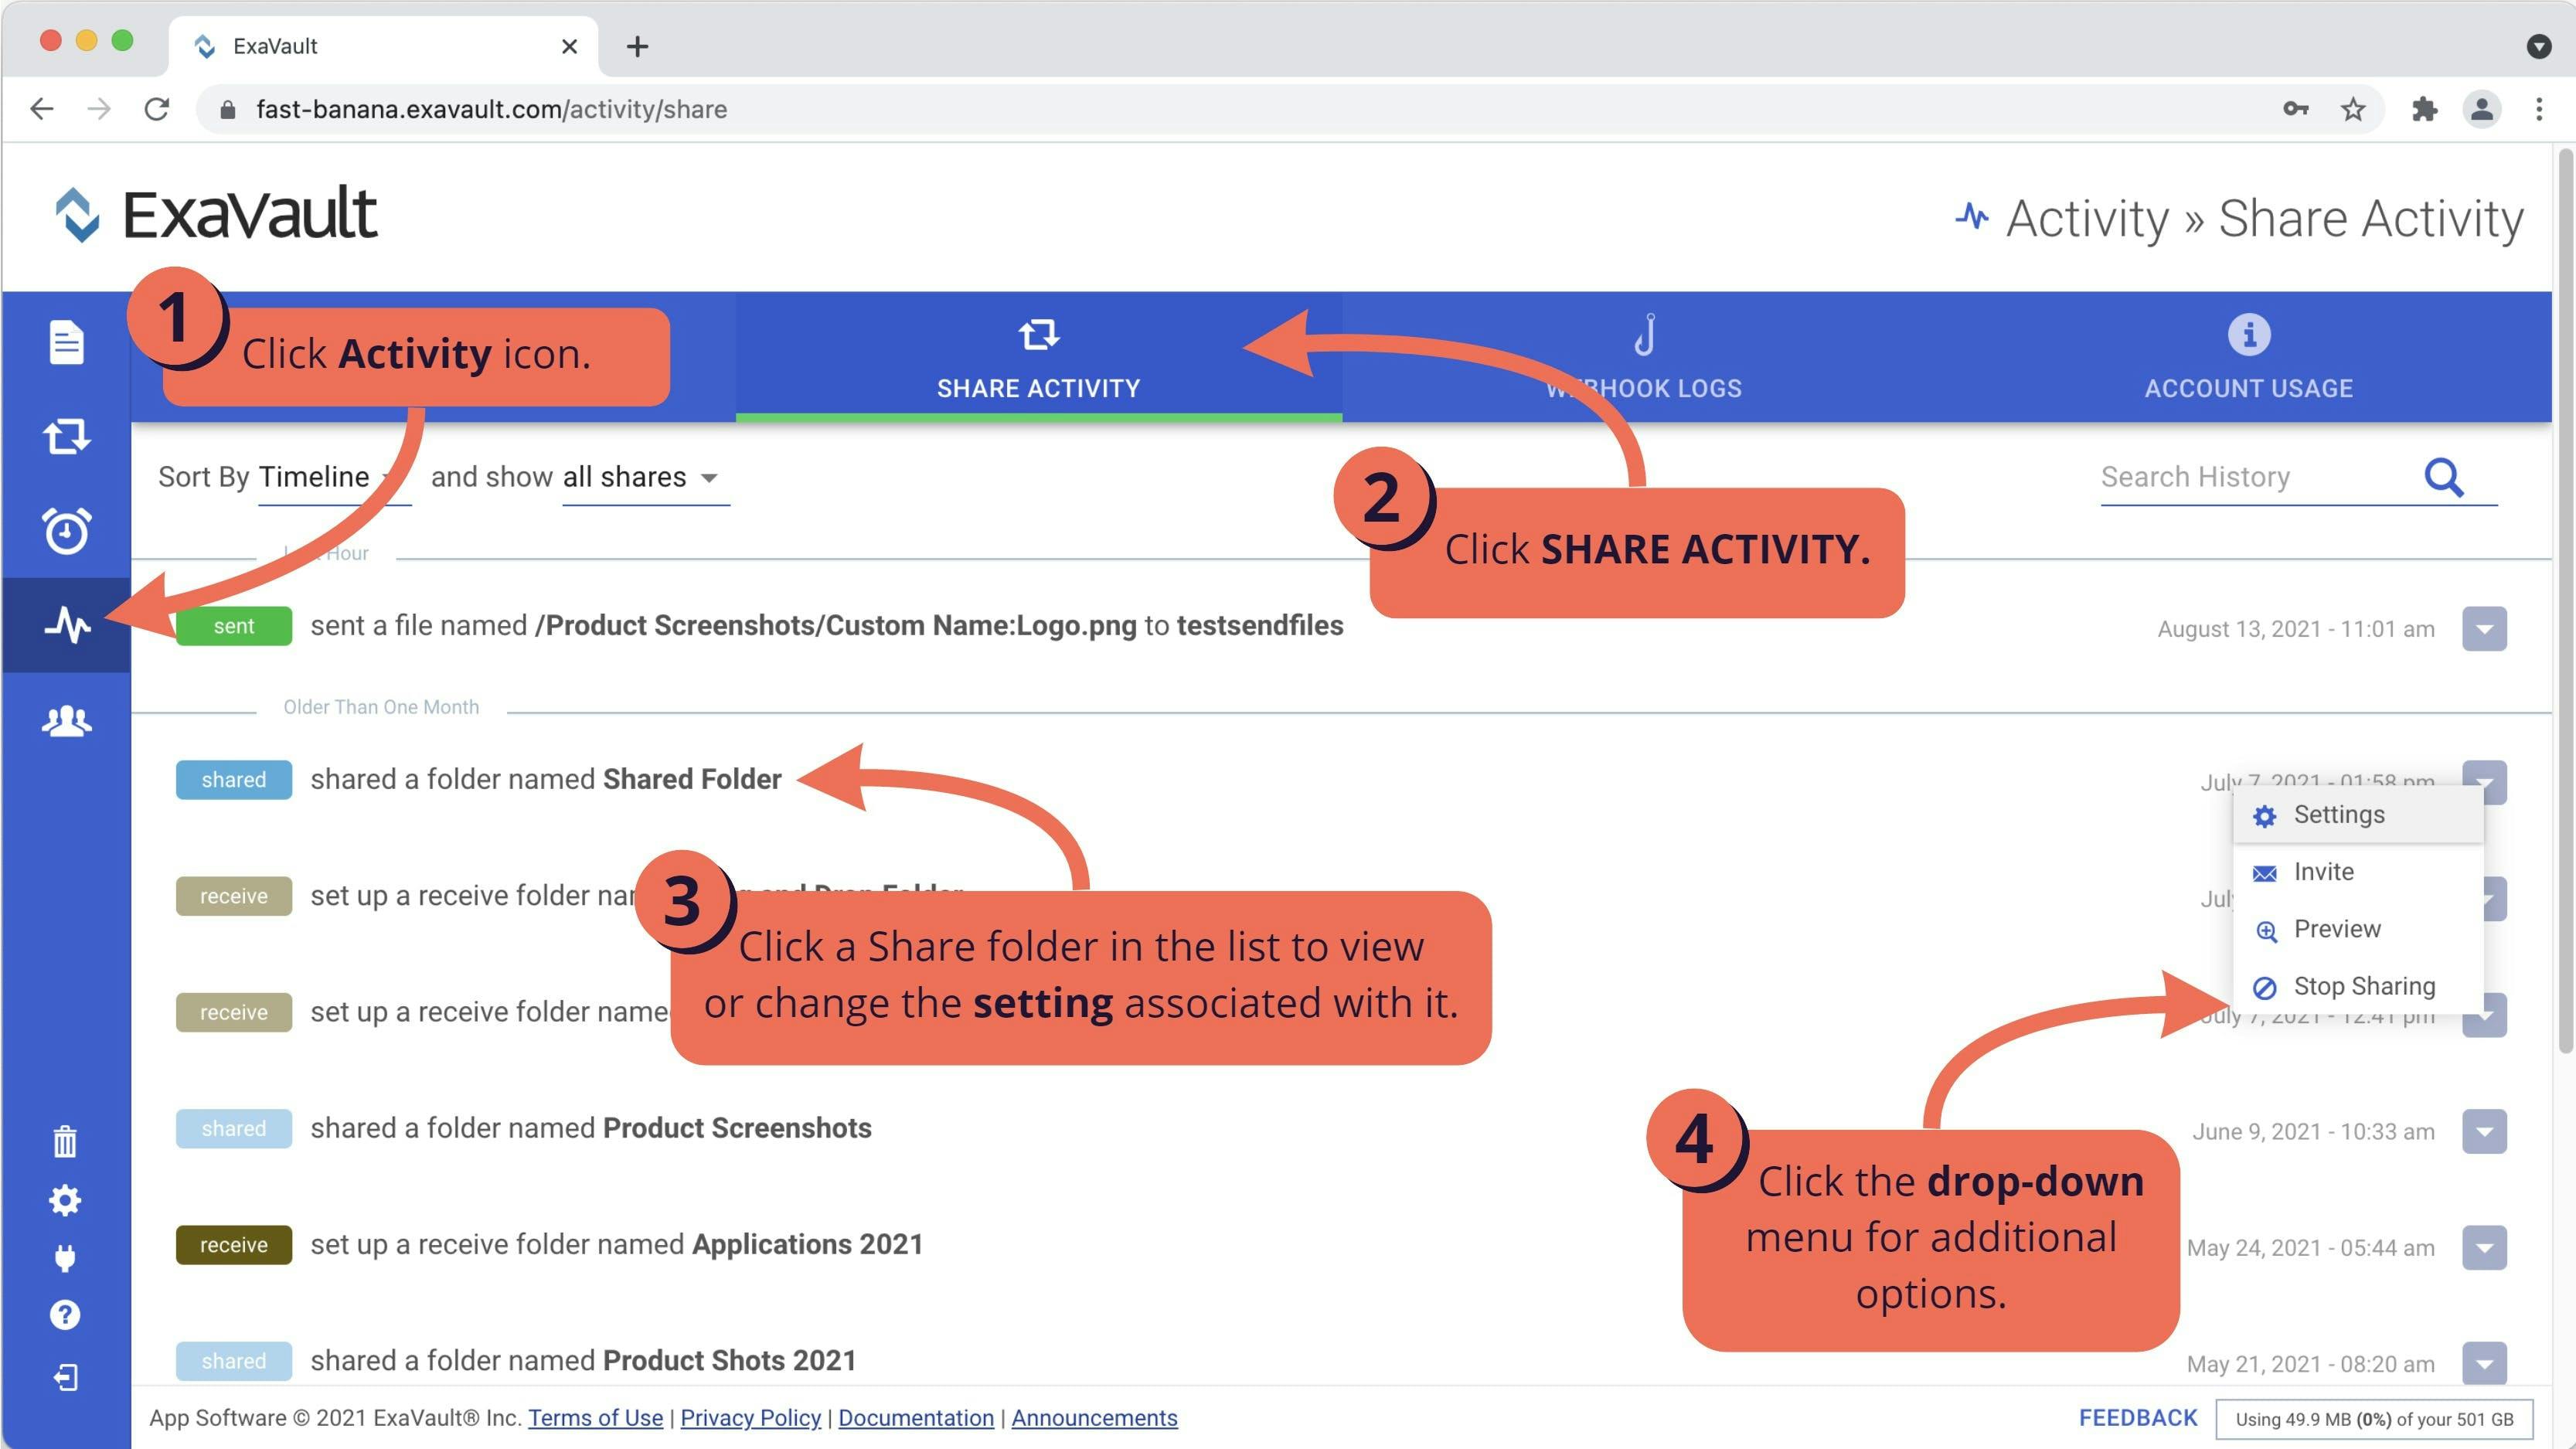
The SHARE ACTIVITY lets you interact with your share folders in several ways. You can forward the folder to new recipients, view the folder contents, change settings for your sent files, and even disable access to the sent files.
1. Click the Activity button on the main toolbar.
2. Click the SHARE ACTIVITY tab.
3. Locate the entry for your share folder in the list and click on the item to open settings.
4. You can also use the drop-down arrow to the right of your share folder entry to display the menu of options:
- Settings opens the SETTINGS tab for the share.
- Invite opens the INVITE tab for the share.
- Preview opens the share link that was sent to recipients in a new browser tab for review.
- Stop Sharing disables access to the share folder completely. If selected, the share can not be restarted - a new share will need to be created.
Settings Tab
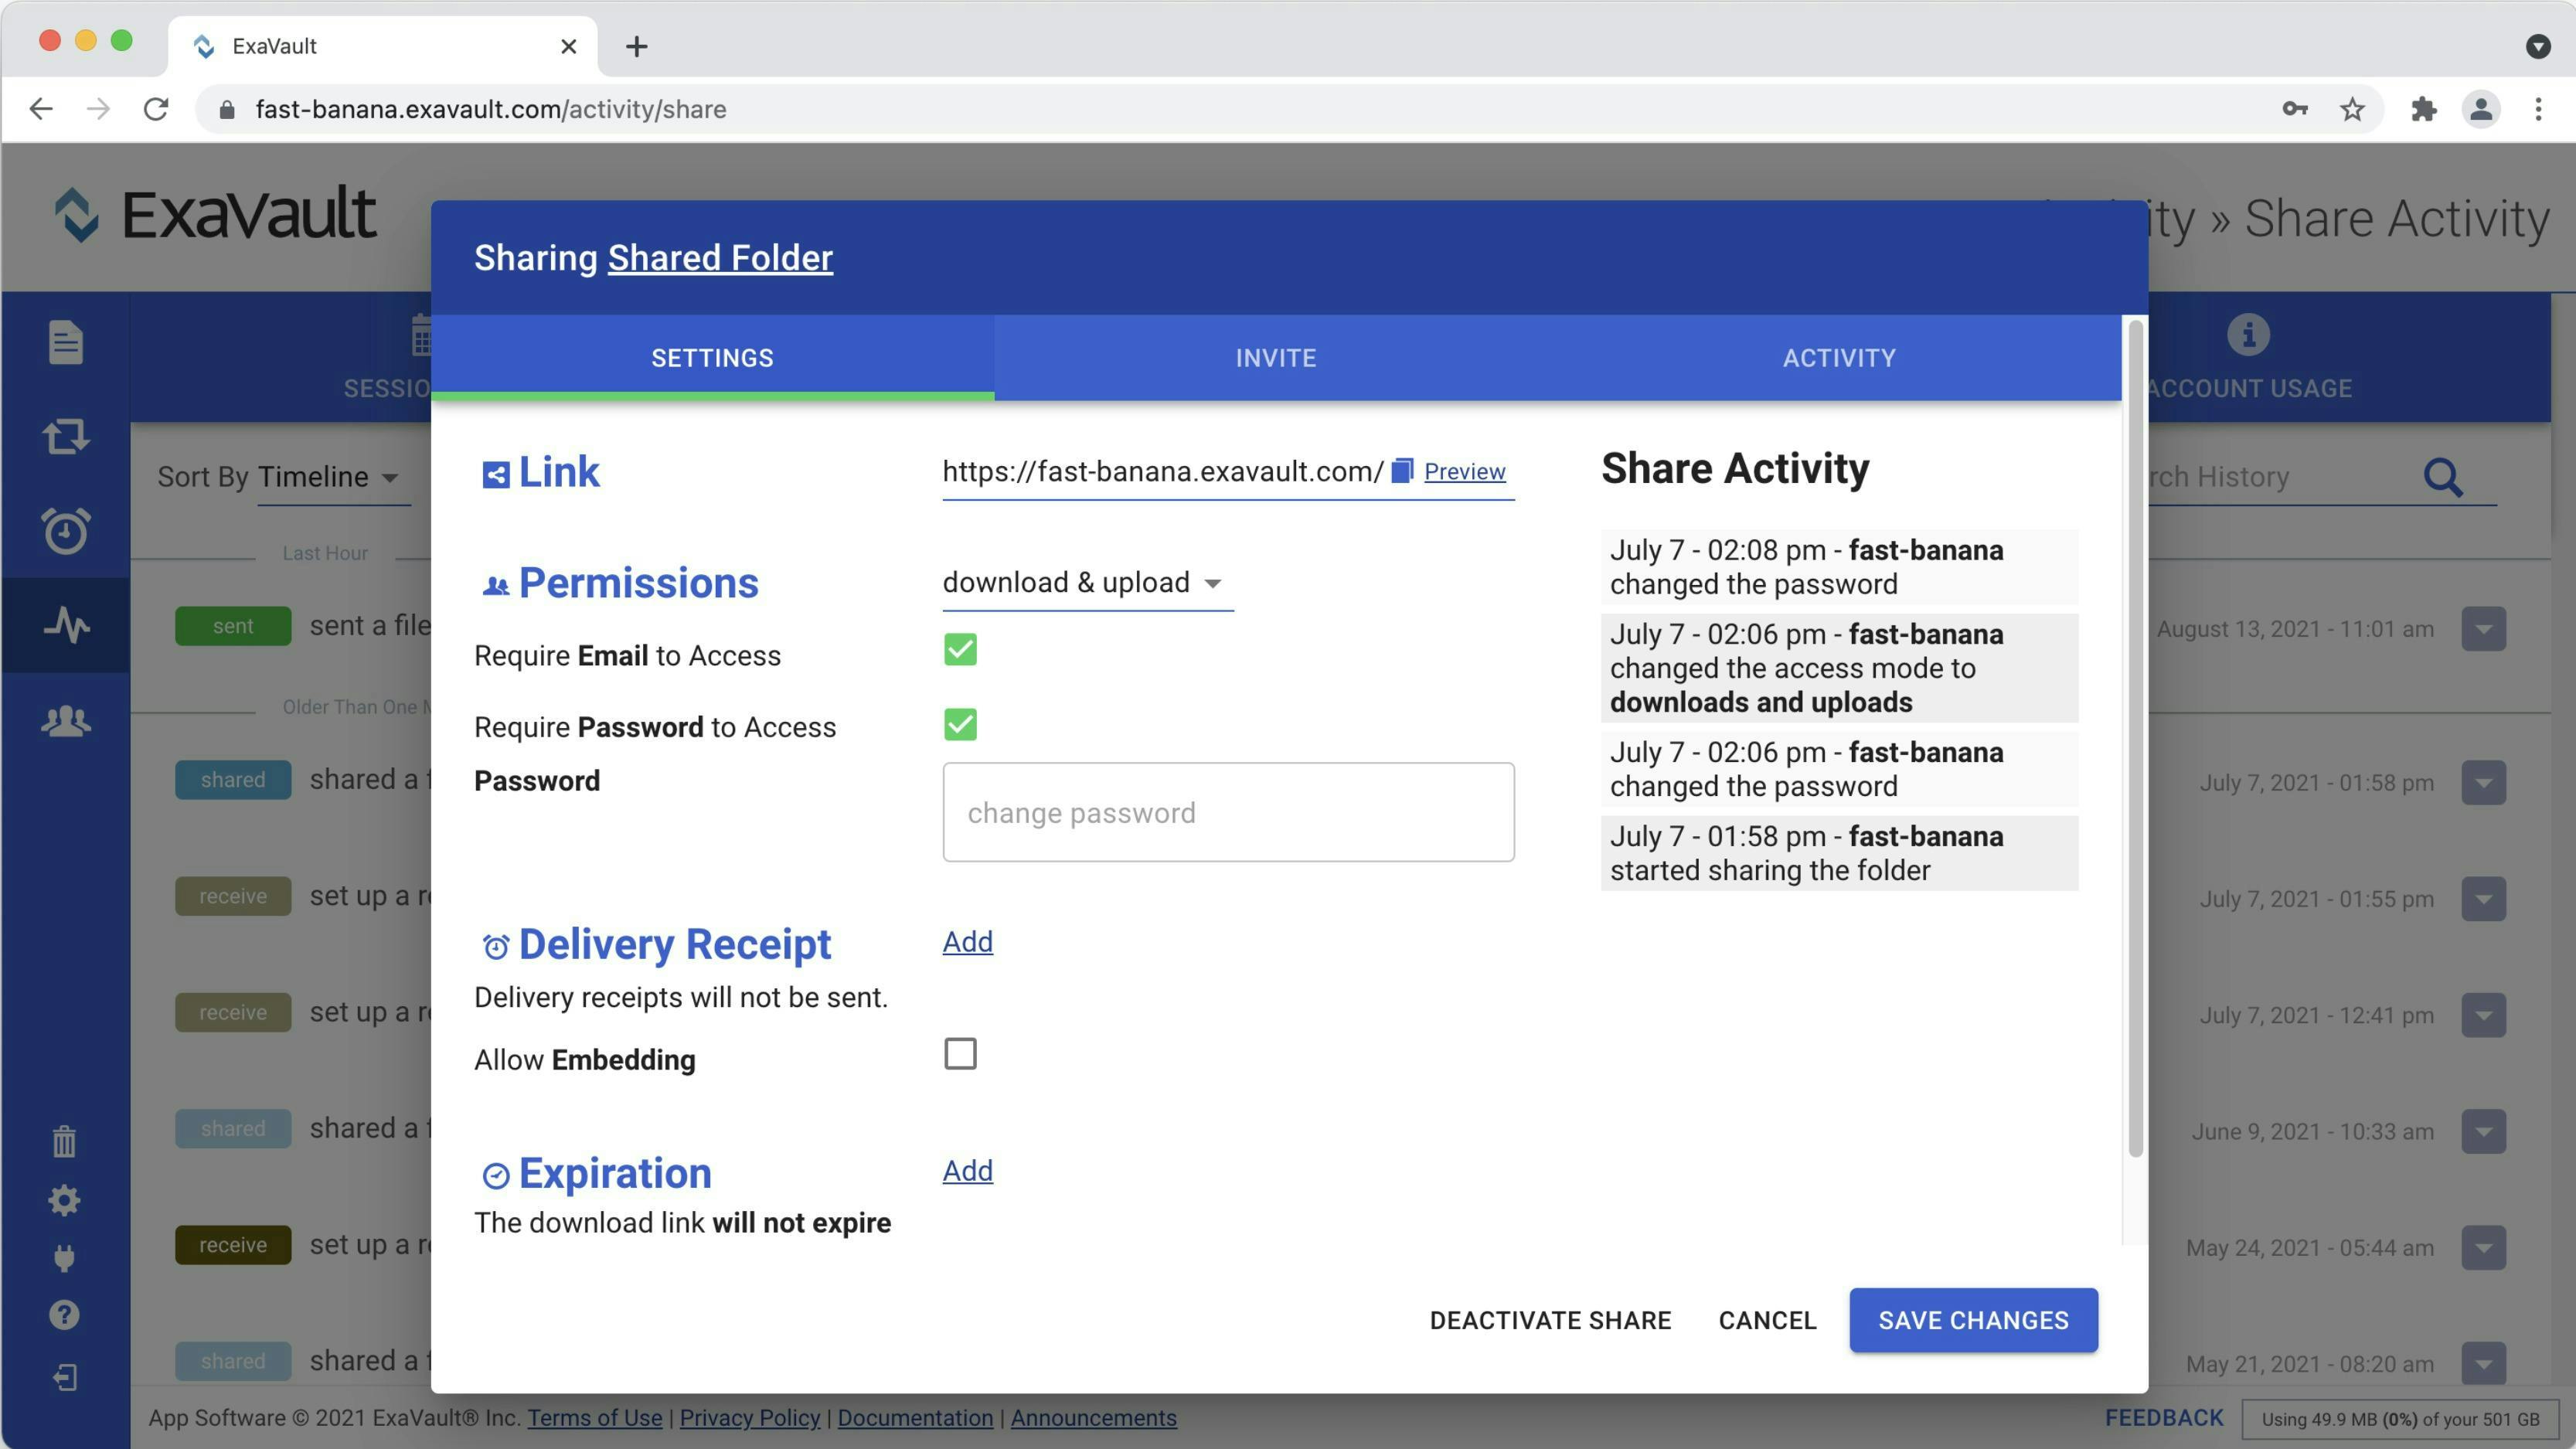
On the SETTINGS tab you will be able to update or add the following settings. These may already be enabled pending the initial set-up of the share folder.
- Link: Displays the link that invitees will received to access the folder.
- Use the Files Icon to quickly copy the full URL to your computer's clipboard.
- Use the Preview link to open the URL in a new browser tab with the current settings (password/email requirements). - Permissions: Provides control over how invitees can interact with your share folder. Options include:
- download only
- download & upload
- download, upload, modify & delete - Require Email Access: When selected, this setting forces invitees to enter an email address before accessing the share folder.
- Require Password to Access: When selected, a password field appears. Adding a password to this field will require the invitee to enter the same password before accessing the share folder.
- Delivery Receipt: Determines if anyone will receive notification when the invitee accesses the share folder.
- If Add is selected, a delivery receipt can be sent to the user viewing the settings or to a list of email addresses (separated by a space or comma in the field that appears).
- If Remove is selected, no delivery receipt will be sent. - Allow Embedding: if selected, you will see a Get code link. Selecting this link allows you to copy the HTML required for embedding this folder on a website.
- Expiration: By default, share folders will not have an expiration date. An expiration dates can be added on any future date. Clients attempting to access the share folder after the expiration date will receive a message that the folder are no longer available.
- To change the expiration, click on Add or the current expiration date to open the calendar picker and select the new date. - Share Activity: Shows a log of the interactions with the share folder (invites sent, new invitees added, share setting updates, and received invites).
- Deactivate Share: Click to remove access to the share folder. Once deactivated the send can not be re-opened; the link is disable and a new Send must be made.
- Cancel: Click to leave the settings without saving any changes.
- Save Changes: Click to save any changes made to the settings above.
Invite Tab
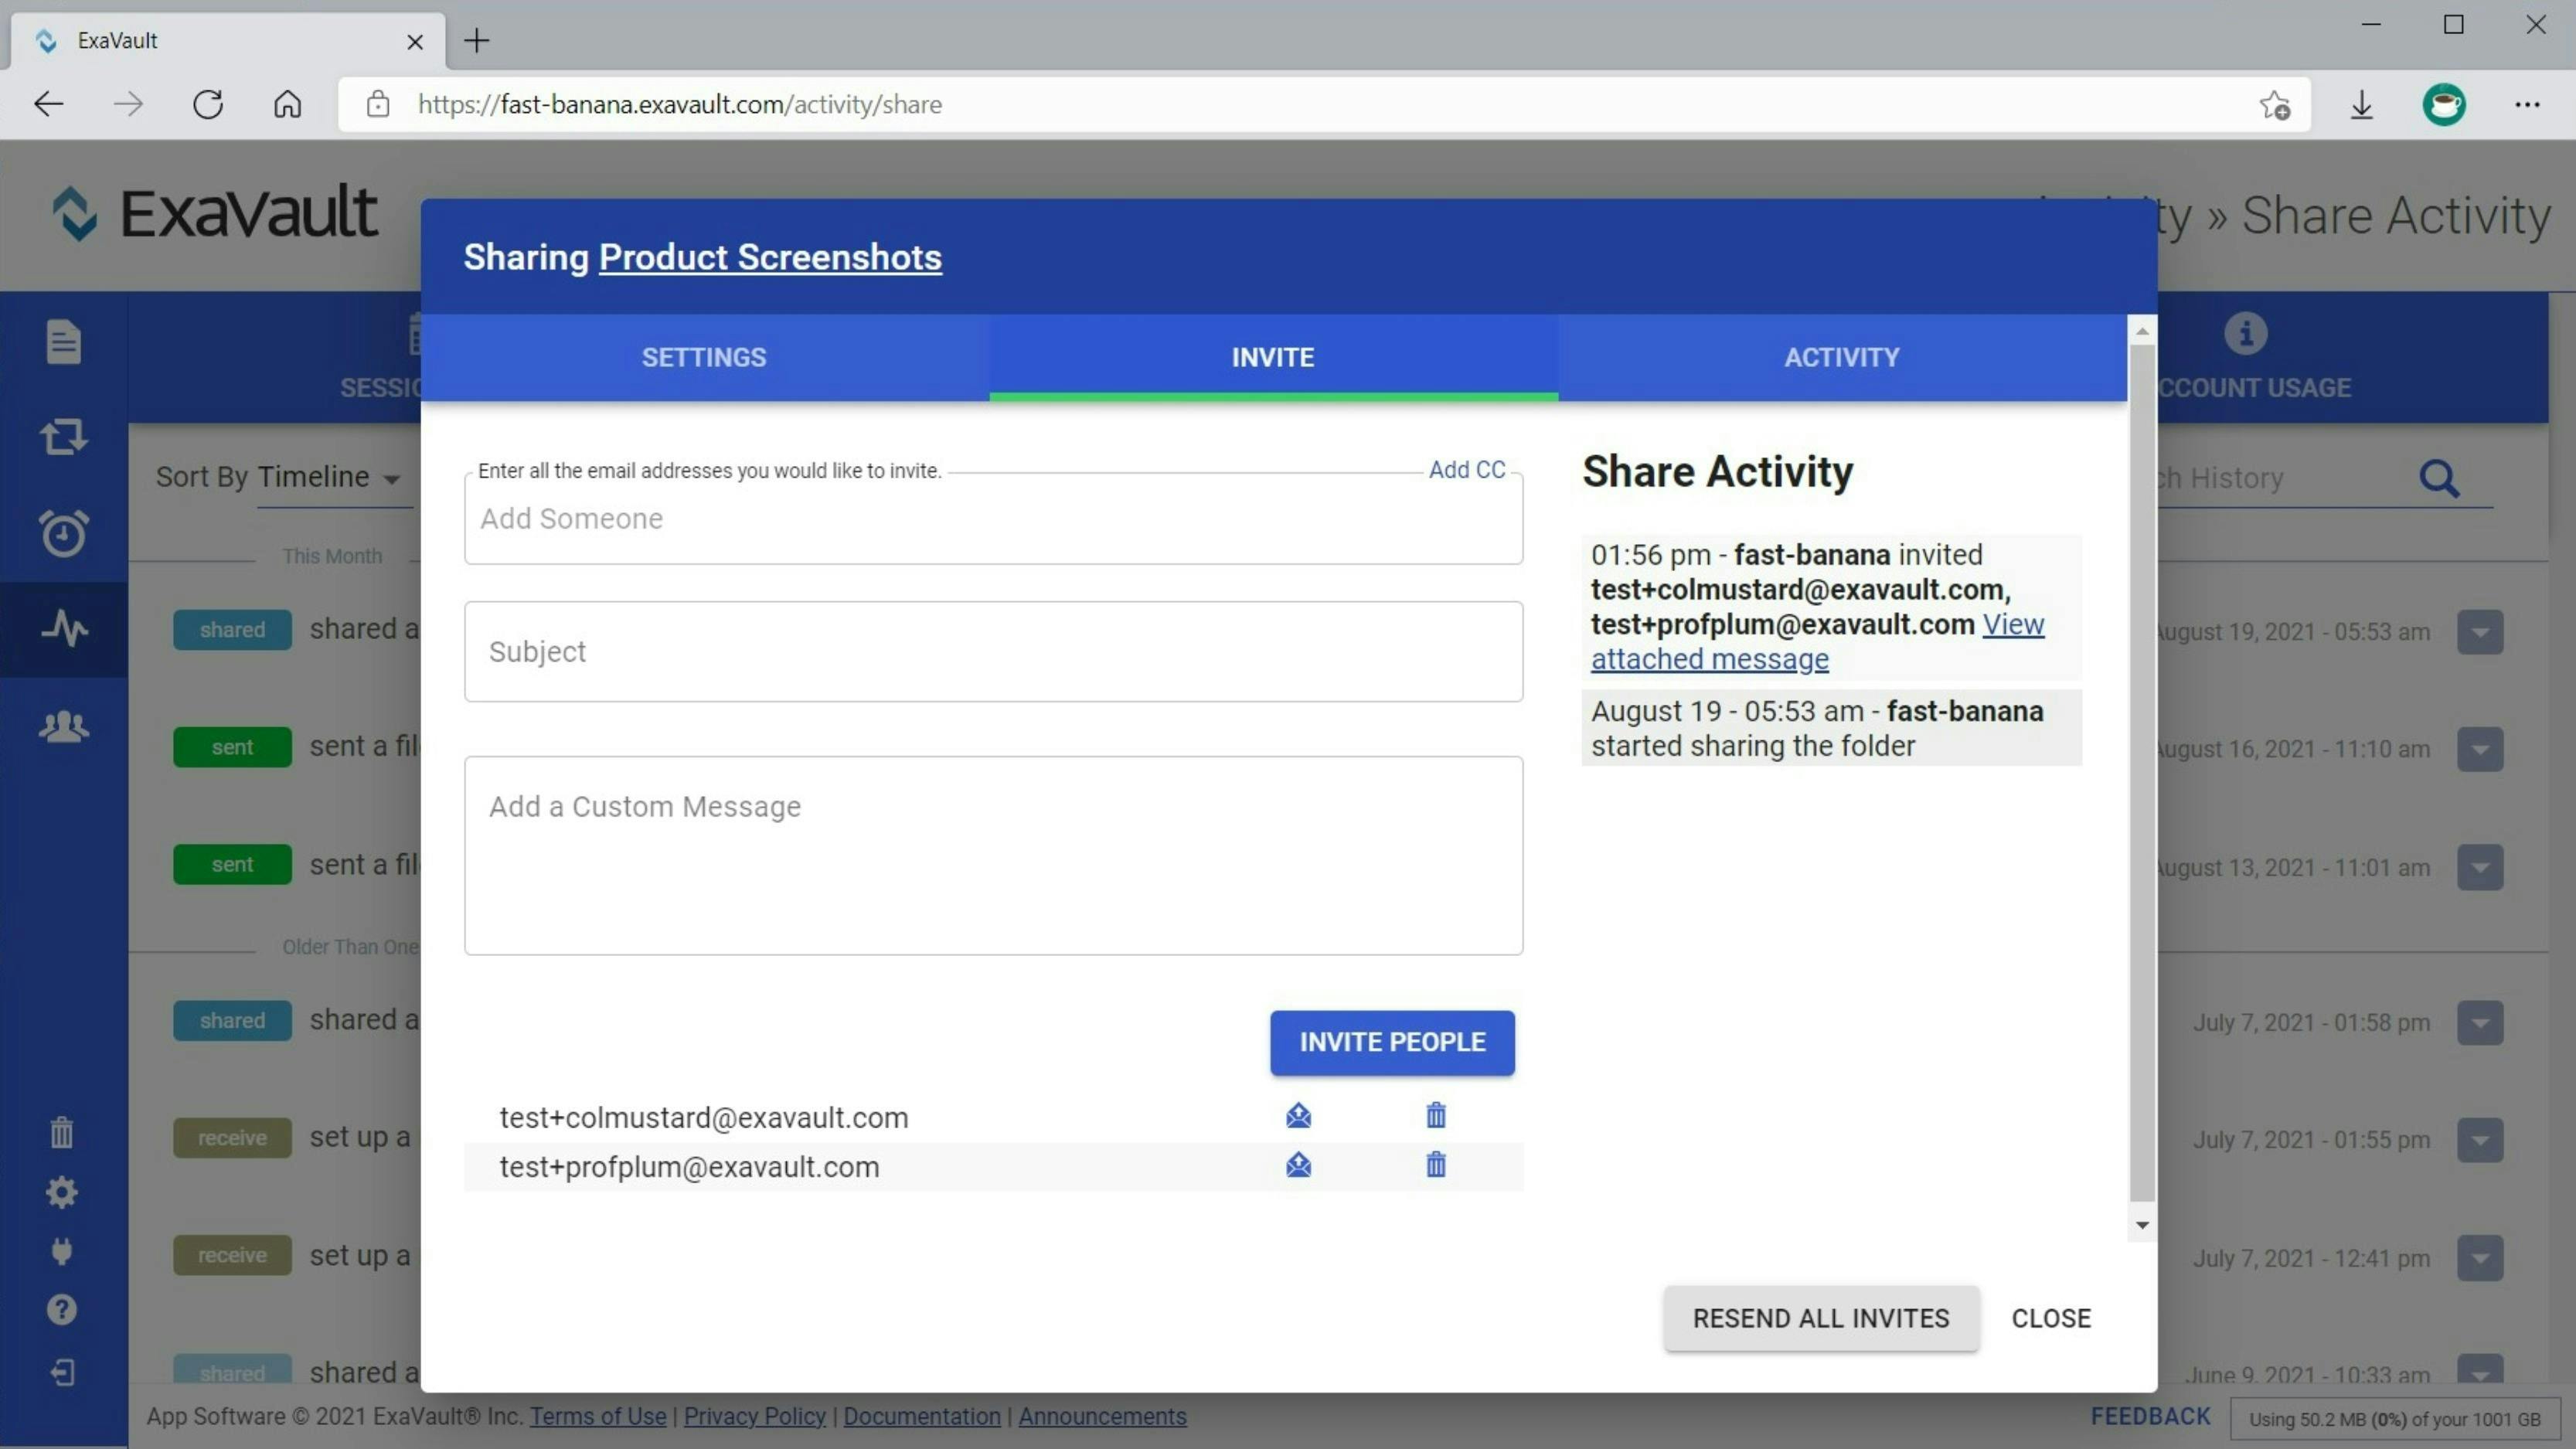
When viewing the INVITE tab for a share, you have the following options:
- Add New Invitees: Fields for creating new invitation emails for the share folder. To send a new email, follow these steps:
1. In the Add Someone field, type an email address.
2. To add a second email, enter a comma or press space before typing the next address. You can also copy-and-paste a list of emails or use an Email List feature to create a preset list.
3. In the Subject field, add the custom subject line you would like to appear in invite email.
4. Add a Custom Message in the field to include additional text for the body of your invite email
5. Click the INVITE PEOPLE button. - View Invitees List: Below the INVITE PEOPLE button is a list of all email addresses that were sent a share invitation email or who accessed the share by entering their email address when prompted (if require email address is enabled for the share).
- Click on the Trash Can icon to remove someone from the invitee list.
- Click the Envelope icon to resent the invitation email to a specific invitee. - Share Activity: Shows a log of the interactions with the share folder (invites sent, new invitees added, share setting updates, and received invites).
- RESEND ALL INVITES: Click button to send the invitation email to all emails listed in the invitee list.
- CLOSE: Exits the settings for this share.
Activity Tab
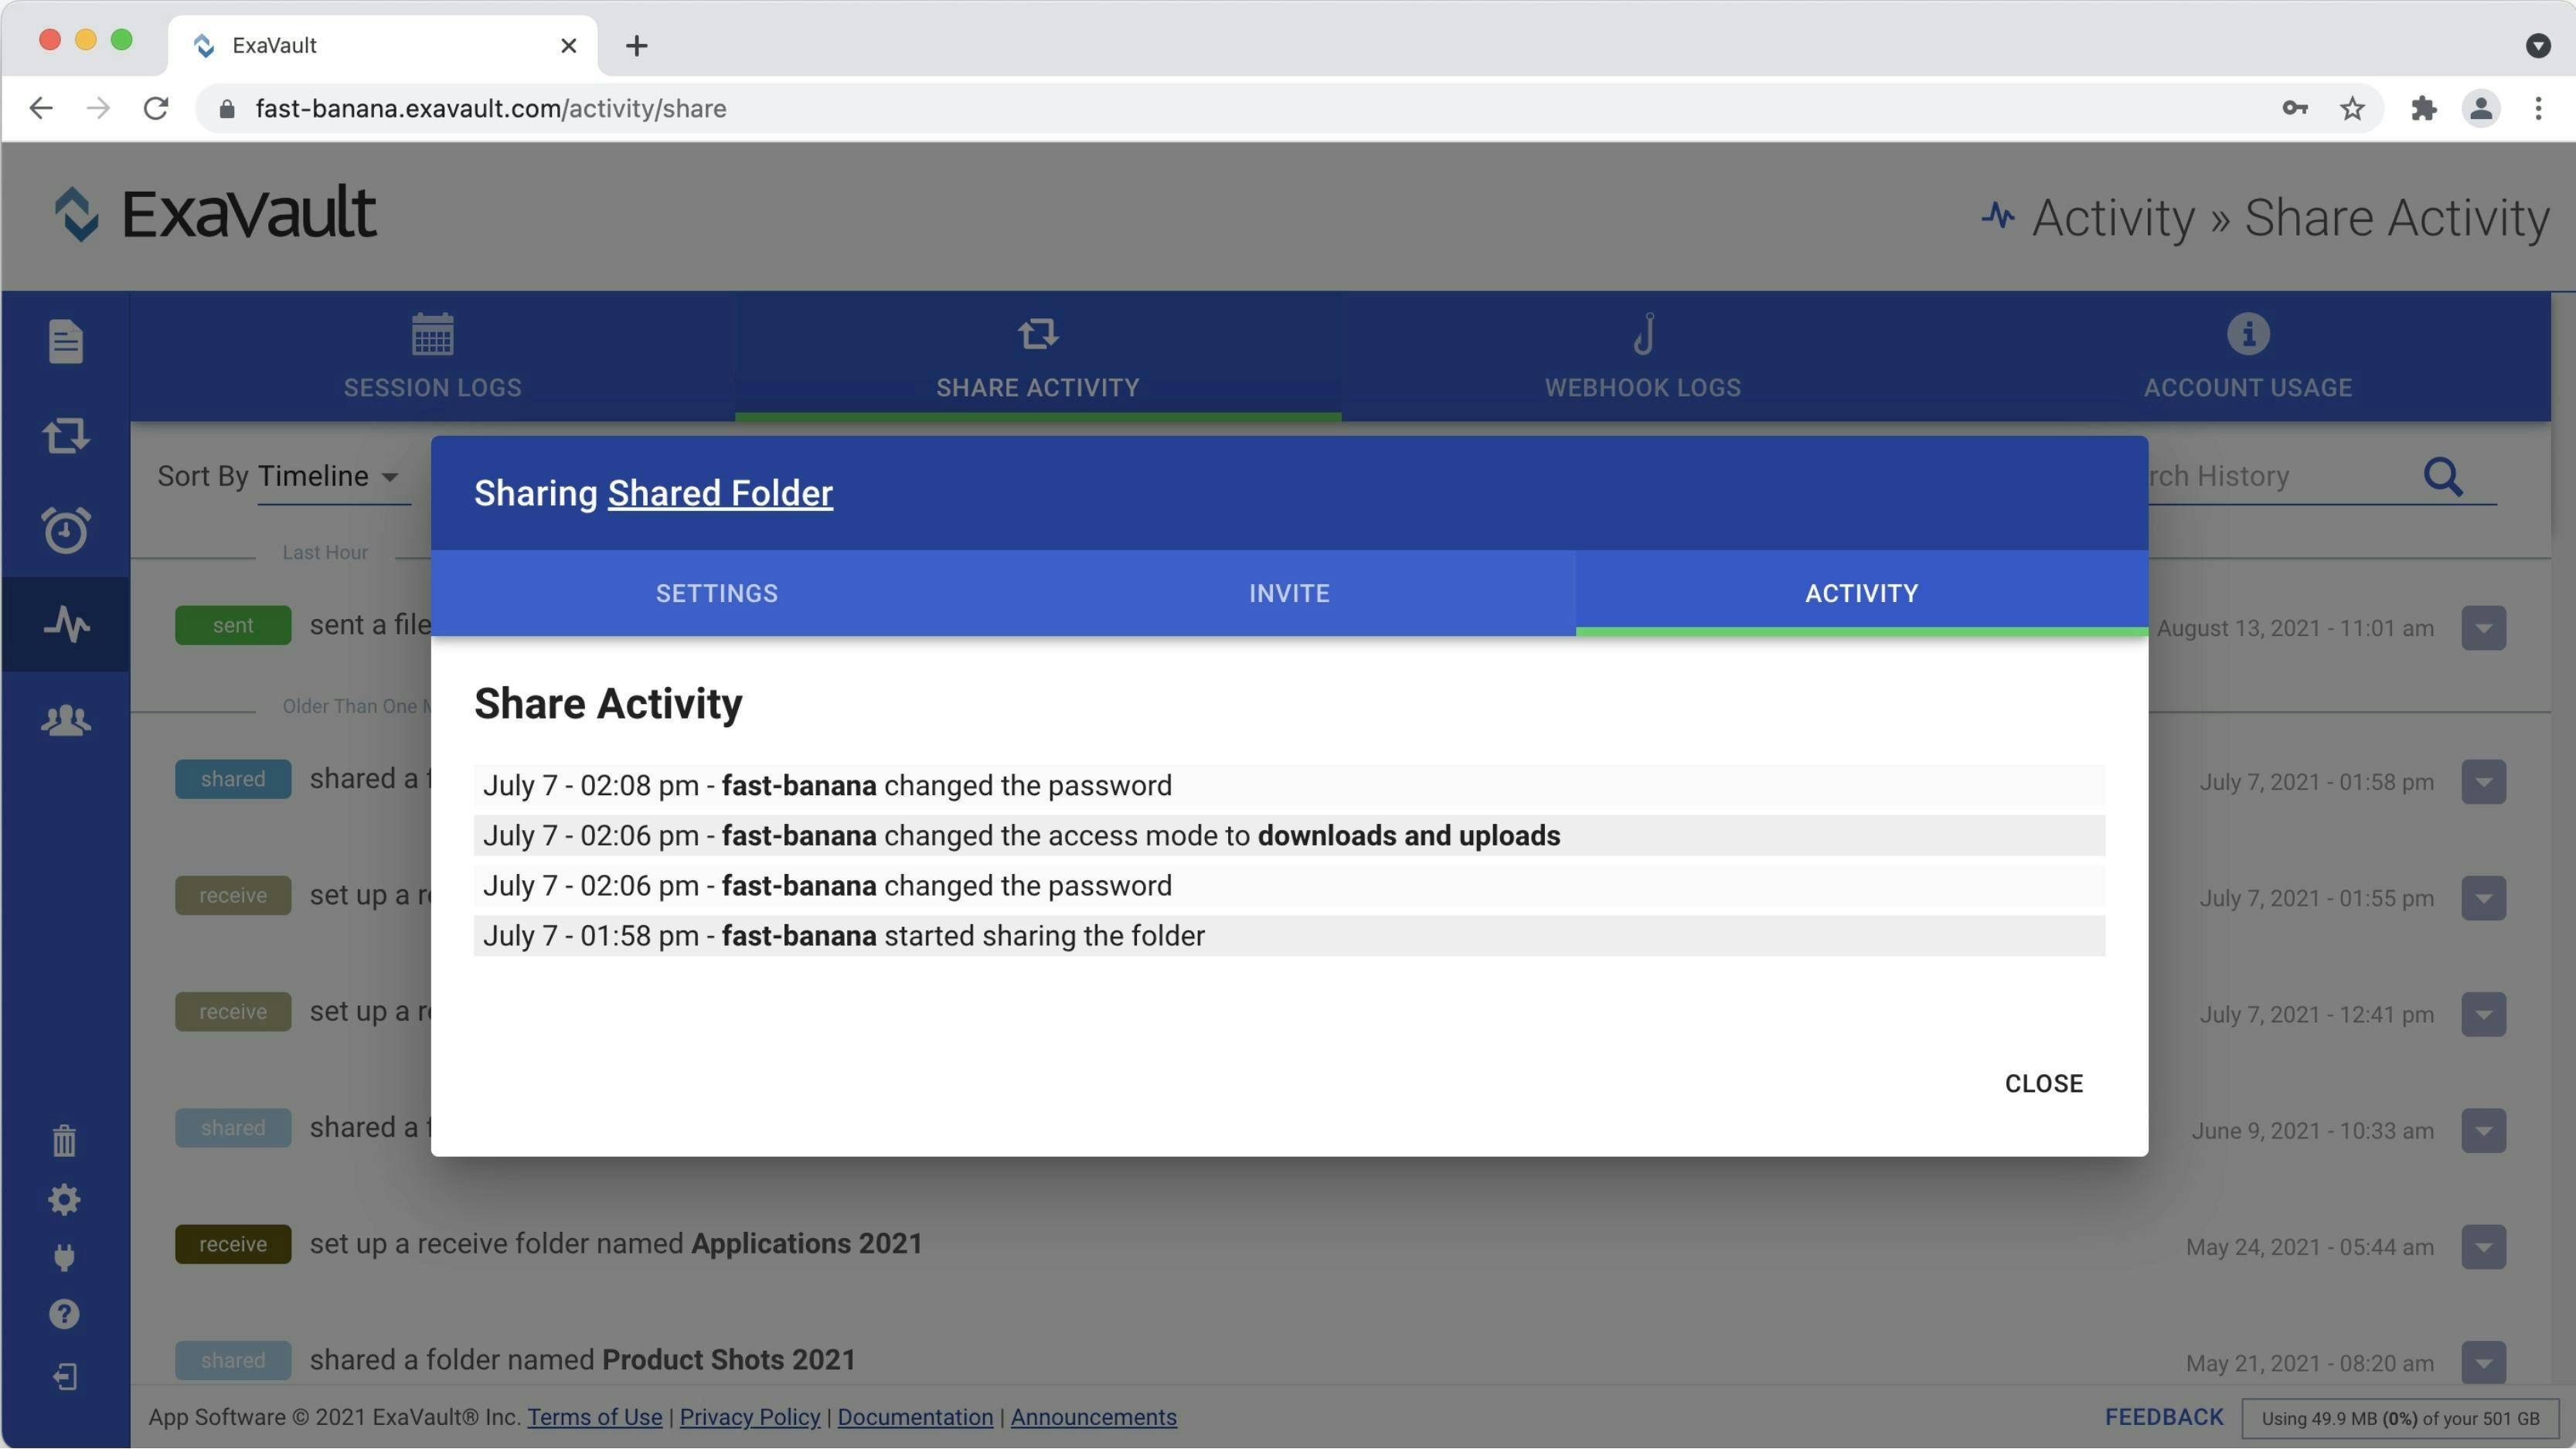
The ACTIVITY tab shows a log of the following interactions with the share:
- Invites sent and new invitees added
- Share setting updates
- Received invites (invitees who visit the link)
To view additional logging for when and how clients interacted with the items in your share (download, deletes, etc), visit the SESSIONS LOG.
Disabling Access to Share Folders
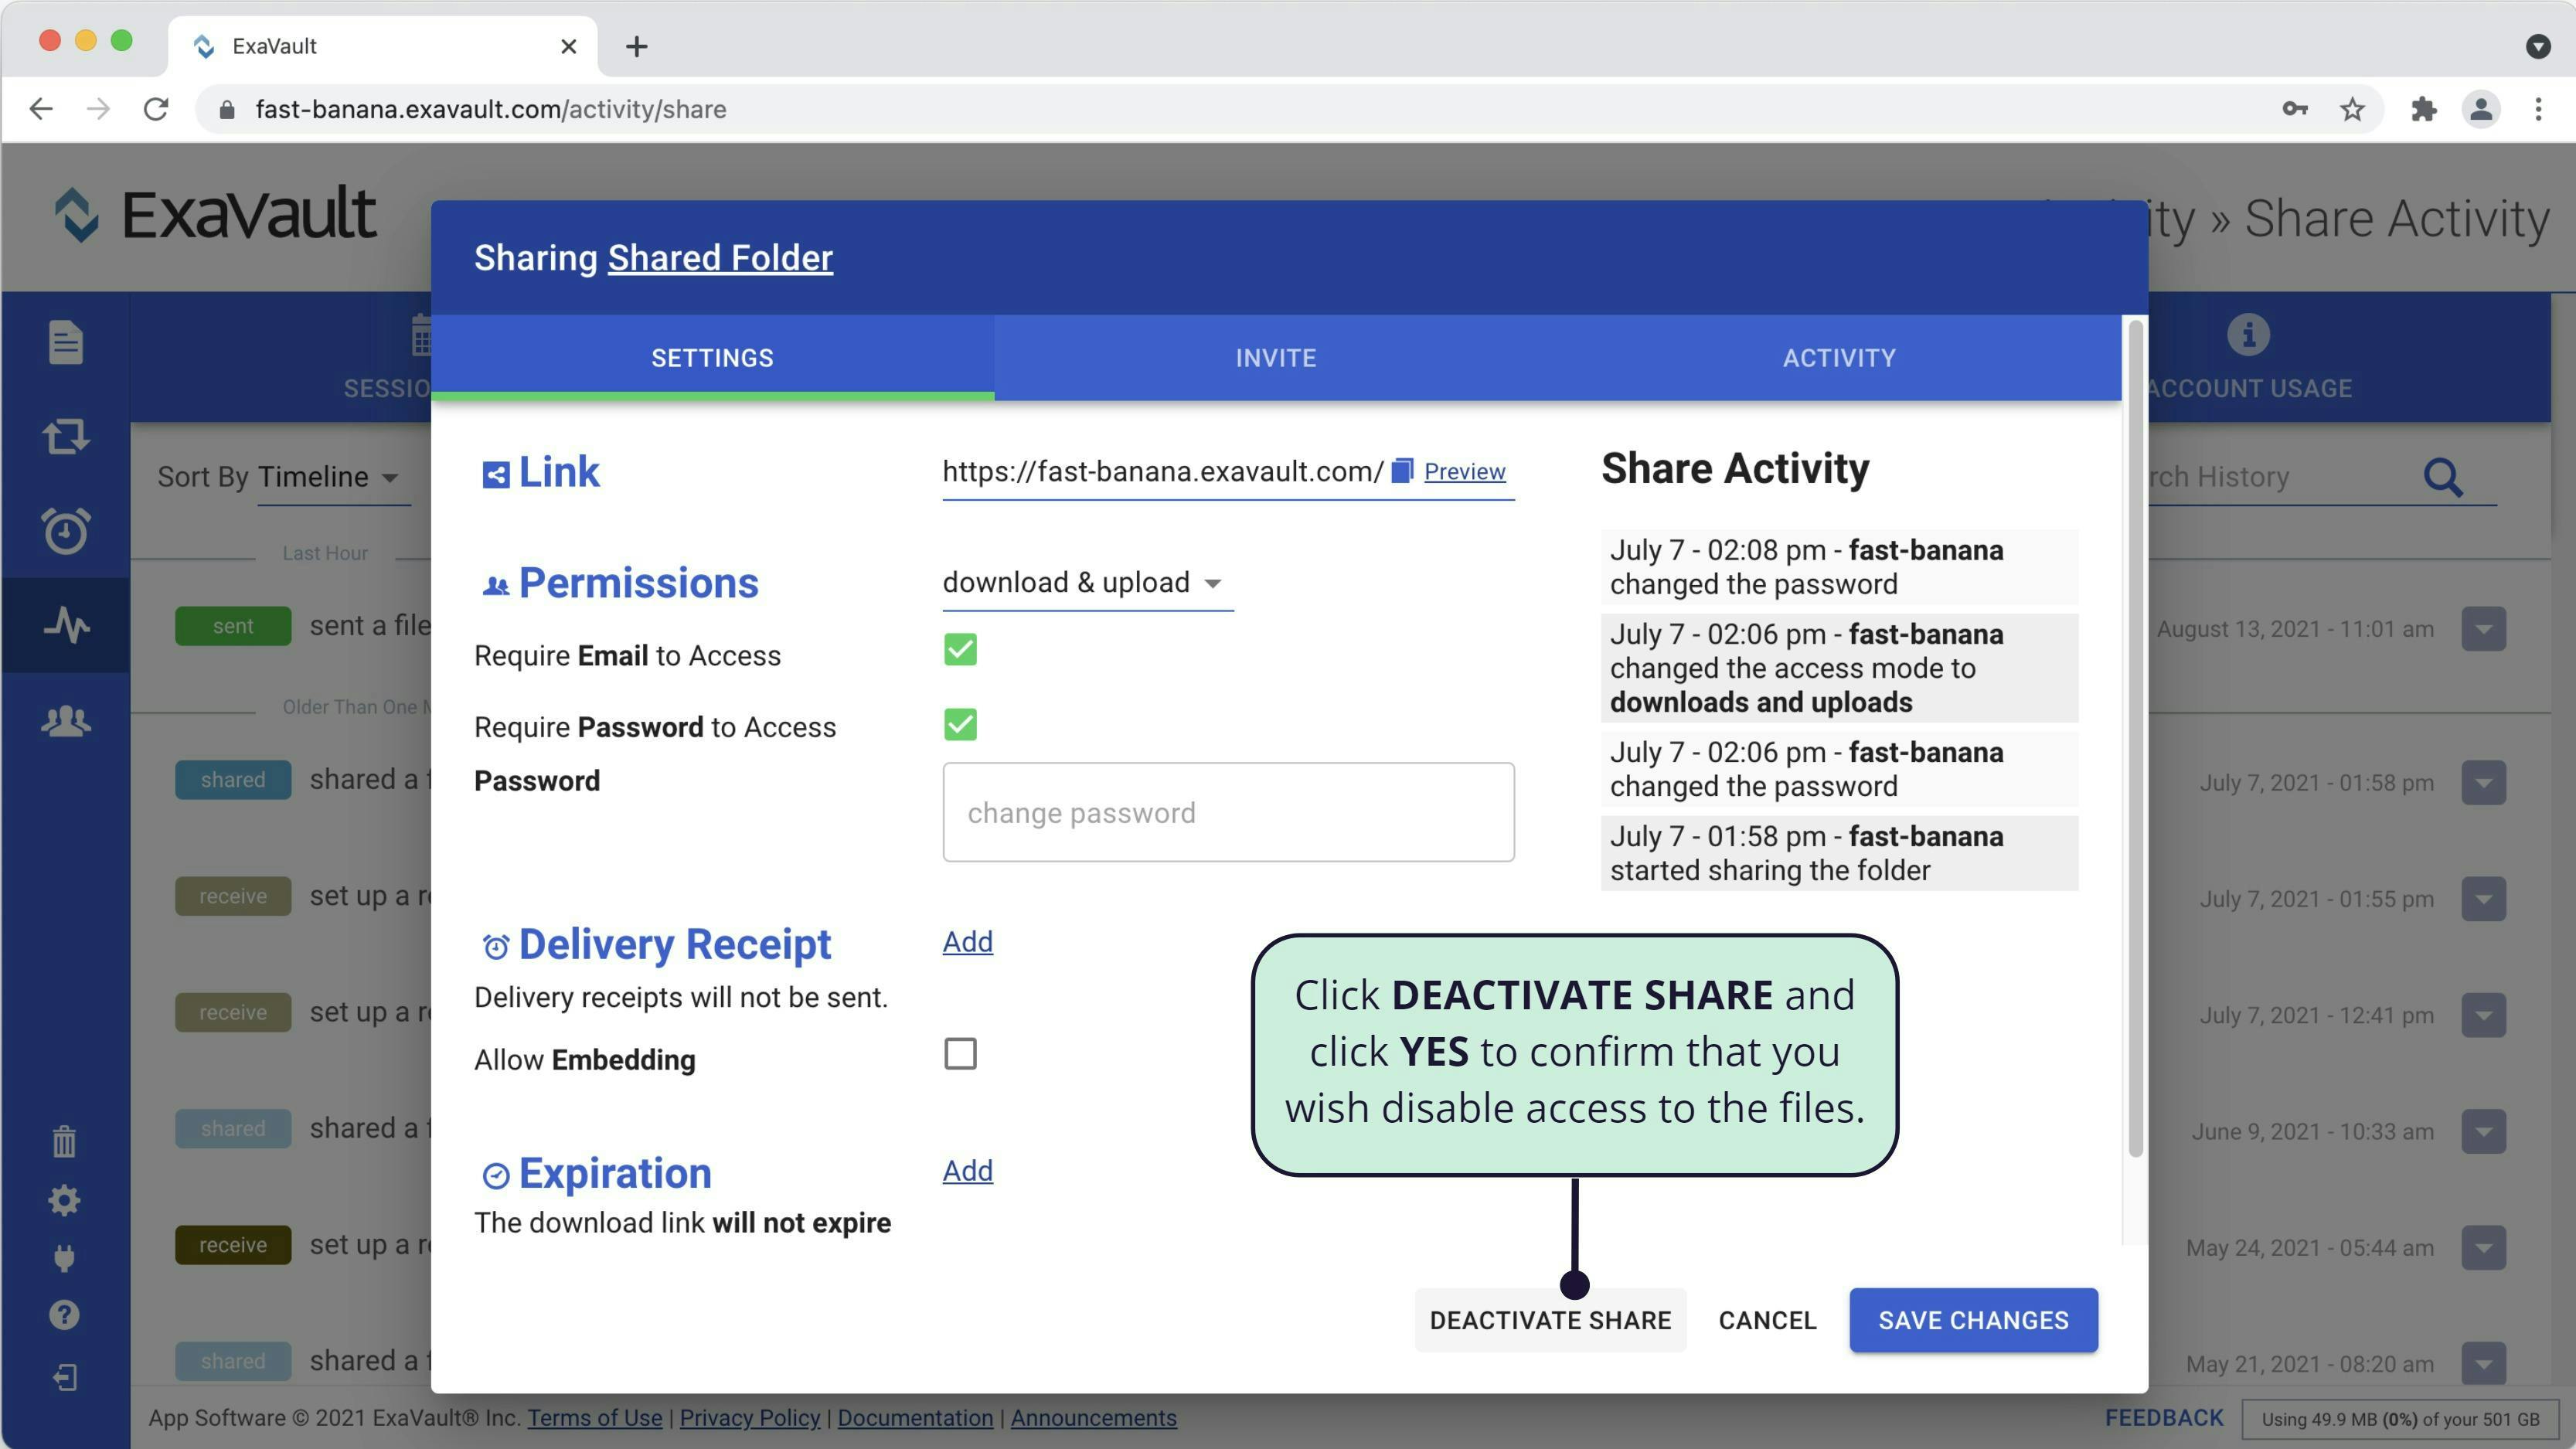
If you need to remove access to a share folder, you can disable the share at any time after it is created. If people attempt to access the files after you've disabled them, they'll receive a message that the files are no longer available.
To disable sent files that have been sent:
1. Click the Activity button on the main toolbar.
2. Click the SHARE ACTIVITY tab.
3. Click on the share entry to open the settings.
4. Click the DEACTIVATE SHARE button.
5. Click the YES button to confirm that wish to disable access to the folder.
Table Of Contents
Support Library
Still Have Questions?
Email Us
Don't see the answer you need? Drop us a note, and our support team will email you back.
Send Email


