Send Files
Sending files on ExaVault is as simple as adding an attachment to an email. But unlike email, you're not limited to the size and type of attachments – you can easily send multi-gigabyte files.
The send files feature is great if you need to quickly get one or more files to somebody. If you need to create a shared workspace, we recommend setting up a shared folder. And if you need to get files from someone, try creating a receive folder.
How to Send Files
To send files from ExaVault, start by clicking the Sharing button on the main navigation toolbar on the left side of your window. It will open the SEND tab for sharing by default. Complete the following steps:
Step 1: Select what should be sent

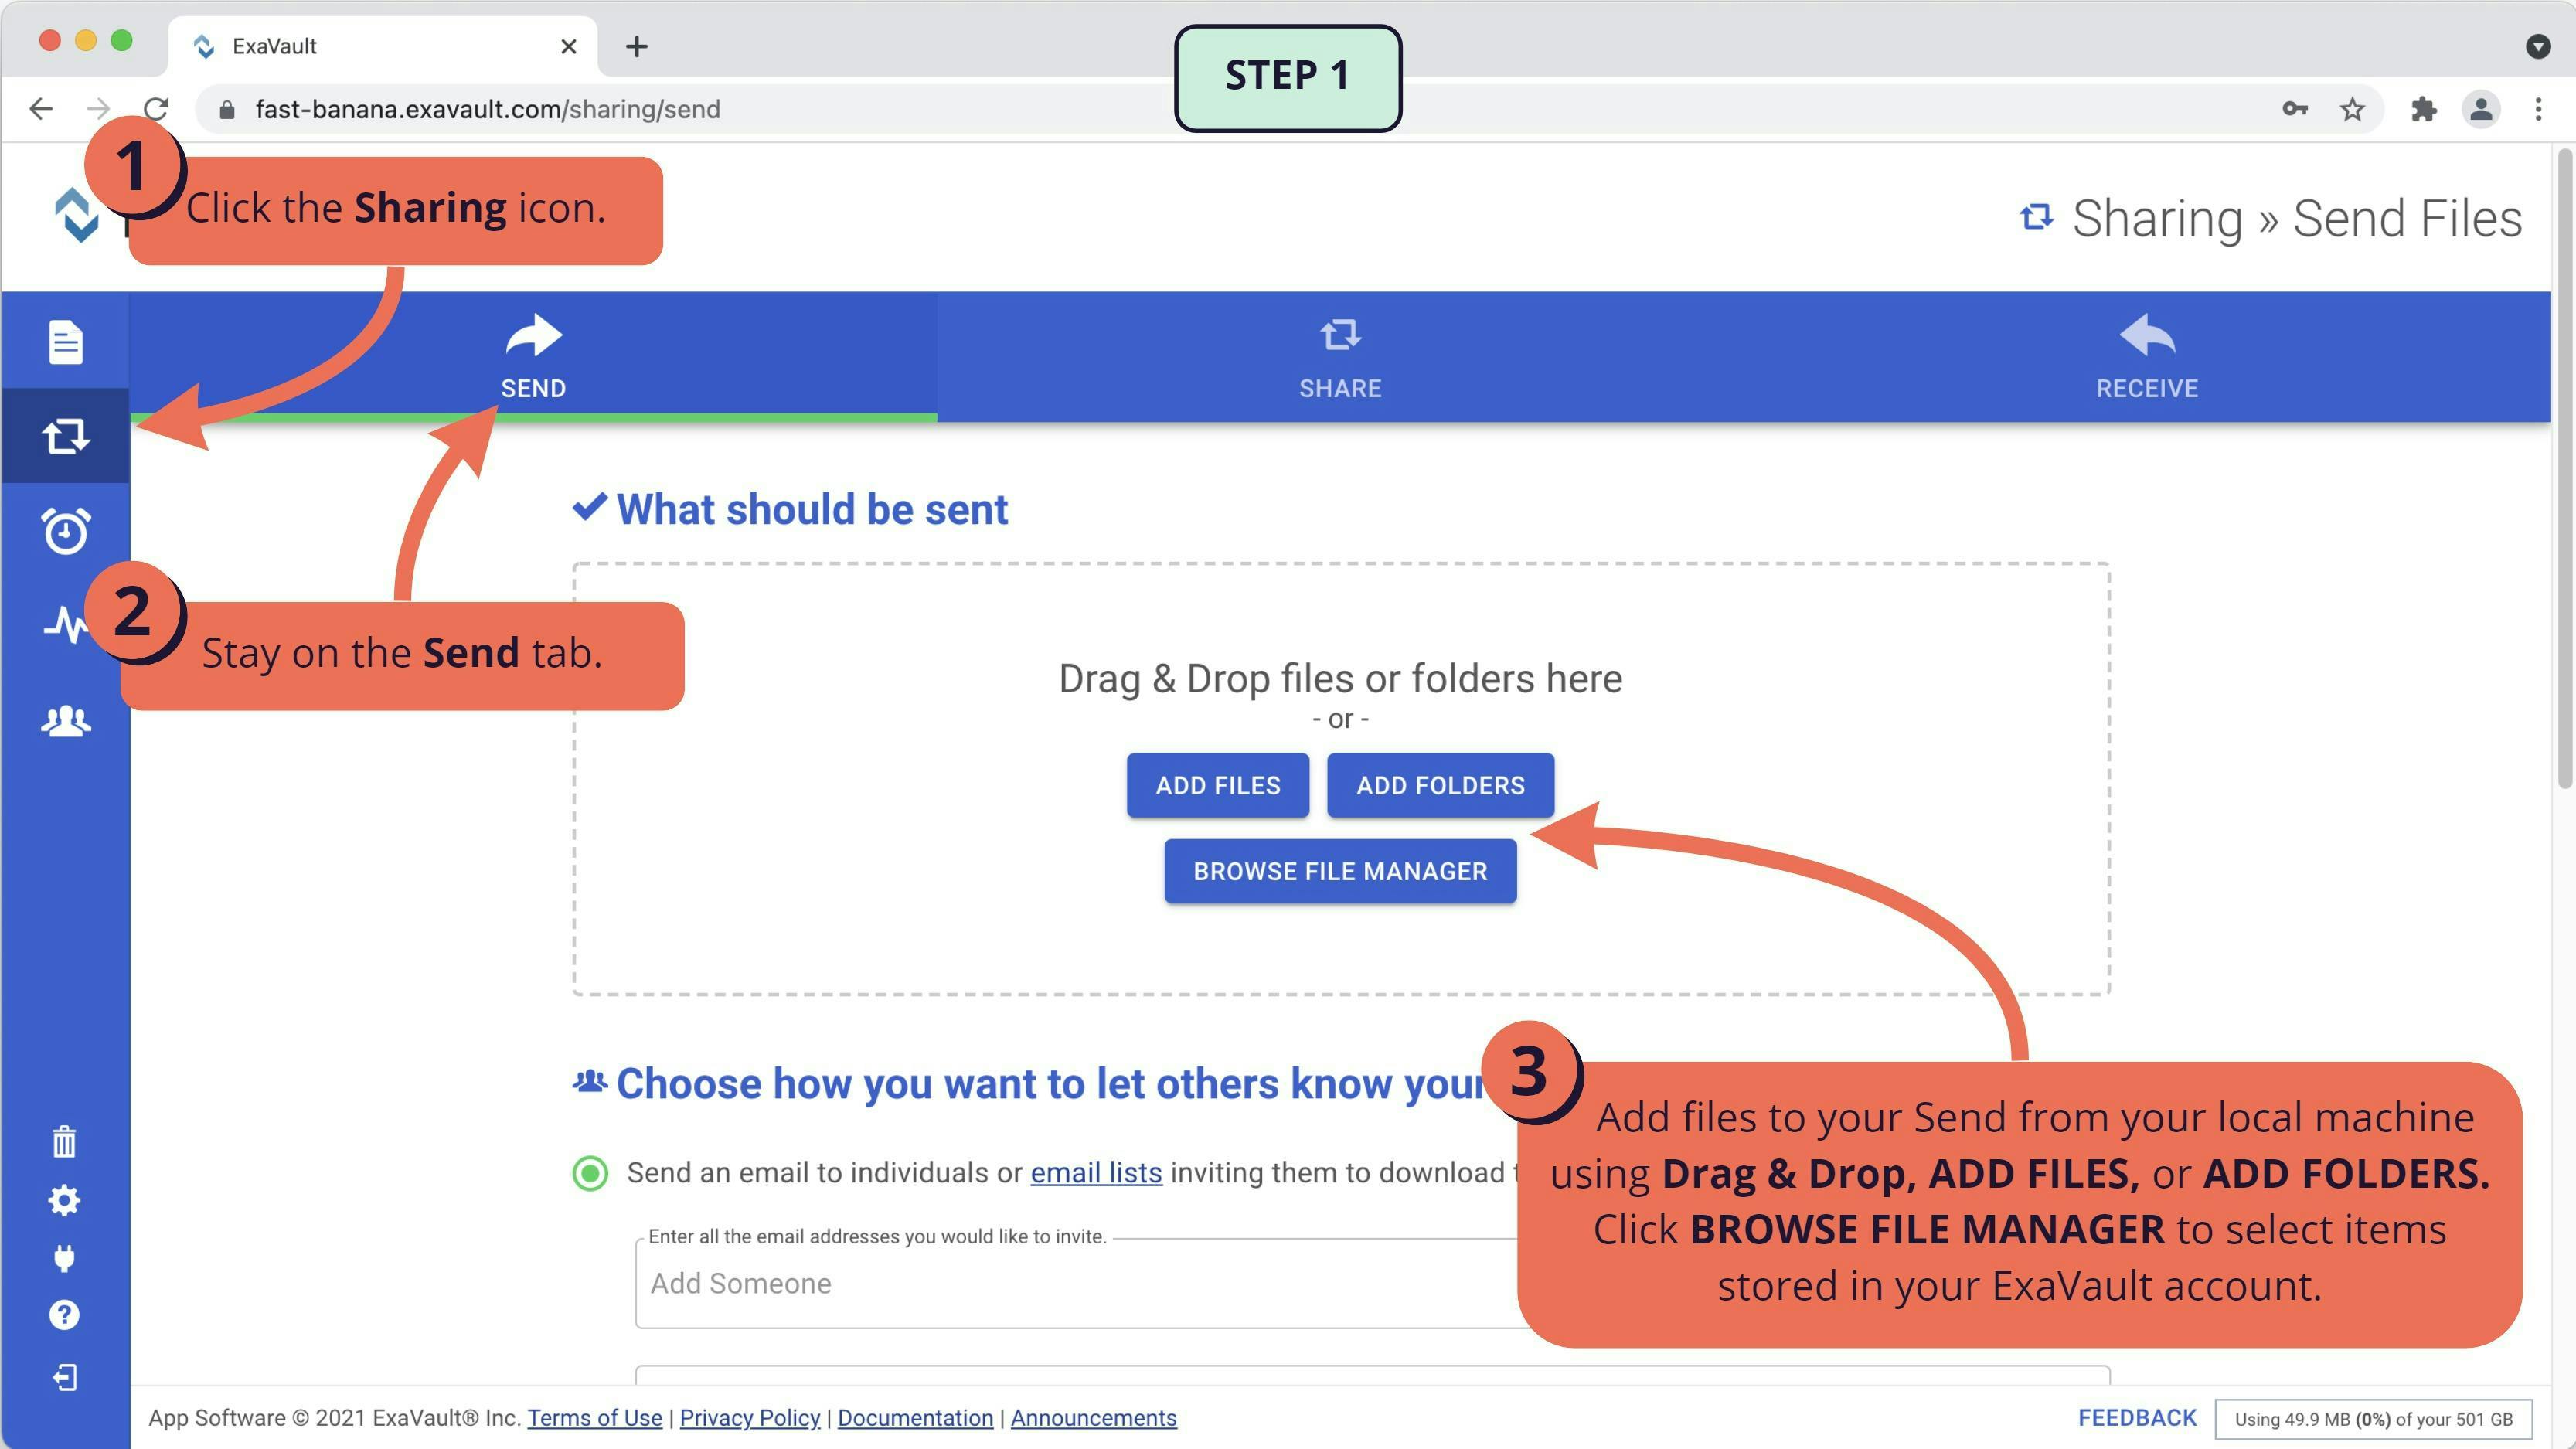
There are three options for selecting the files to include in your send:
- Drag & Drop items from your local machine.
- Click ADD FILES or ADD FOLDERS to select items from your local machine.
- Click BROWSE FILE MANAGER to select items stored in your ExaVault account.
When adding items to send, you can include a combination of files/folders from both your local machine and your ExaVault account.
You can send a maximum of 10GB of files at any one time. If you need to send more than 10GB of files with a single link, you should use a Shared folder.
Step 2: Choose how to notify recipients of sent items
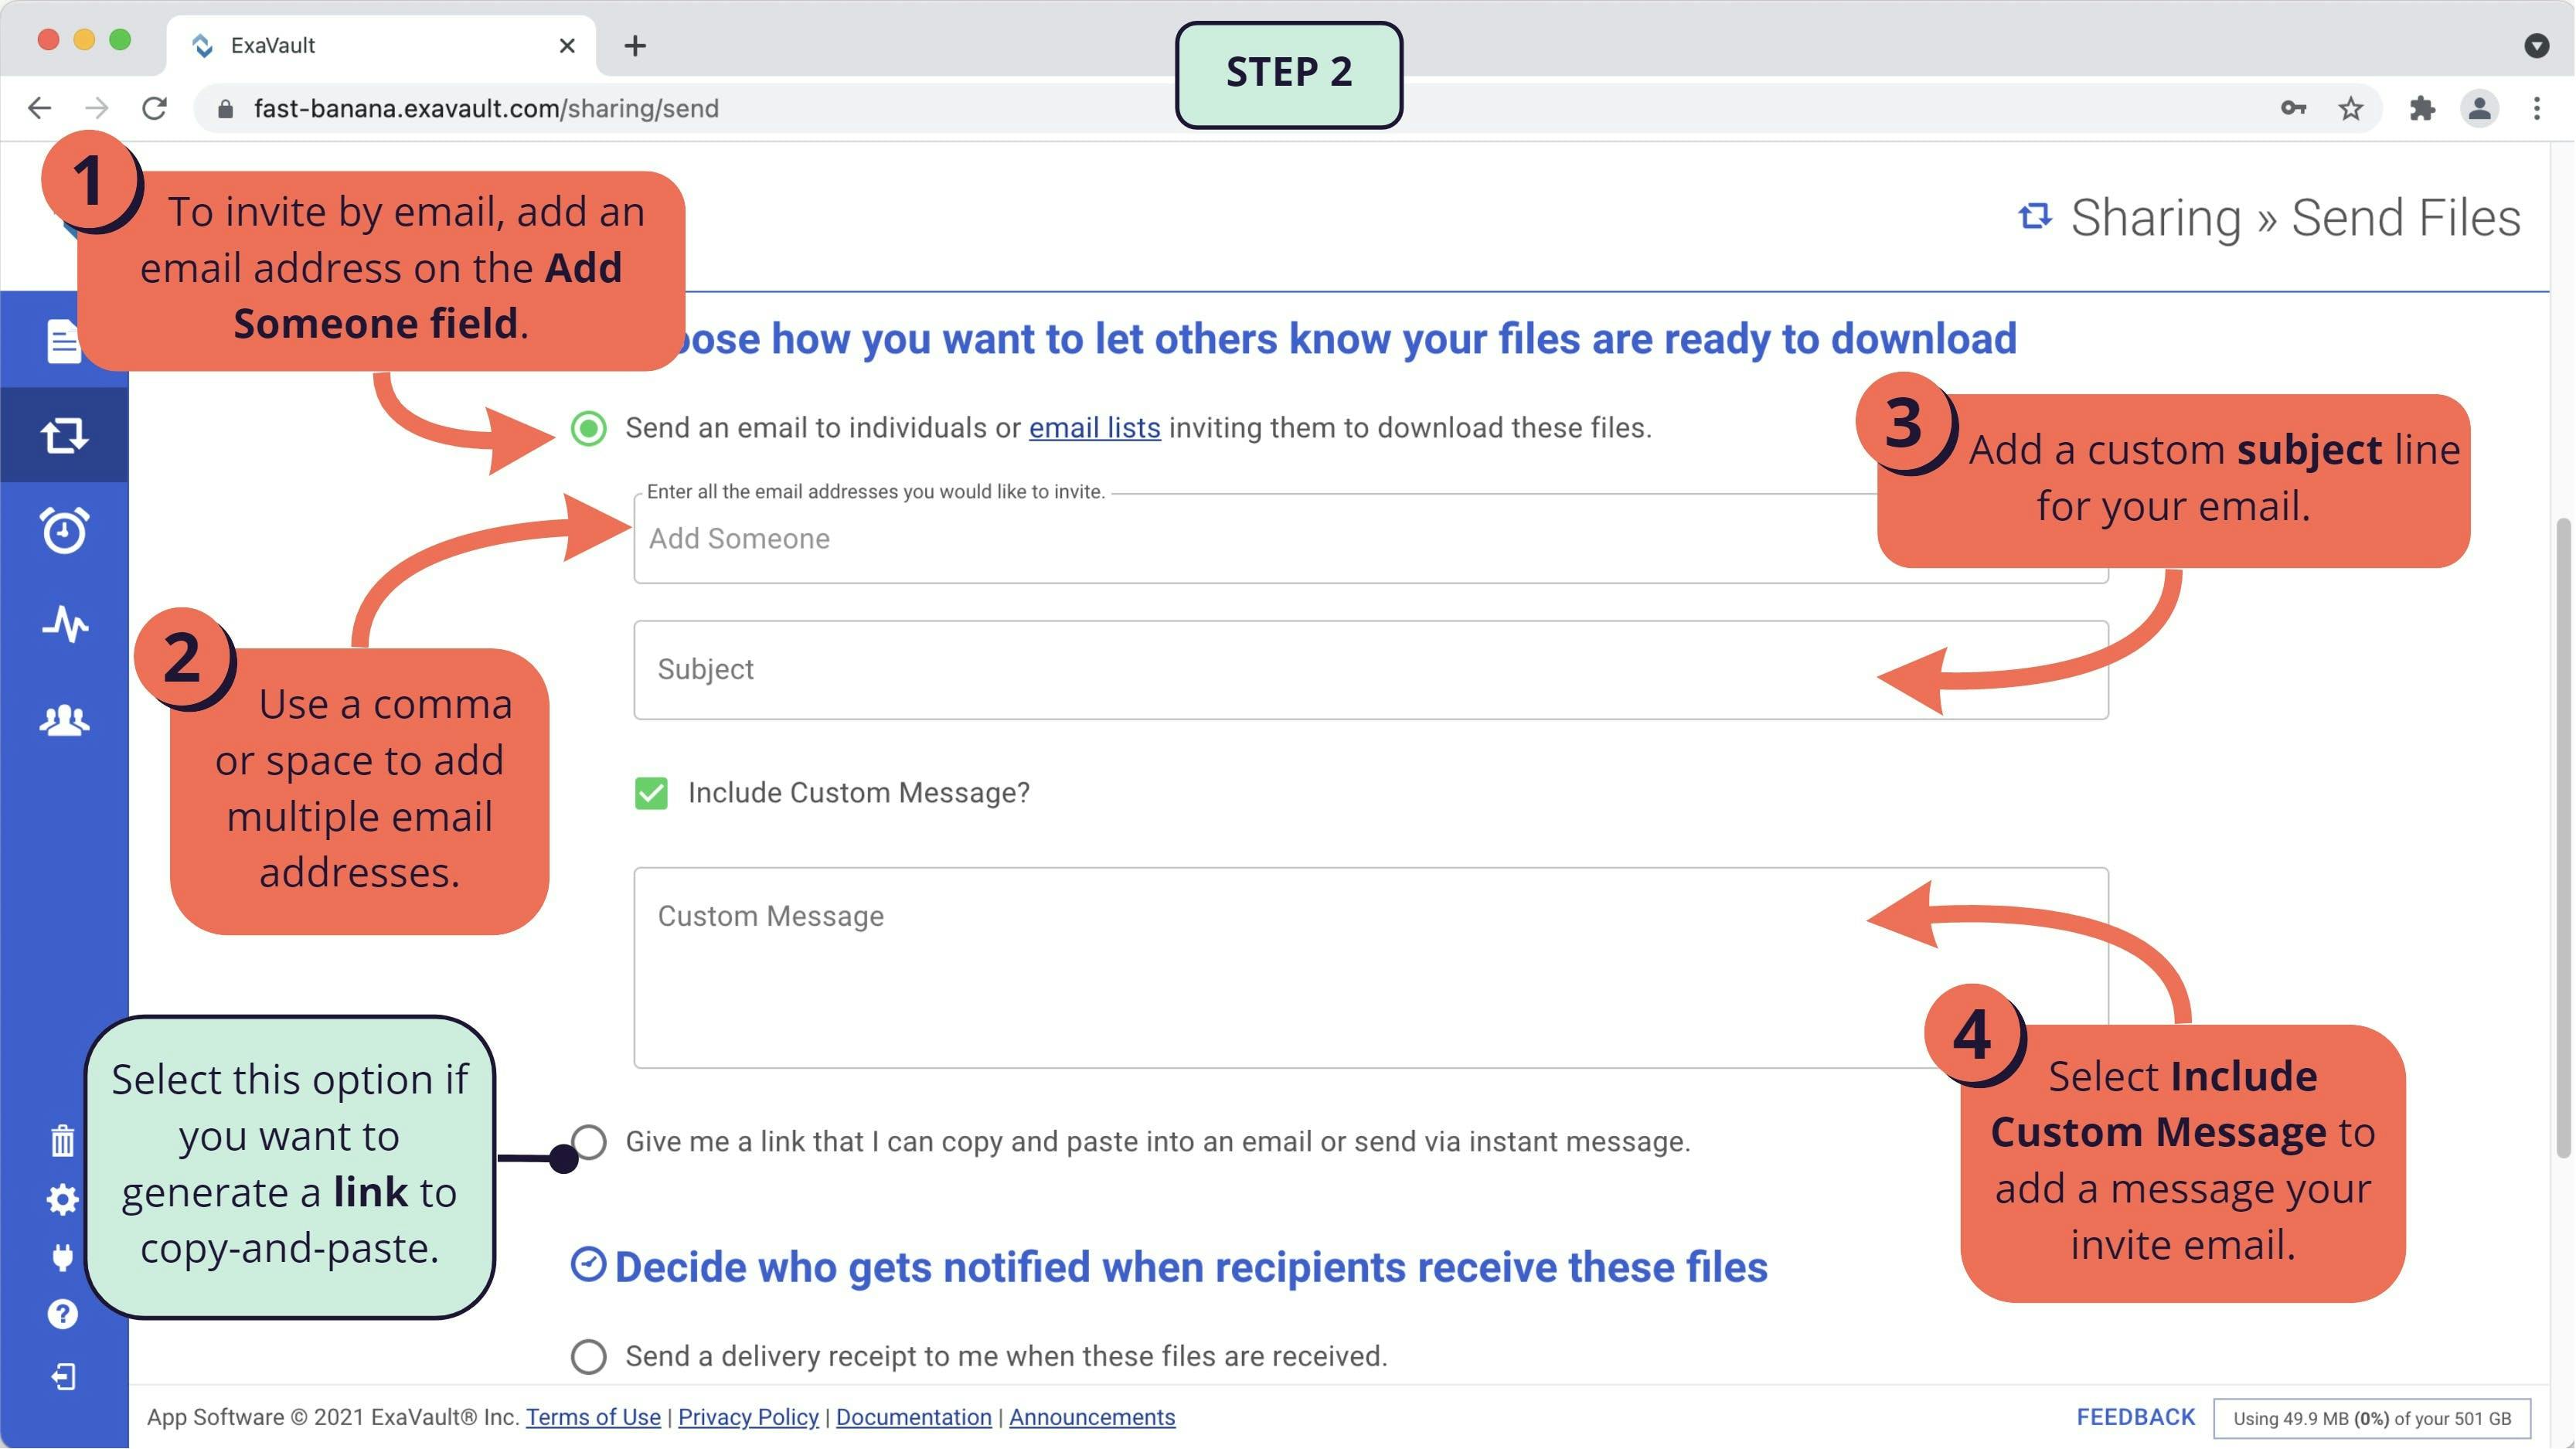
There are two options for notifying your recipient(s) about the files available for download:
Send an email with instructions to access the share link.
1. In the Add Someone field, type an email address.
2. To add a second email, enter a comma or press space before typing the next address. You can also copy-and-paste a list of emails or use an Email List feature to create a preset list.
3. In the Subject field, add the custom subject line you would like to appear in invite email.
4. You have the option to select Include Custom Message? This will provide a Custom Message field that can be used to include additional text for the body of your invite email.
Copy a link to manually circulate the files for download.
- When this option is selected, no immediate action is required. A link will be provide once you finish your settings and click CONFIRM SEND.
- This method is best if you intend on sharing the link through an instant messenger, hyperlinking in a newsletter, or similar communications.
You can Require recipients to enter their email address if you select the Give me a link… option when sharing your folder.
If you are publicly sending you file(s)/folder(s) rather than inviting specific recipients to download, you may want to collect the email of each person who accesses the file(s)/folder(s) for additional activity logging and notification options.
Step 3: Decide who gets notified when files are received
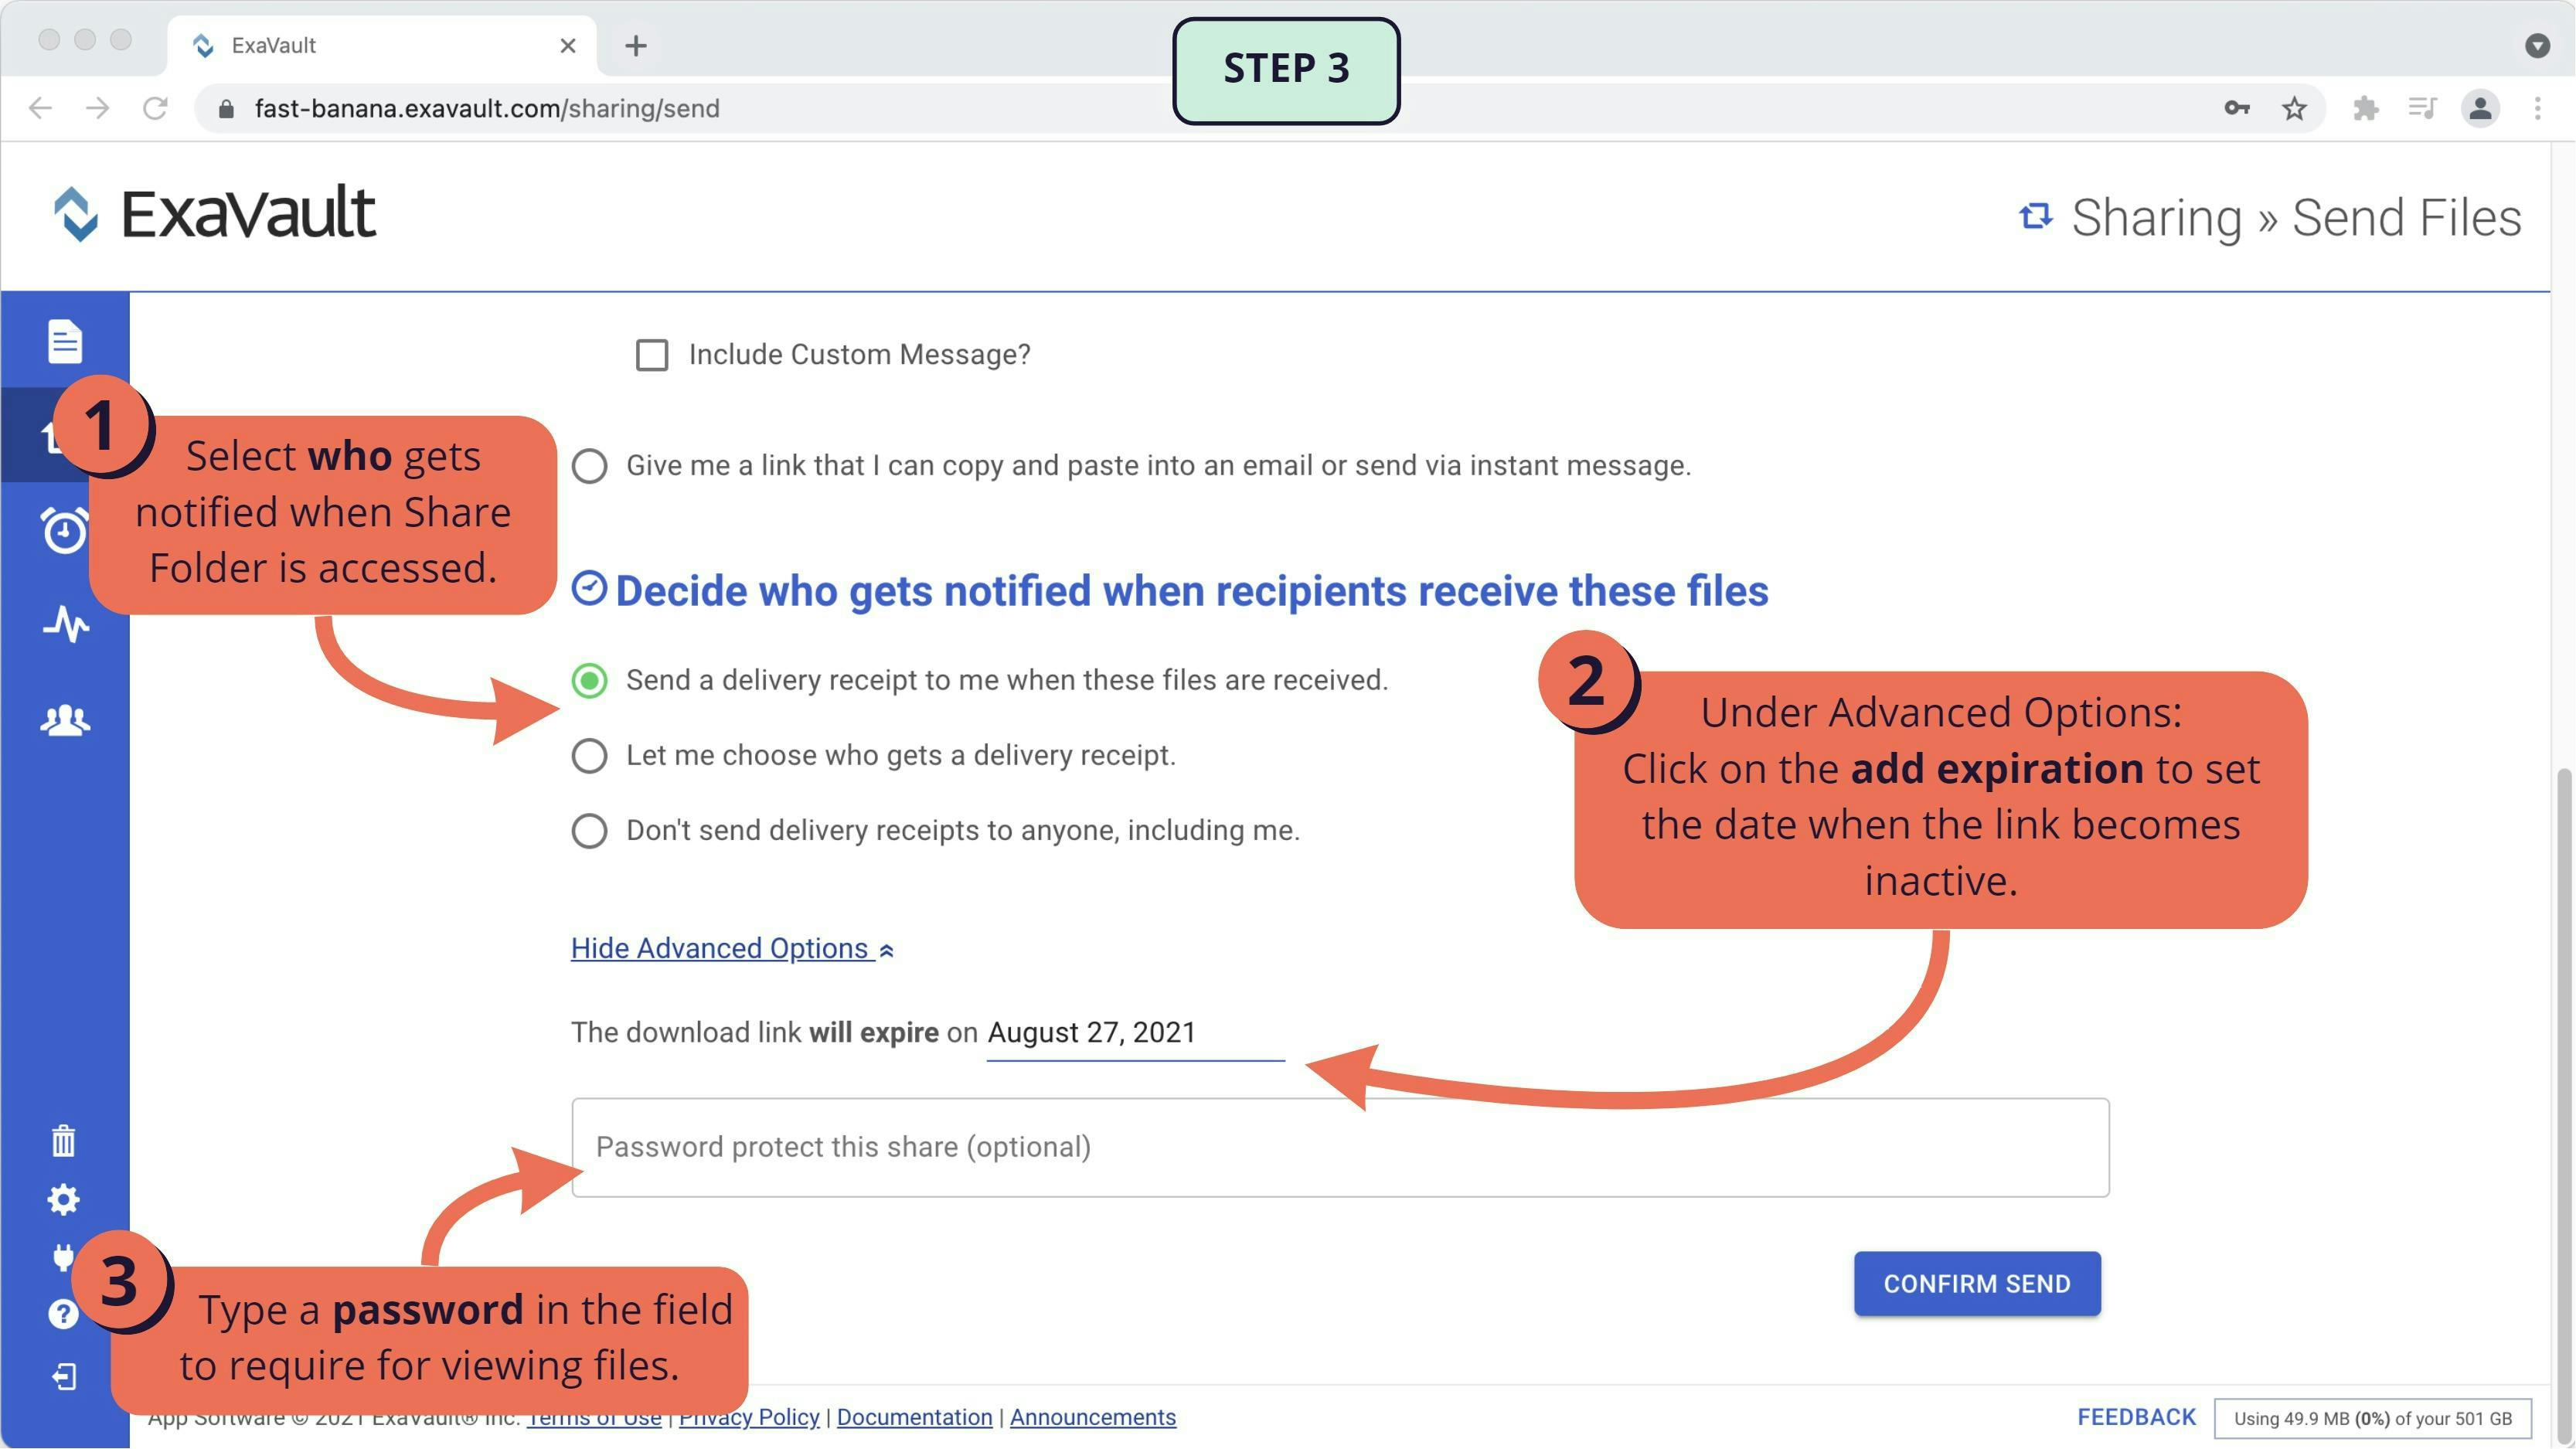
When sending files, a delivery receipt email can be triggered when the invitee has accessed the sent files. You have the following options for sending the delivery receipt:
- Send a delivery receipt to me when these files are received. sends a message the to user who originally sent the files.
- Let me choose who gets a delivery receipt. allows you to enter one or many email addresses (separated by a space or comma) to receive the delivery receipt email.
- Don't send any delivery receipts to anyone, including me. disables the delivery receipt for this file send.
(Optional) Advanced Options
There are two additional settings that can be found when clicking Show Advance Options:
Expiration Date
By default, sent files will have an expiration date of fourteen (14) days after they are initially sent. Dates can be increased up to sixty (60) days. Clients attempting to access files after the expiration date will receive a message that the files are no longer available.
To change the expiration:
1. Click on the current expiration date listed to open the calendar picker.
2. Select the new date.
3. Click Ok.
Password Protect
You have the option to enable a password for extra security. When this setting is enabled, users will be prompted for the password before they are allowed to access the files.
To set the password:
1. Type your password in the field.
2. To send files without password, leave password field blank or delete any text previously entered.
3. Once all settings are finished, click CONFIRM SEND to save password.
Step 4: Click CONFIRM SEND
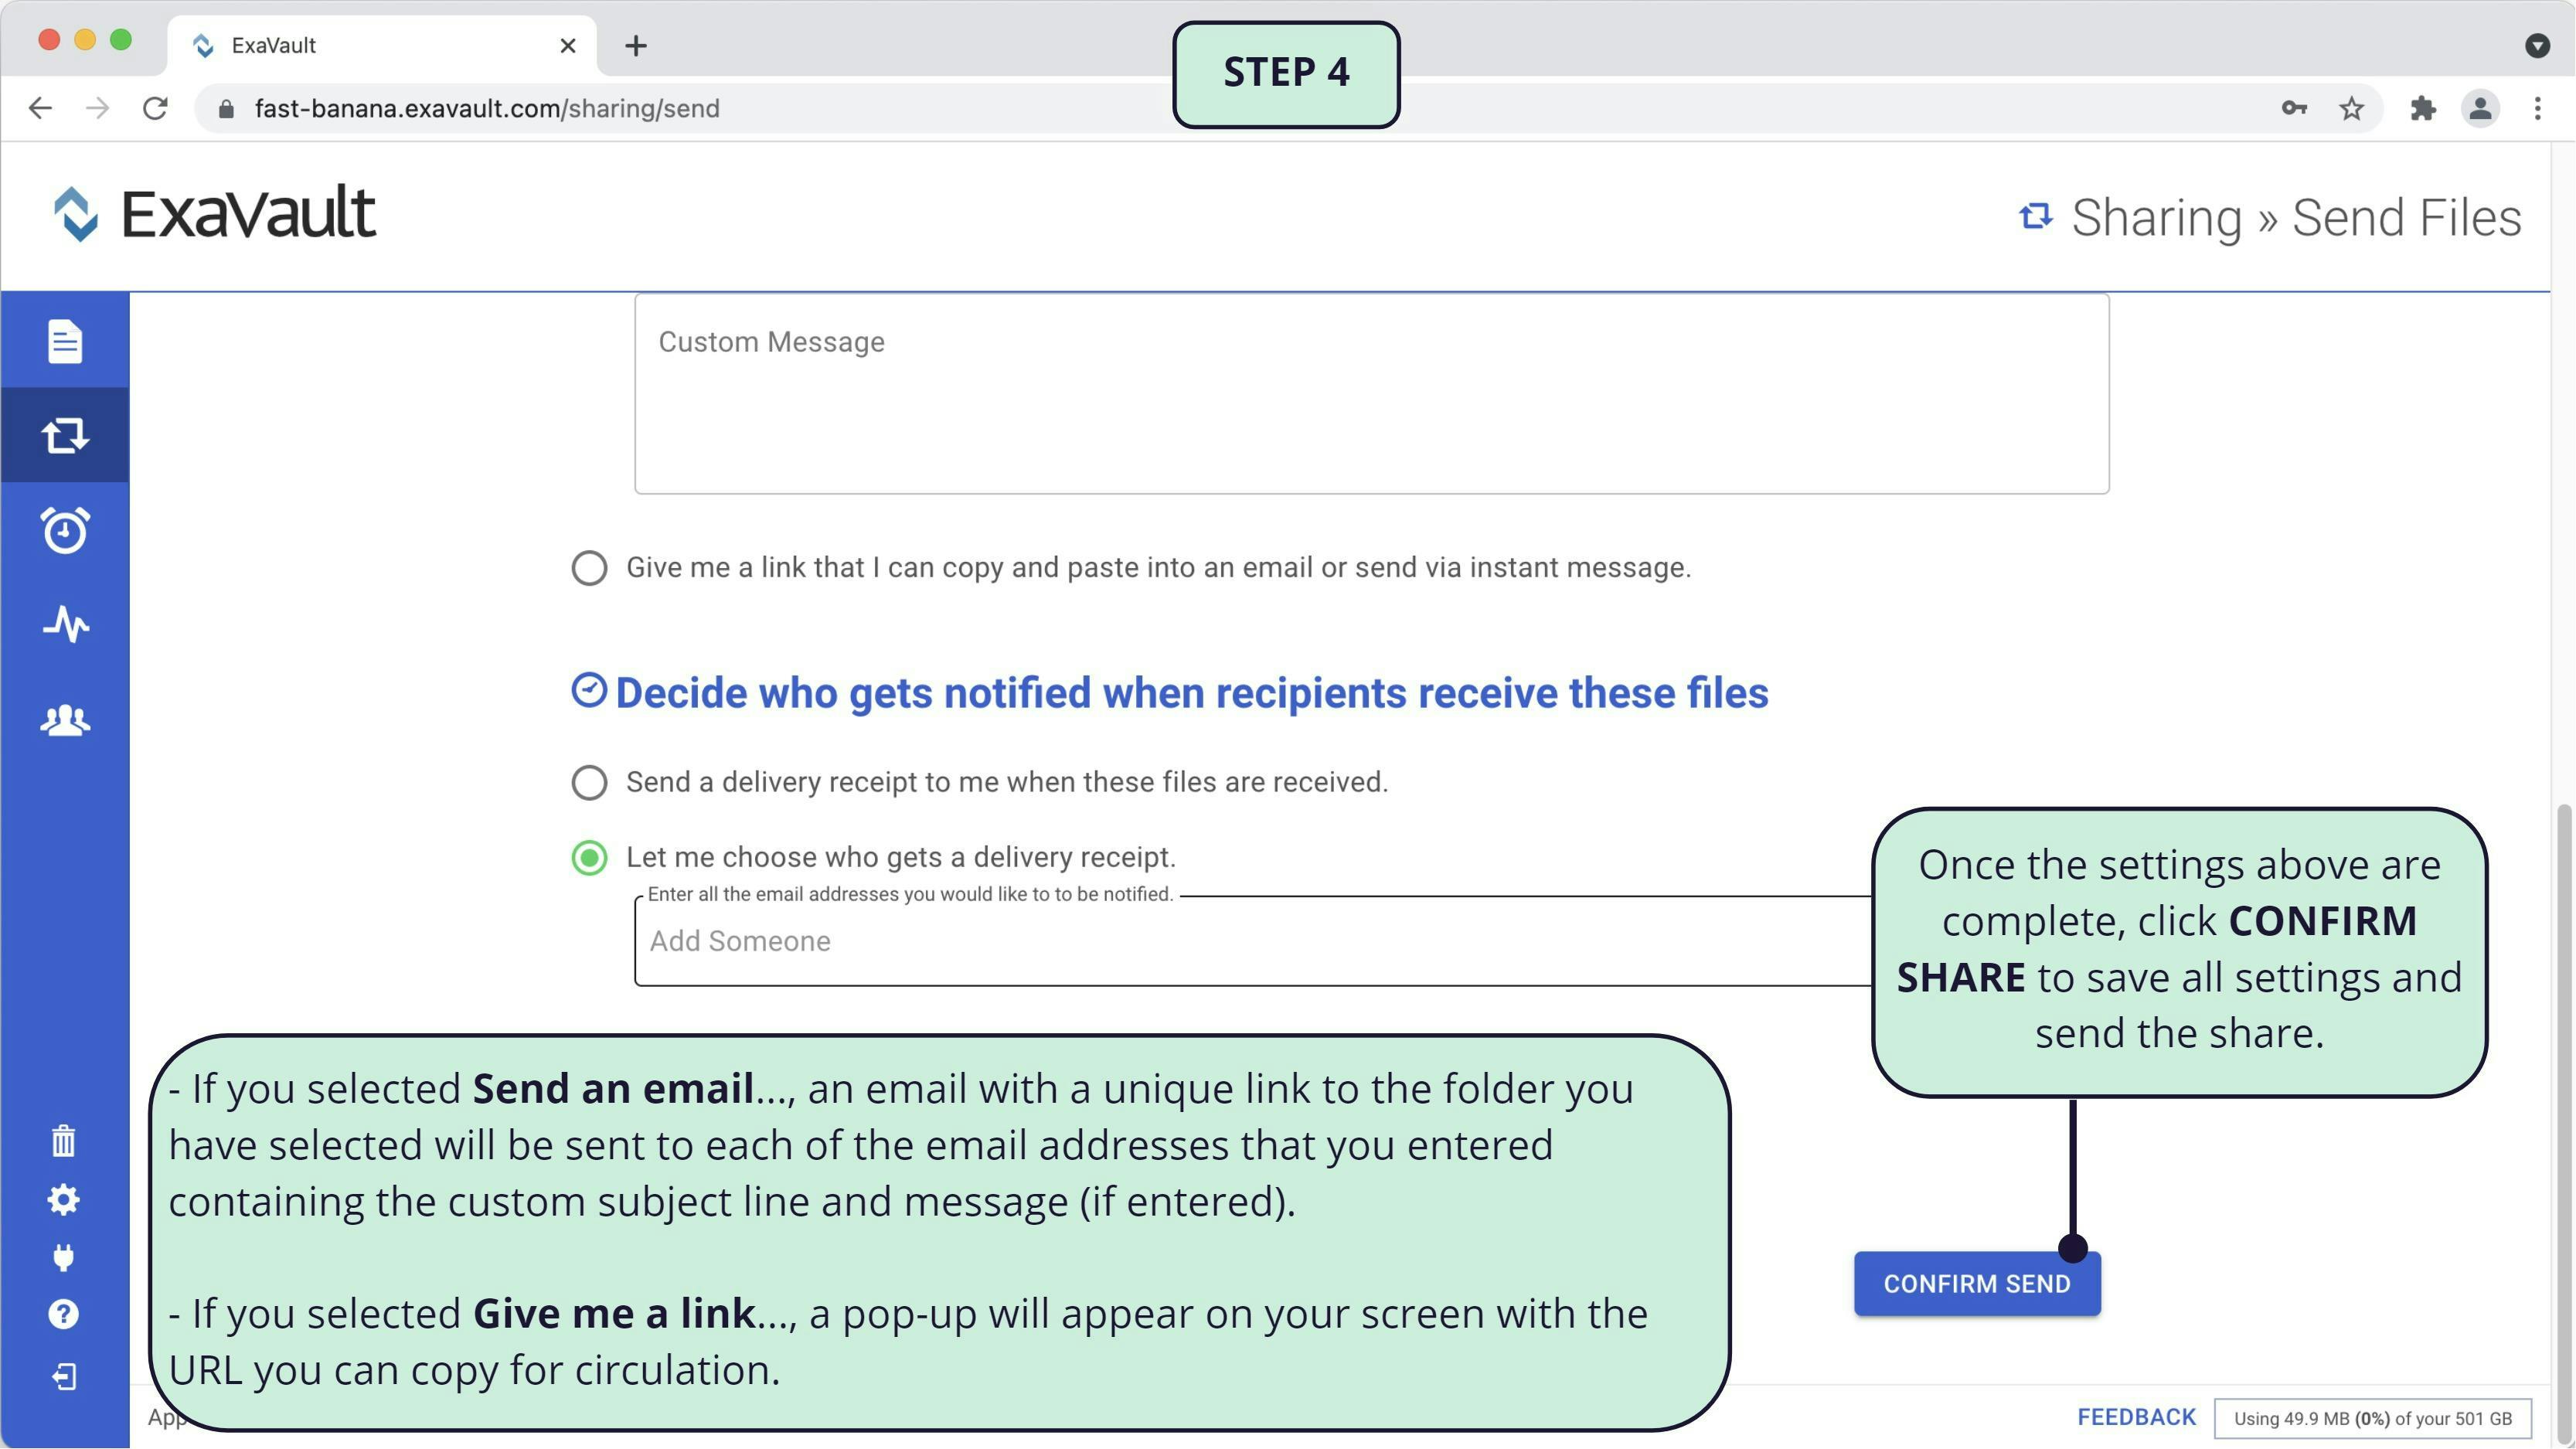
Once the settings above are complete, click CONFIRM SEND to save all settings, create the send link for downloads, and notify the recipients.
- If you selected Send an email…, an email with a unique link to the file(s)/folder(s) you have selected will be sent to each of the email addresses that you entered containing the custom subject line and message (if entered)
- If you selected Give me a link…, a pop-up will appear on your screen with the URL you can copy-and-paste to circulate.
Managing Existing Sent Files
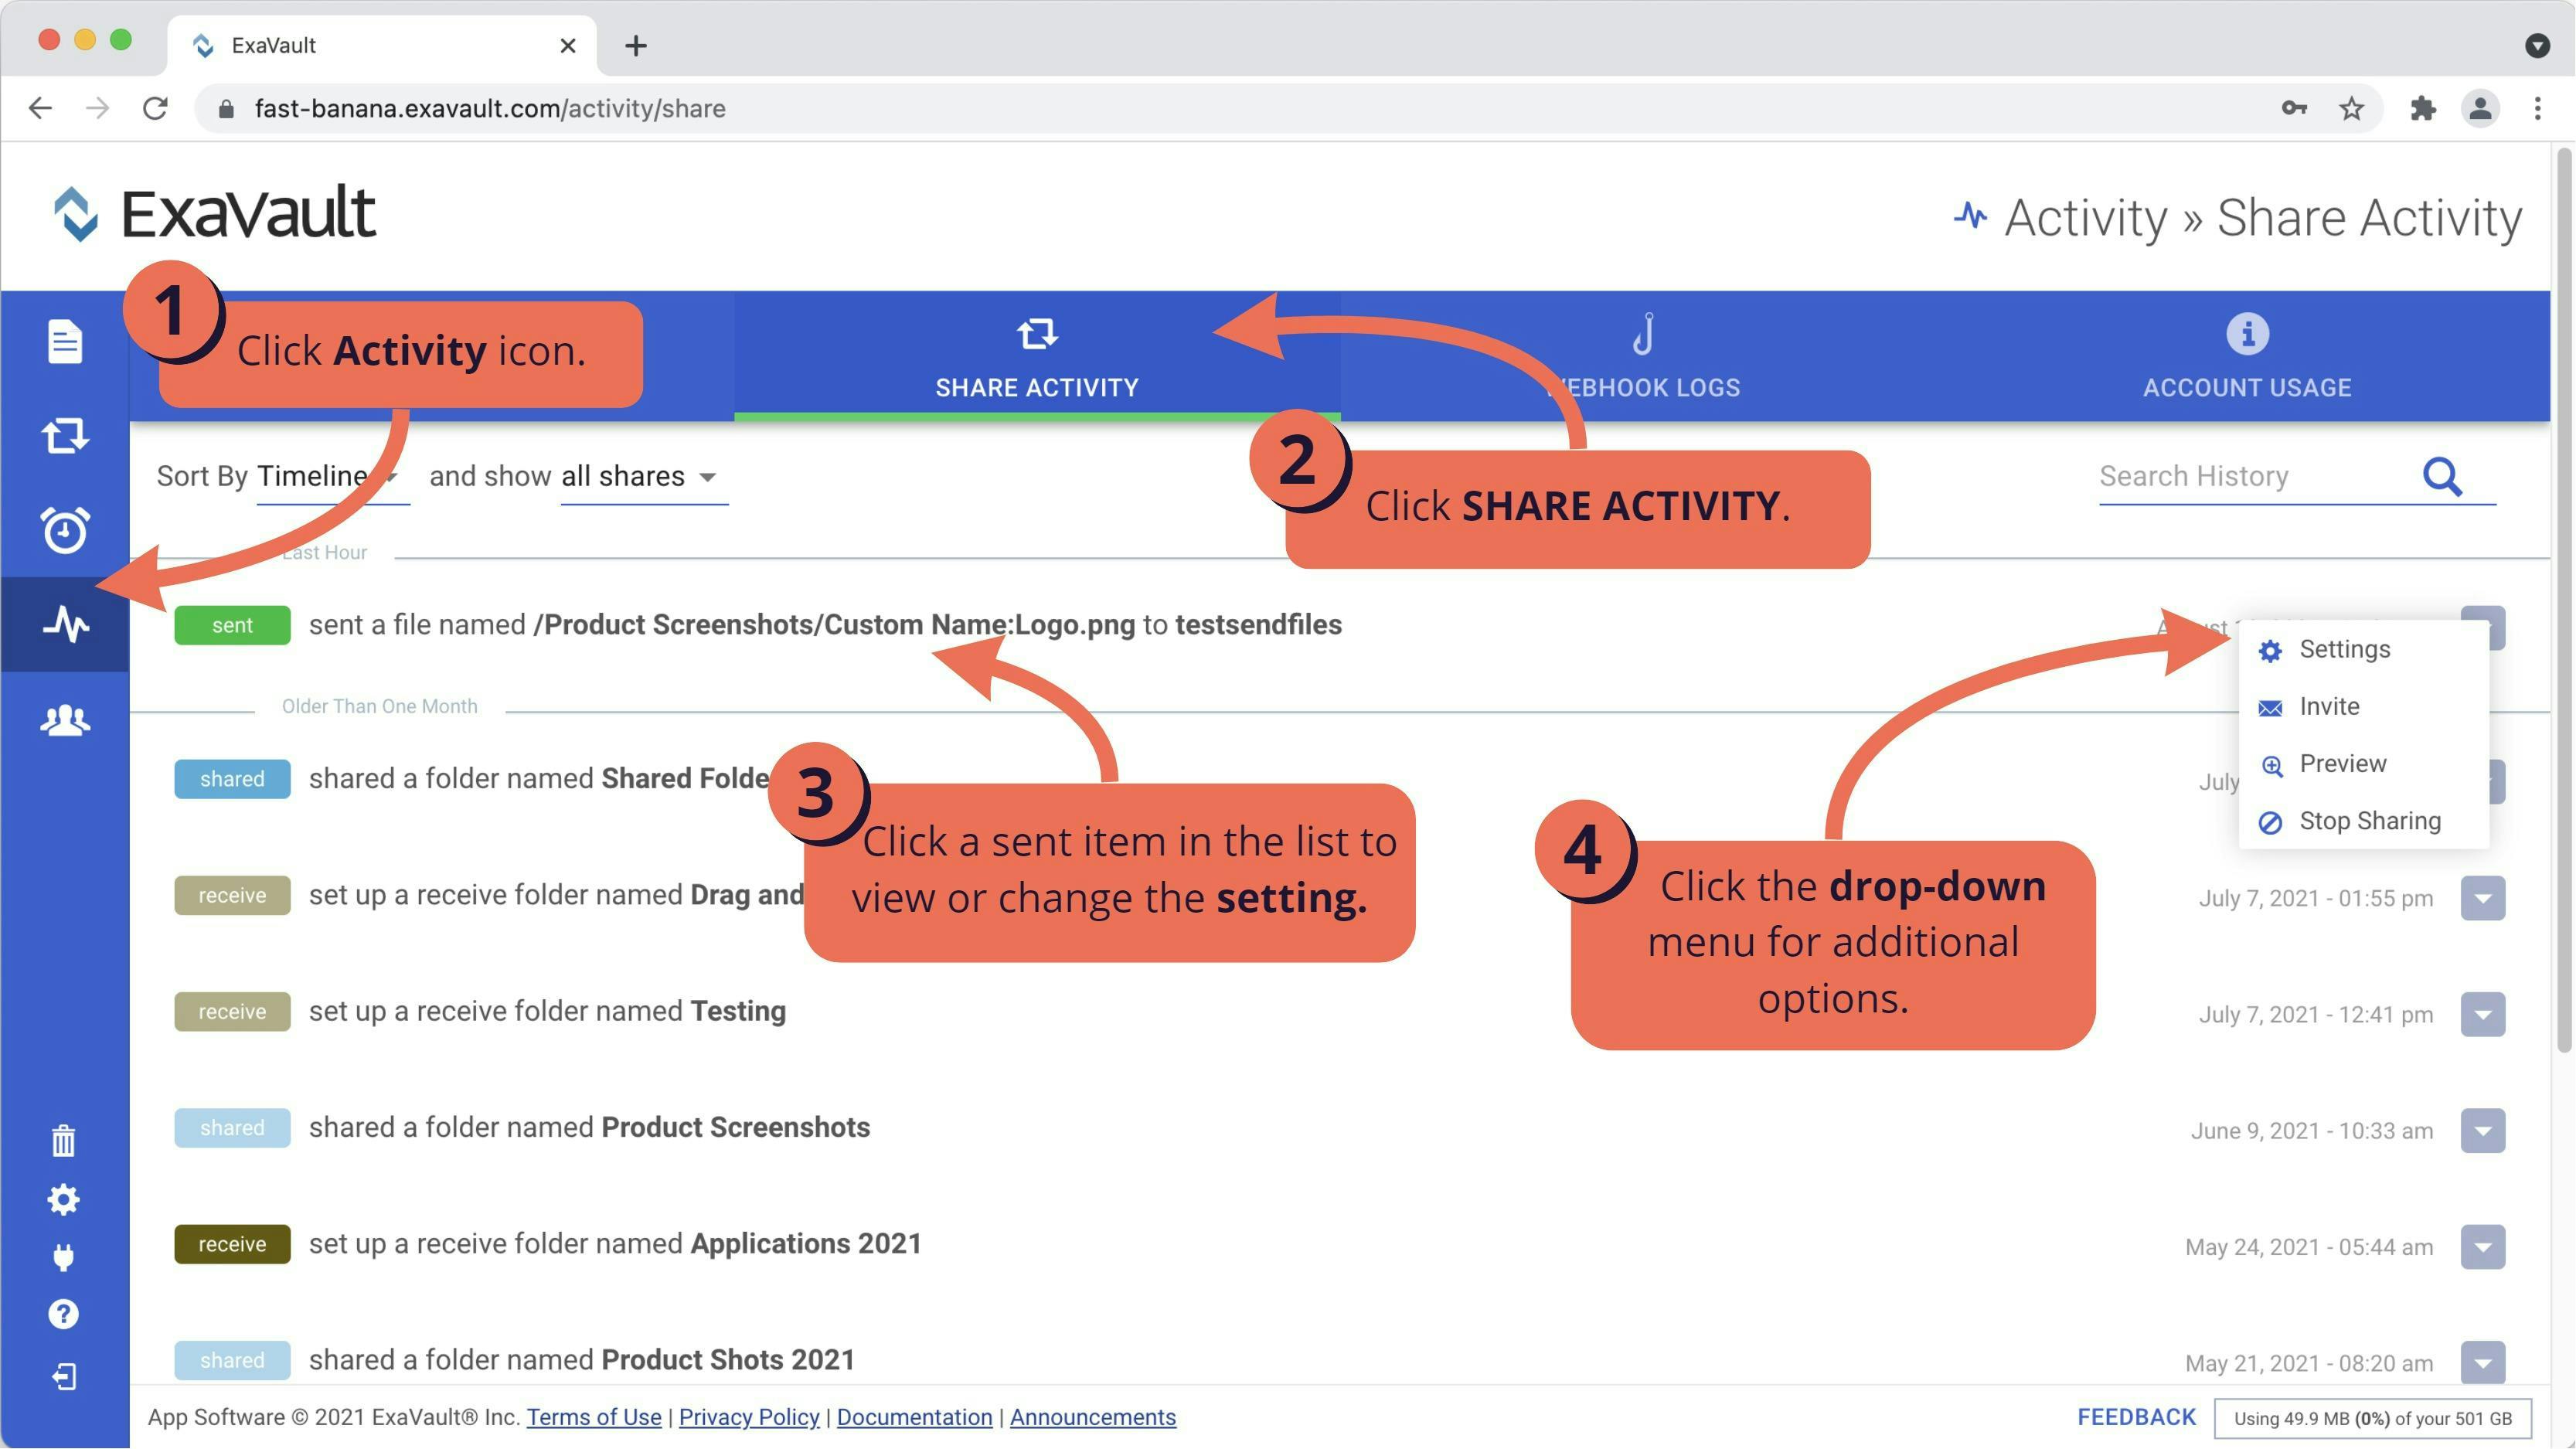
The SHARE ACTIVITY lets you interact with your sent files in several ways. You can forward the files to new recipients, view the files that were sent, change settings for your sent files, and even disable access to the sent files.
1. Click the Activity button on the main toolbar.
2. Click the SHARE ACTIVITY tab.
3. Locate the entry for your sent files in the list and click on the item to open settings.
4. You can also use the drop-down arrow to the right of your sent files entry to display the menu of options:
- Settings will open the SETTINGS tab for the send.
- Invite will open the INVITE tab for the send.
- Preview will open the send link that was sent to recipients in a new browser tab for review.
- Stop Sharing will disable access to the sent file(s)/folder(s) completely. If selected, the share can not be restarted - a new share will need to be created.
Settings Tab
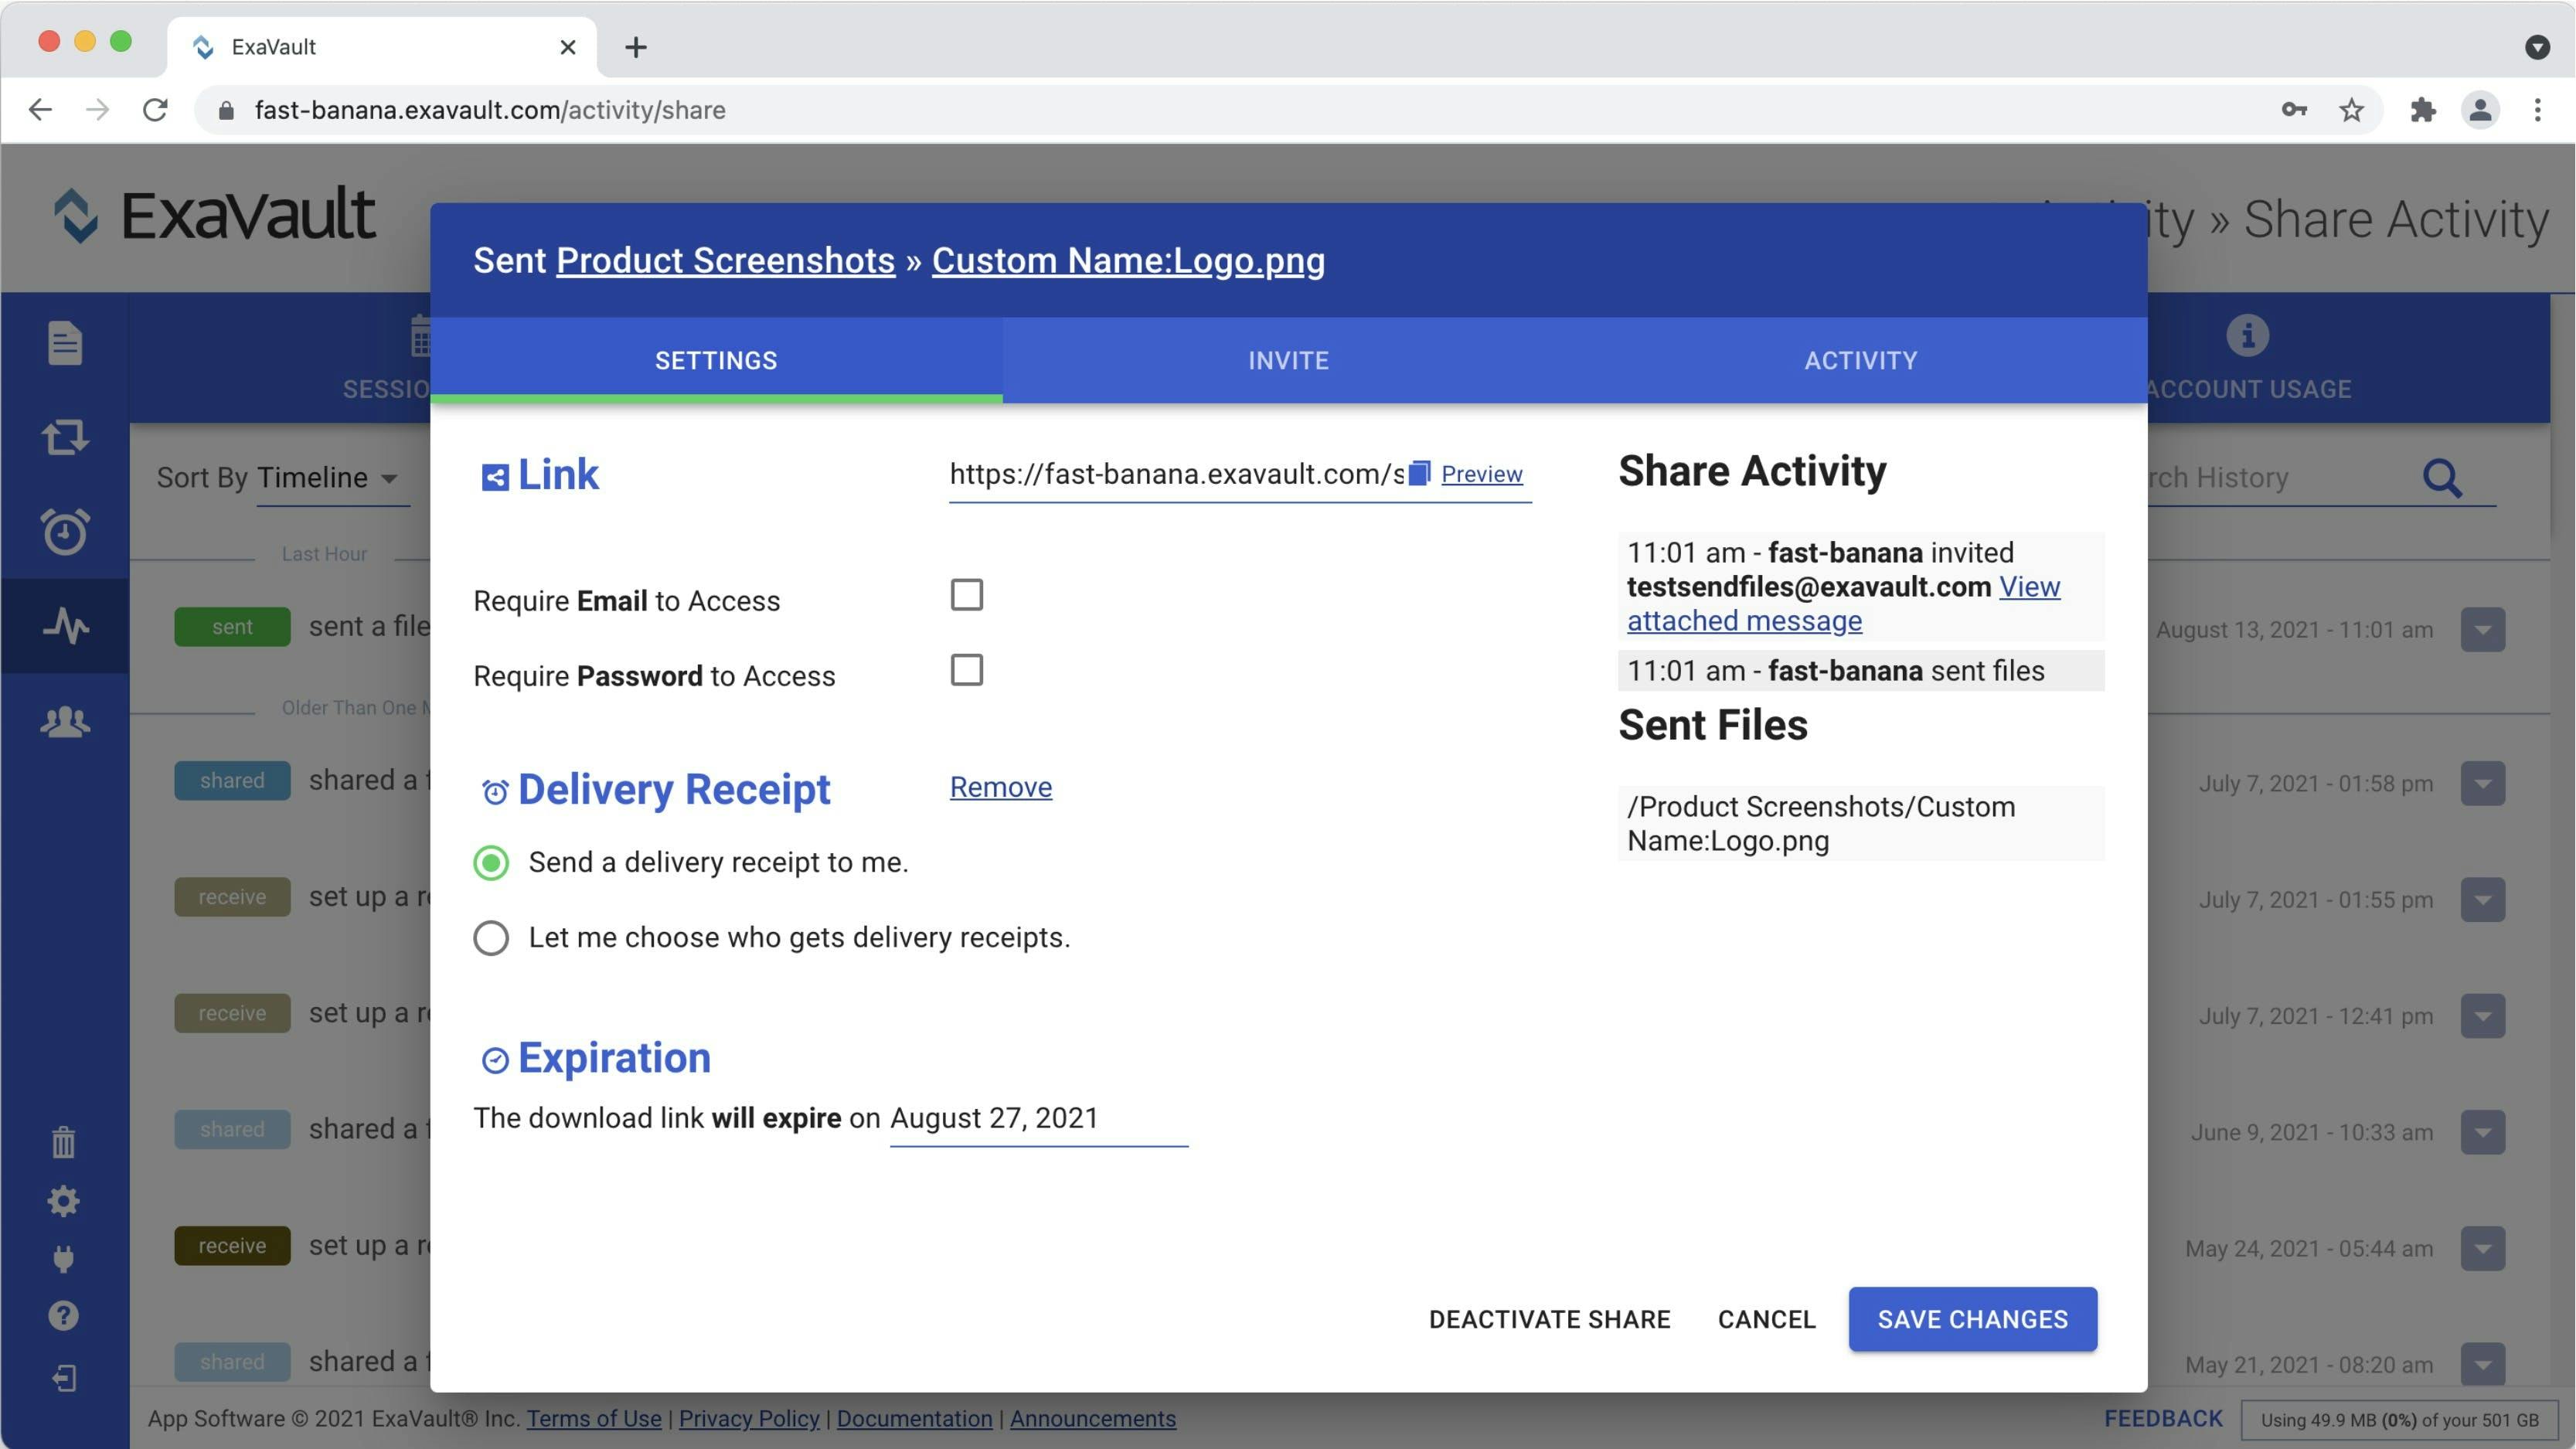
On the SETTINGS tab you will be able to update or add the following settings. These may already be enabled pending the initial set-up of the sent file(s)/folder(s).
- Link: Displays the link that invitees will received to access the files to download.
- Use the Files Icon to quickly copy the full URL to your computer's clipboard.
- Use the Preview link to open the URL in a new browser tab with the current settings (password/email requirements). - Require Email Access: When selected, this setting forces invitees to enter an email address before accessing the files to download.
- Require Password to Access: When selected, a password field appears. Adding a password to this field will require the invitee to enter the same password before accessing the files for download.
- Delivery Receipt: Determines if anyone will receive notification when the invitee accesses the files for download.
- If Add is selected, a delivery receipt can be sent to the user viewing the settings or to a list of email addresses (separated by a space or comma in the field that appears).
- If Remove is selected, no delivery receipt will be sent. - Expiration: Sent files must have an expiration date, which can not be more than sixty (60) days from the date you sent the files. By default, sent files will have an expiration date of fourteen (14) days after they are initially sent. Clients attempting to access files after the expiration date will receive a message that the files are no longer available.
- To change the expiration, click on the current expiration date to open the calendar picker and select the new date. - Share Activity: Shows a log of the interactions with the sent files (invites sent, new invitees added, share setting updates, and received invites).
- Sent Files: Displays the list of file(s)/folder(s) included in the send.
- Deactivate Share: Click to remove access to sent files before the expiration date. Once deactivated the send can not be re-opened; the link is disable and a new Send must be made.
- Cancel: Click to leave the settings without saving any changes.
- Save Changes: Click to save any changes made to the settings above.
Invite Tab
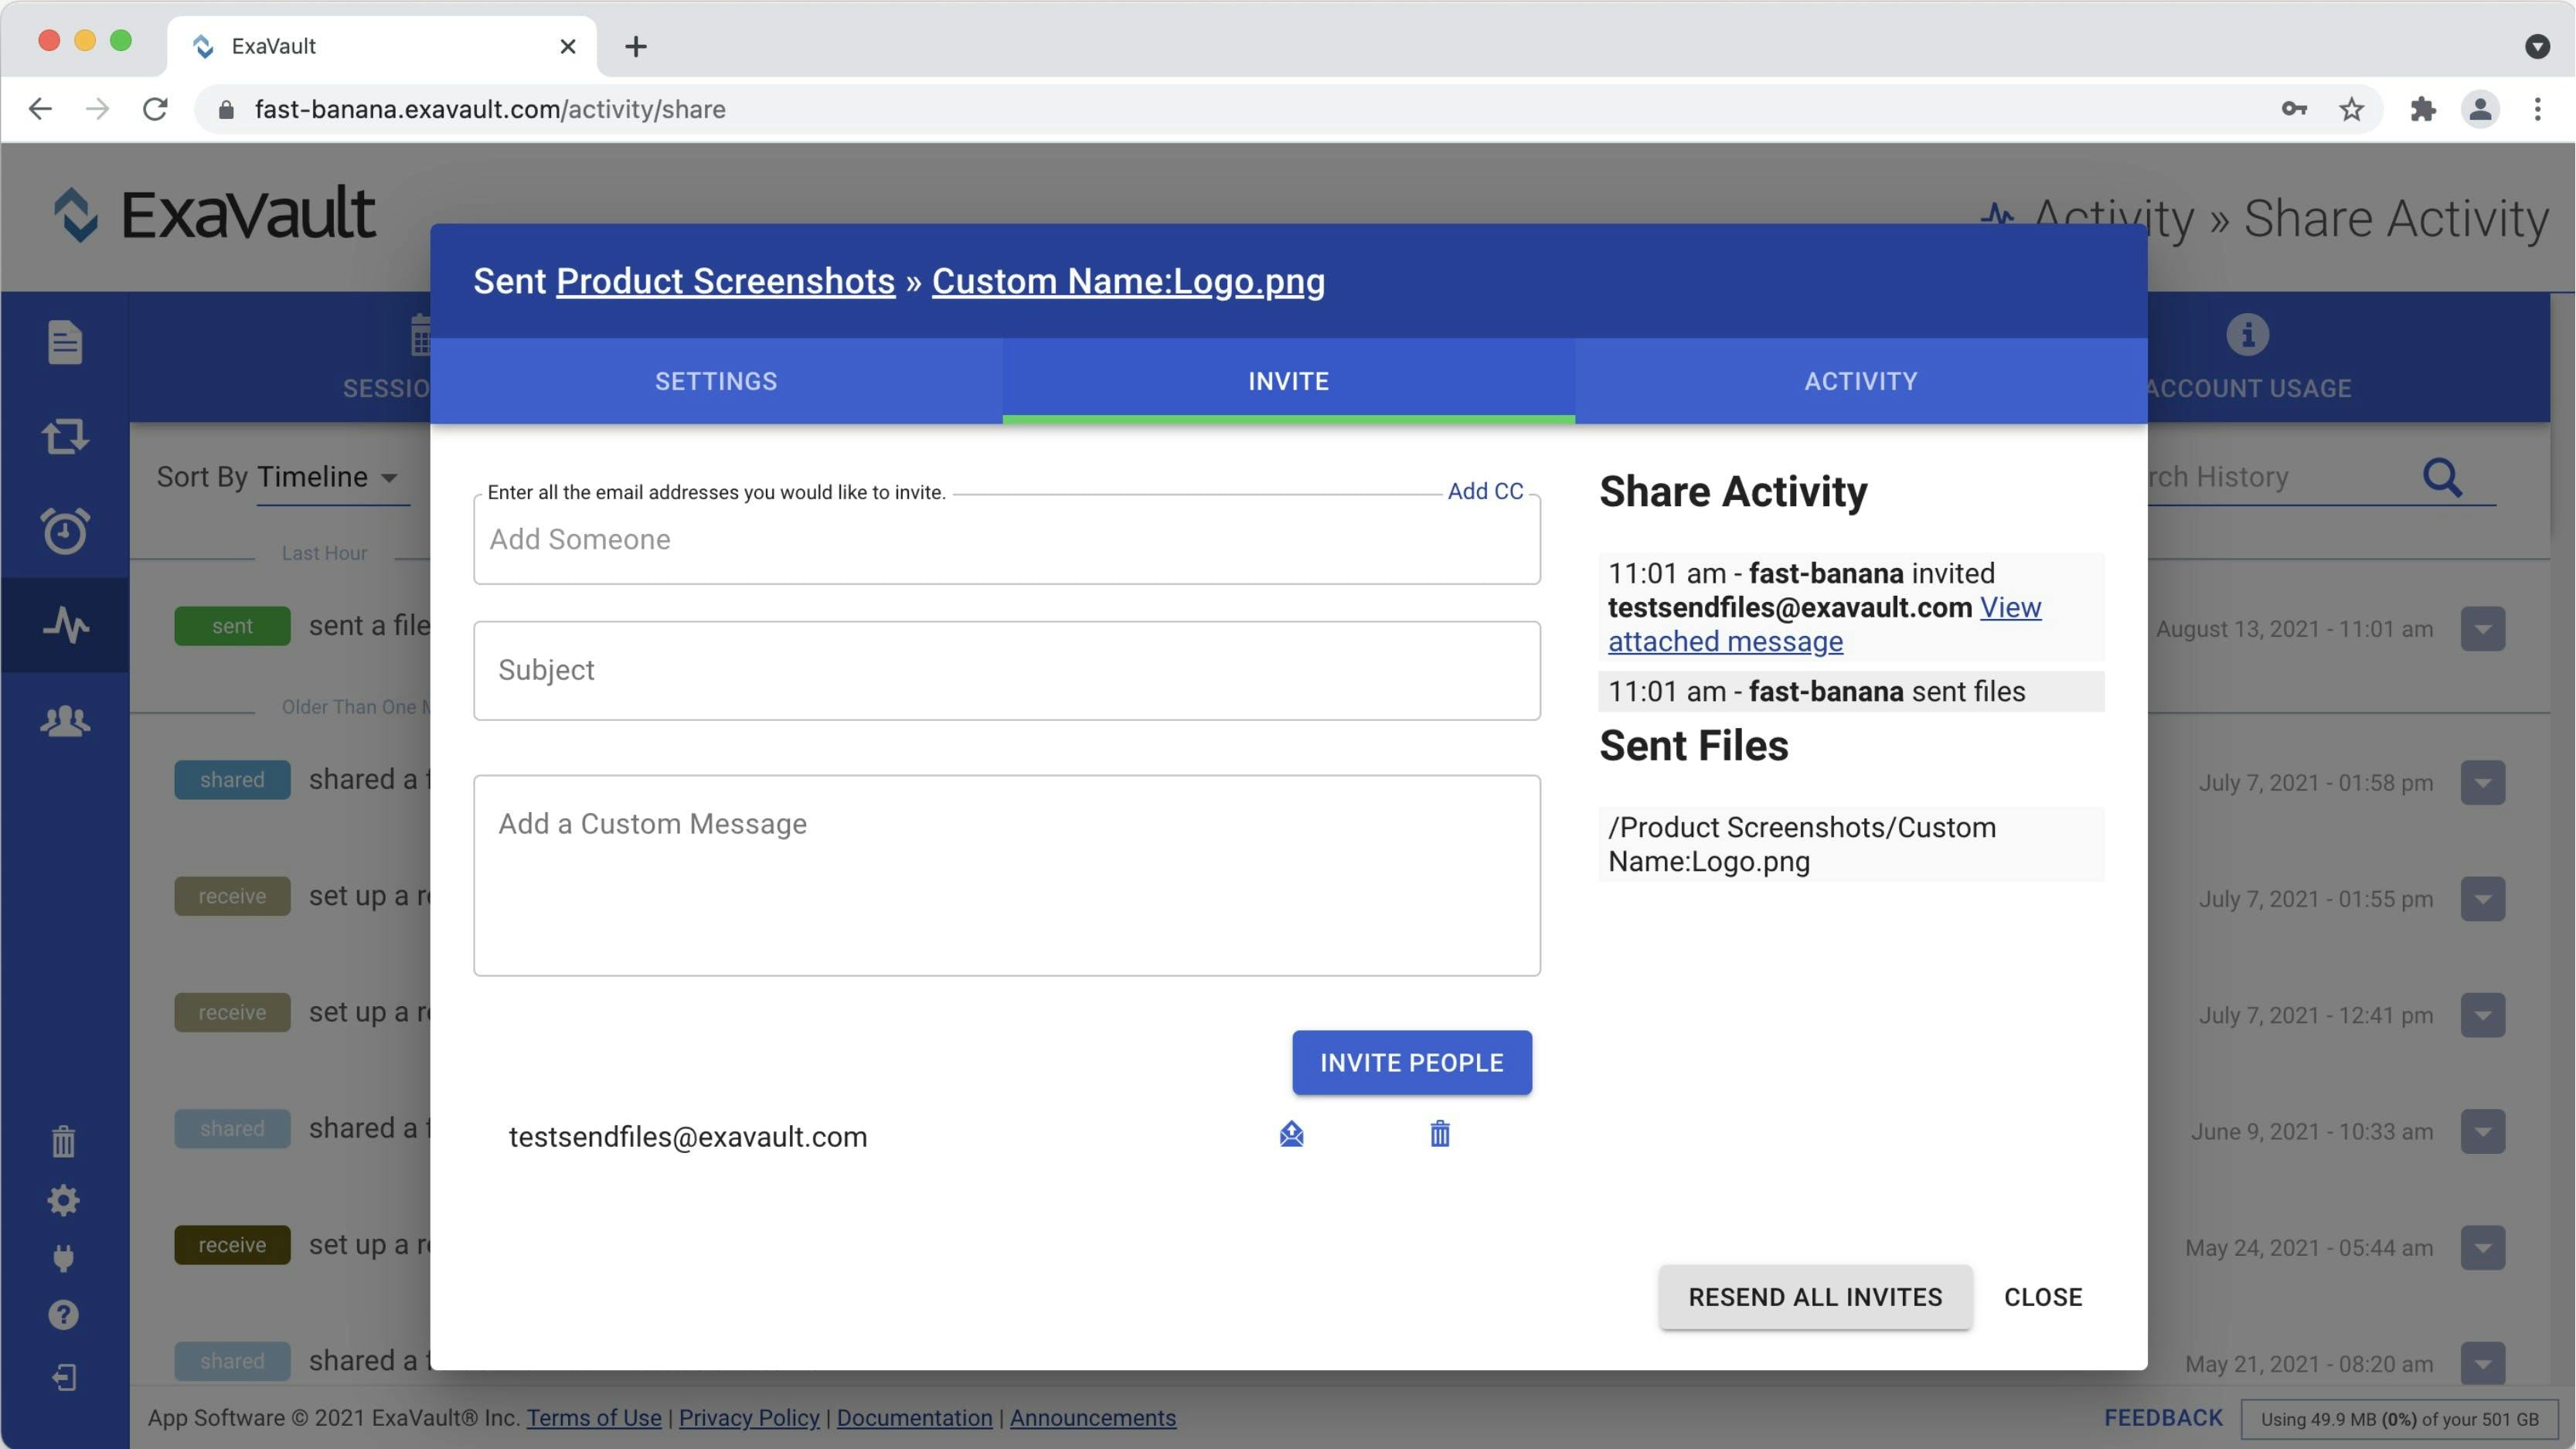
When viewing the INVITE tab for a send, you have the following options:
- Add New Invitees: Fields for creating new invitation emails for the sent file(s)/folder(s). To send a new email, follow these steps:
1. In the Add Someone field, type an email address.
2. To add a second email, enter a comma or press space before typing the next address. You can also copy-and-paste a list of emails or use an Email List feature to create a preset list.
3. In the Subject field, add the custom subject line you would like to appear in invite email.
4. Add a Custom Message in the field to include additional text for the body of your invite email
5. Click the INVITE PEOPLE button. - View Invitees List: Below the INVITE PEOPLE button is a list of all email addresses that were sent a share invitation email or who accessed the share by entering their email address when prompted (if require email address is enabled for the share).
- Click on the Trash Can icon to remove someone from the invitee list.
- Click the Envelope icon to resent the invitation email to a specific invitee. - Share Activity: Shows a log of the interactions with the sent files (invites sent, new invitees added, share setting updates, and received invites).
- Sent Files: Displays the list of file(s)/folder(s) included in the send.
- RESEND ALL INVITES: Click button to send the invitation email to all emails listed in the invitee list.
- CLOSE: Exits the settings for this send.
Activity Tab
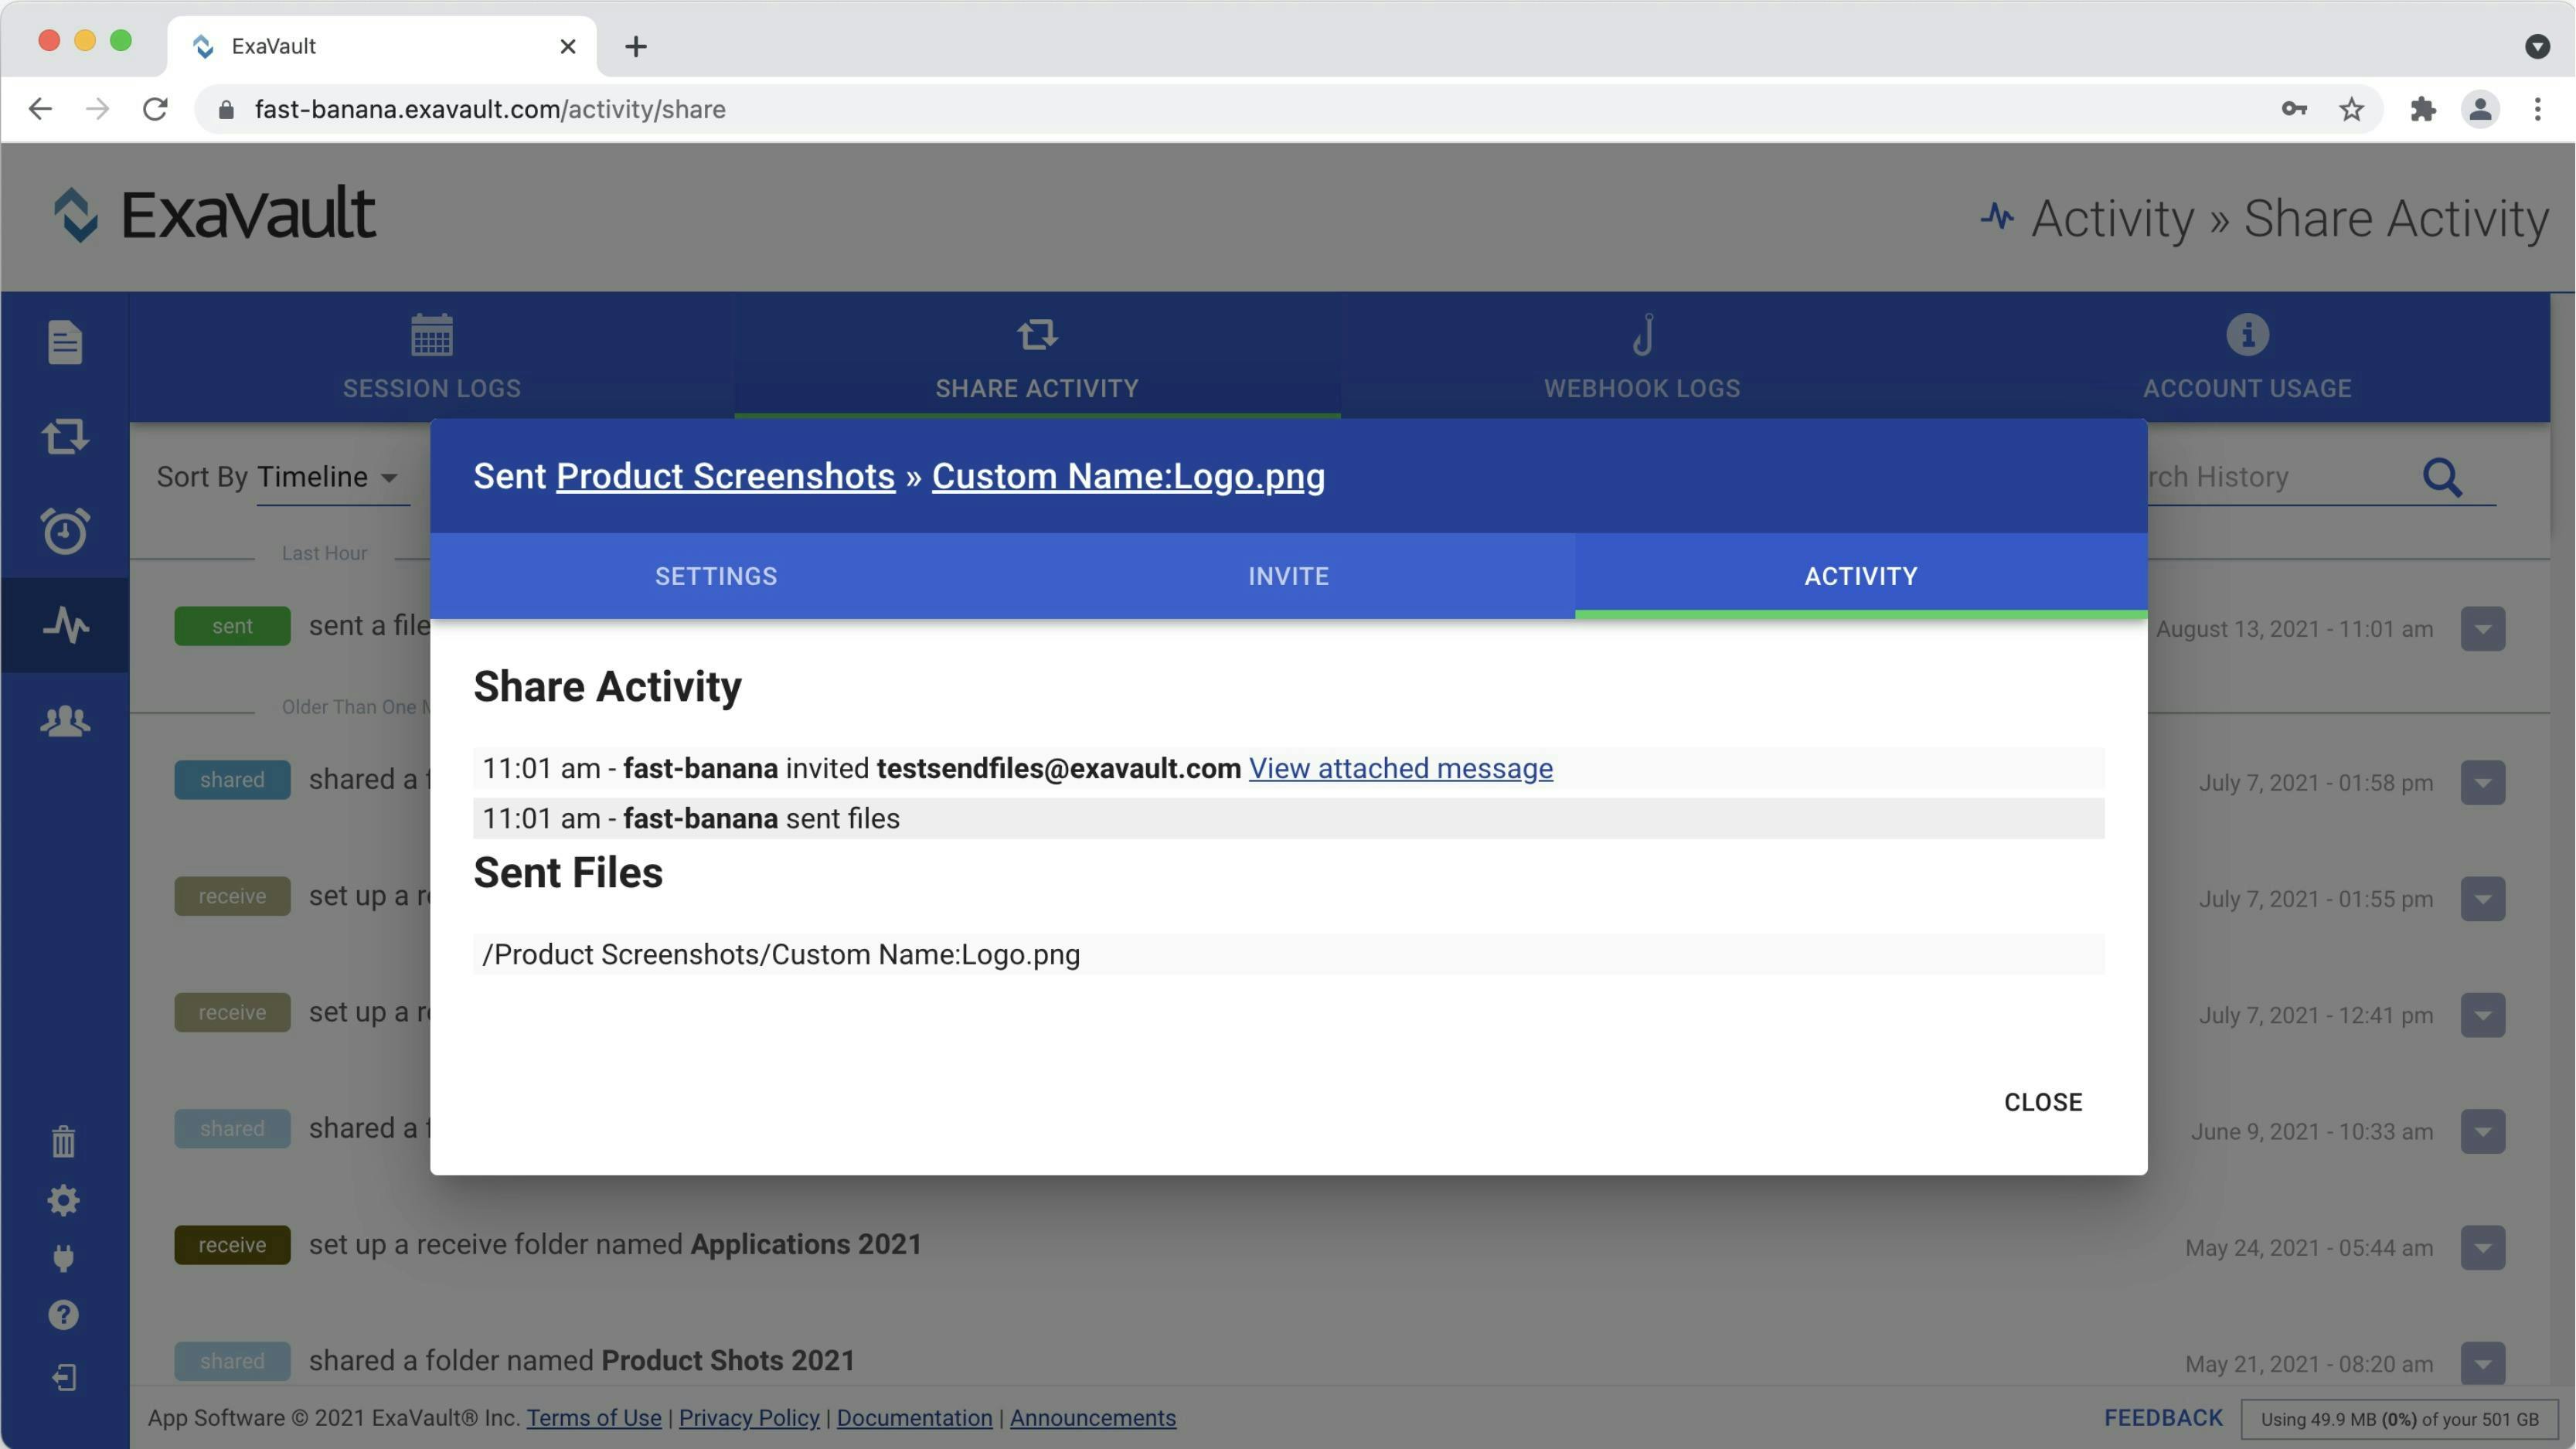
The ACTIVITY tab shows a log of the following interactions with the share:
- Invites sent and new invitees added
- Share setting updates
- Received invites (invitees who visit the link)
To view additional logging for when and who downloaded specific files from your server, visit the SESSIONS LOG.
Disabling Access to Sent Files
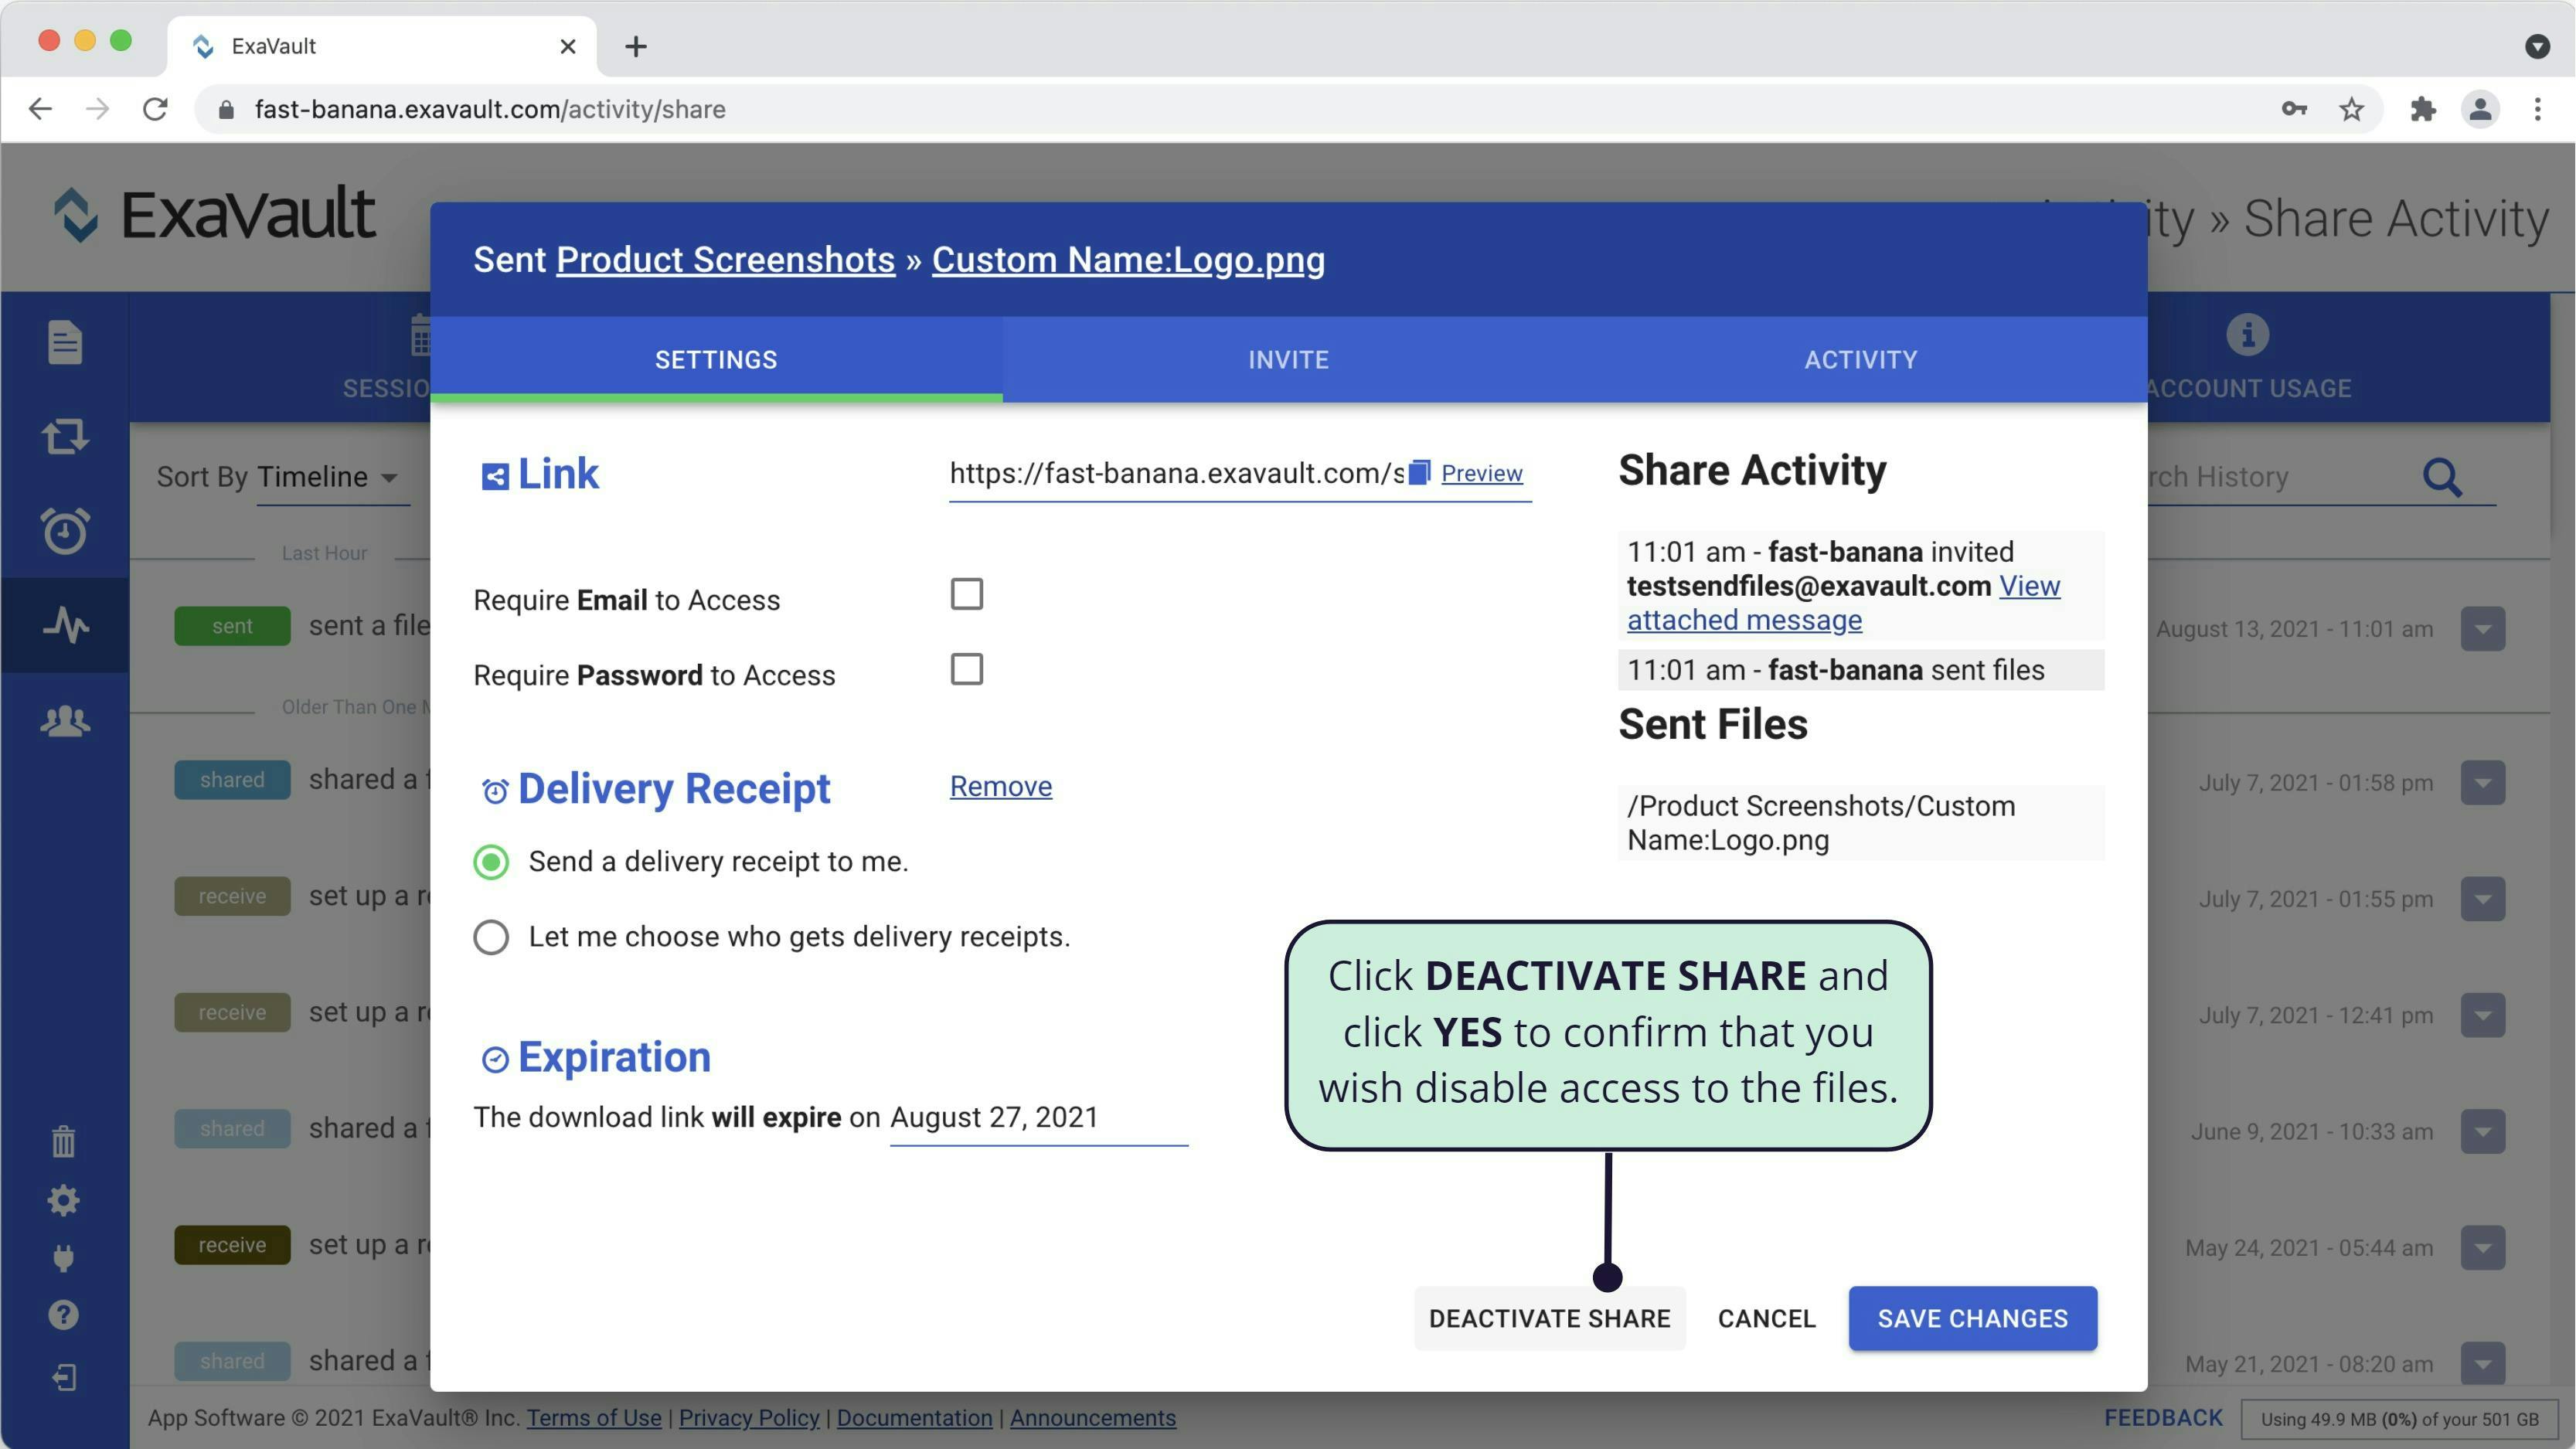
If you need to remove access to sent files before the expiration date, you can disable the share at any time after it is created. If people attempt to access the files after you've disabled them, they'll receive a message that the files are no longer available.
To disable sent files that have been sent:
1. Click the Activity button on the main toolbar.
2. Click the SHARE ACTIVITY tab.
3. Click on the entry to open it.
4. Click the DEACTIVATE SHARE button.
5. Click the YES button to confirm that wish to disable access to the files.
Frequently Asked Questions
Where are the sent files stored?
When you send files, they are stored in a separate location from the rest of your account. If you sent files that were already in your account, copies of those files are used rather than the originals.
This means that:
- Files that are sent do not count against your used storage space, so you could send 1GB of files 100 different times without losing any space.
- You can delete a file from your account that has been sent, and the sent files will be unaffected.
- If you change a file after it has been sent, your recipient will not receive the changes, only the original version.
How can I send files without an expiration date?
At this time, you cannot prevent your send files links from expiring automatically more than 60 days after the files are first sent. If you want a permanent link for your customer to download files, you should use a shared folder.
Is there a limit on how big a file I can send?
You can send a maximum of 10GB of files at any one time. If you need to send more than 10GB of files with a single link, you should use a shared folder.
Table Of Contents
Support Library
Still Have Questions?
Email Us
Don't see the answer you need? Drop us a note, and our support team will email you back.
Send Email


